Theme editor

Scale Model Shop

Italeri 1/35 Schnellboote Build

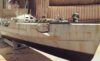
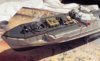
Very nice Gregg, bit too rust streaked for me...or should I say...well sea worn, but that does not detract from the excellent build quality and those mines look the part. I remember someone at my boat club having some made from ping-pong balls and they fell overboard and floated-it was great as they bobbed on the surface with just the top third showing and everybody was trying to avoid them :D .

Super stuff.

Si:)
 
Thread owner
Some updates soon, just waiting for a new camera to arrive.

Camera's and terra-firma don't mix very well:( :(

Gregg
 
\ said:
Some updates soon, just waiting for a new camera to arrive.Camera's and terra-firma don't mix very well:( :(

Gregg
What camera have you chosen? I recently bought a bottom-of-the-range SLR, a Nikon D3100, and it is proving very satisfactory for table-top photography.
 
Thread owner
\ said:
What camera have you chosen? I recently bought a bottom-of-the-range SLR, a Nikon D3100, and it is proving very satisfactory for table-top photography.
Only a Fuji FinePix 8200 Bridge Camera, with my Christmas present monies. I saw a reasonable deal on the net and am just awaiting delivery.

I have a Fuji FinePix S1000s Bridge Camera that recently sprang wings and went flyaway. It appeared to be undamaged until I realised that the batteries were only lasting about a third of their usual capacity.

A change of new batteries and the same result, and regularly I would get a blank screen with the caption 'File Fault'

Up until it's little trip it had been faultless.

I realise that there is little chance of me visiting airfields/shows any more, so the bridge will be more than adequate for family/modelling needs.

I have accumulated many 35mm SLR's over the years along with a couple of vintage models, but the cost of buying/processing films/plates is too prohibitive now.

Gregg
 
Thread owner
First tentative shots with new camera, still much to learn but getting there slowly :) .

After seeing that some of my original crew had absconded to some of the other members threads on here, I have made some new ones and am finalising the positions around the Boote.:rolleyes::rolleyes:

The next step is the hull major, which I am approaching with some trepidation. I have never tackled an area this large with a hairy stick:eek::eek:

View attachment 77139

View attachment 77140

View attachment 77141

View attachment 77142

View attachment 77143

View attachment 77144

View attachment 77145

View attachment 77146

View attachment 77147

View attachment 77148

View attachment 77149


Gregg

View attachment 190162

View attachment 190163

View attachment 190164

View attachment 190165

View attachment 190166

View attachment 190167

View attachment 190168

View attachment 190169

View attachment 190170

View attachment 190171

View attachment 190172
 

Attachments

  • 004.JPG
    004.JPG
    3 KB · Views: 0
  • 005.JPG
    005.JPG
    3 KB · Views: 0
  • 006.JPG
    006.JPG
    3.3 KB · Views: 0
  • 007.JPG
    007.JPG
    3.2 KB · Views: 0
  • 008.JPG
    008.JPG
    2.8 KB · Views: 0
  • 009.JPG
    009.JPG
    2.8 KB · Views: 0
  • 011.JPG
    011.JPG
    3 KB · Views: 0
  • 012.JPG
    012.JPG
    2.8 KB · Views: 0
  • 014.JPG
    014.JPG
    3 KB · Views: 0
  • 015.JPG
    015.JPG
    3.1 KB · Views: 0
  • 016.JPG
    016.JPG
    3.4 KB · Views: 0
Hi Gregg

I've only just caught up with this and I am mightily impressed!

I love the work you've done with the figures and the schnellboote itself looks excellent. The weathering is very effective, the detail is amazing but what I like the most is the very natural look you have to the figures and the very lived in look of the working space. All well executed and all very believable.

All the more remarkable as you're working in limited space.

I'm giving you a 'top build' now because it already merits it.

Cheers P
 
\ said:
Hi GreggI've only just caught up with this and I am mightily impressed!

I love the work you've done with the figures and the schnellboote itself looks excellent. The weathering is very effective, the detail is amazing but what I like the most is the very natural look you have to the figures and the very lived in look of the working space. All well executed and all very believable.

All the more remarkable as you're working in limited space.

I'm giving you a 'top build' now because it already merits it.

Cheers P
What he said!

Gern
 
Thread owner
Thank you all for your encouraging comments, they are really appreciated.

Recently I have been able to get my building board out a little more than I would normally be able to.

So I have pressed on with the area I have been putting off for a while, the 'HULL' all 39inches of it.

This is the largest area I have ever attempted with a hairy stick and acrylics, and the photo's are my second attempt as I wasn't too happy with the first.

Although the weathering looks to be 'OTT', I have actually used several photo's of very heavily abused Boots as the base for my weathering.

Apparently because they were often sent out night after night into action there was no time to keep 'Shipshape & Bristol Fashion maybe I should change that to 'Berlin'. They waited until it was damaged enough to have to take it out of line, then carried out all the repairs necessary at that time.

View attachment 77465

View attachment 77466

View attachment 77467

View attachment 77468

View attachment 77469

View attachment 77470

View attachment 77471

View attachment 77472

View attachment 77473

View attachment 77474

View attachment 77475

View attachment 77476


View attachment 190488

View attachment 190489

View attachment 190490

View attachment 190491

View attachment 190492

View attachment 190493

View attachment 190494

View attachment 190495

View attachment 190496

View attachment 190497

View attachment 190498

View attachment 190499
 

Attachments

  • My Schnellboot Hull Weathering 021.JPG
    My Schnellboot Hull Weathering 021.JPG
    2.3 KB · Views: 0
  • My Schnellboot Hull Weathering 016.JPG
    My Schnellboot Hull Weathering 016.JPG
    2.8 KB · Views: 0
  • My Schnellboot Hull Weathering 008.JPG
    My Schnellboot Hull Weathering 008.JPG
    2.7 KB · Views: 0
  • My Schnellboot Hull Weathering 010.JPG
    My Schnellboot Hull Weathering 010.JPG
    2.8 KB · Views: 0
  • My Schnellboot Hull Weathering 007.JPG
    My Schnellboot Hull Weathering 007.JPG
    2.7 KB · Views: 0
  • My Schnellboot Hull Weathering 006.JPG
    My Schnellboot Hull Weathering 006.JPG
    2.6 KB · Views: 0
  • My Schnellboot Hull Weathering 004.JPG
    My Schnellboot Hull Weathering 004.JPG
    3.1 KB · Views: 0
  • My Schnellboot Hull Weathering 003.JPG
    My Schnellboot Hull Weathering 003.JPG
    2.7 KB · Views: 0
  • My Schnellboot Hull Weathering 002.JPG
    My Schnellboot Hull Weathering 002.JPG
    2.7 KB · Views: 0
  • My Schnellboot Hull Weathering 001.JPG
    My Schnellboot Hull Weathering 001.JPG
    2.2 KB · Views: 0
  • My Schnellboot Hull Weathering 029.JPG
    My Schnellboot Hull Weathering 029.JPG
    2.8 KB · Views: 0
  • My Schnellboot Hull Weathering 030.JPG
    My Schnellboot Hull Weathering 030.JPG
    2.3 KB · Views: 0
Superb job Gregg, the weathering work is fantastic, you've achieved a brilliant result for your efforts.
 
Wow!!! :eek:

Great build!! The weathering is just stunning!!!

Cheers

Polux
 
stunning work like all the action on the deck adds to a great build and the weathering as has been said is spot on
 
Thread owner
Finally got up the nerve to install the electronic gizmo's.

Only temporary positioning at present time, as I still need to carry out a water balance test yet. Weighing in at about 5 lb's so far.

Mixers & ESC modules wired up but still got the receiver and cooling fans to position, motors still to be wired in.

View attachment 80072


Gregg

View attachment 193095
 

Attachments

  • Electrics.JPG
    Electrics.JPG
    2.7 KB · Views: 0
Back
Top