Theme editor

Scale Model Shop

Jambo's Matchbox Beaufighter MK-X 1/72

Status
Not open for further replies.

Jambo

New member
Joined
Dec 29, 2014
Messages
80
Reaction score
0
Points
0
1/3
Thread owner
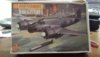
Having a quick skulk around eBay I found this kit and quite liked the idea of it, having just got back from holiday the "fragile" box has been forced through the letterbox, saving me a trip to the post office. Thankfully it seems to have survived intact!


Scale Mates has it at ~1974 from the box.


View attachment 122055


3 colour kit, it proudly proclaims, none the less I may go belt & braces & spring for some paint...


View attachment 122056


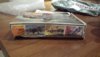
Box following letterbox interface


View attachment 122057


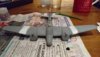
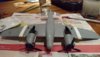
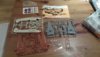
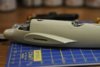
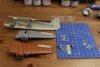
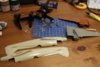
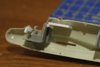
Sprues and instructions, these seem very good actually, virtually no flash or molding issues


View attachment 122058


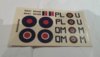
Transfers, I'm not convinced these are a goer, a sheet of transfers from Xtradecal have been ordered up. I'm pretty sure that's not cheating, I probably won't fish out a box of origina paint pots either :)


View attachment 122059


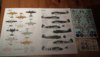
Instructions, somewhat light on detail, but only 6 steps, so how hard can it be right?


My last couple of attempts have hit a wall due to time constraints but I actually have a little free time in the next couple of weeks, and the kit is complete so lets see how we go.


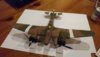
In terms of approach I've mulled this over, there seem to be some inaccuracies around the specific version of the Beaufighter represented in this kit, and some limitations of the kit itself. Knowing how I get when I start getting fussy, I've decided this is going to be done entirely for fun, OOB, and I'm going to paint it the colour scheme I like the look of most. Those that loose sleep if a model is not correct for period may want to avert their eyes...


Jambo

View attachment 234946

View attachment 234947

View attachment 234948

View attachment 234949

View attachment 234950
 

Attachments

  • 20151013_182520-1024.jpg
    20151013_182520-1024.jpg
    2.2 KB · Views: 0
  • 20151013_182923-1024.jpg
    20151013_182923-1024.jpg
    1.1 KB · Views: 0
  • 20151013_182854-1024.jpg
    20151013_182854-1024.jpg
    1.9 KB · Views: 0
  • 20151013_182809-1024.jpg
    20151013_182809-1024.jpg
    2.1 KB · Views: 0
  • 20151013_182531-1024.jpg
    20151013_182531-1024.jpg
    2.1 KB · Views: 0
Thread owner
Well the Xtradecal sheet and decals have turned up, blimey there are a lot of colour options on there!


While briefly considering the bright yellow & black "Target Towing" colours I think I might end up with a costal command dark/light grey, possibly with D-day stripes, or an earth/green burma scheme. A few white schemes on there I quite like but I'm not sure if that's going to be tricky to make uniform with a hairy stick, or whether it'll be a bit over the top on this model.


Jury's out, I used to be indecisive, but now I'm not so sure...


Jambo


Edit: Decals along with the originals:


View attachment 122118


View attachment 235009
 

Attachments

  • 20151014_182953-1024.jpg
    20151014_182953-1024.jpg
    2.1 KB · Views: 0
Thread owner
Managed to make a bit of a start today...


View attachment 122230

View attachment 122231


Wings are assembled, not a bad fit really. There's a hole in the left wing which seems to have nothing to fill it at all. I suspect I'll just fill it with miliput or similar if I can't find a purpose for it. Any ideas?


View attachment 122232


Test fit of the 2 fuselage halves. Interior detail is, err absent, and the little glass bubble behind the pilot should have a radio loop in there instead of a hole. I may do something there or just live with it.


I've decided to go with the Burma colour scheme, looks interesting. Picked up a few paints and will see which ones look right together as there are no exact matches between the Tamiya & Xtracolour paints for a few of them.


Jambo

View attachment 235121

View attachment 235122

View attachment 235123
 

Attachments

  • _MG_7243-1024.jpg
    _MG_7243-1024.jpg
    2.4 KB · Views: 0
  • _MG_7242-1024.jpg
    _MG_7242-1024.jpg
    2.5 KB · Views: 0
  • _MG_7240-1024.jpg
    _MG_7240-1024.jpg
    2.7 KB · Views: 0
Great to see an old Matchbox kit being built. And I remember building one of these as a kid, which was some time ago.
 
Thread owner
\ said:
Is it not for a light ?
If it is there's no part on the transparency sprue for it, so it would be represented by a hole only.


Jambo
 
Thread owner
Right, small update.


I decided to add a little detail to the kit, and gave the pilot a very basic instrument panel and control column, as well as adding a loop of wire in the bubble behind the pilot.


View attachment 123407


Figures then painted up, and a green used for most of the interior


View attachment 123408


View attachment 123410


Main fusalage and wings then added, decided to fill that hole on the port wing as having seen an actual Beaufighter at RAF Museum London on Tuesday I couldn't see anything on the wing to explain the hole in any case.


View attachment 123409


Next up sanding the filler down and priming for paint.


Jambo

View attachment 236298

View attachment 236299

View attachment 236300

View attachment 236301
 

Attachments

  • _MG_7333-1024.jpg
    _MG_7333-1024.jpg
    2.8 KB · Views: 0
  • _MG_7336-1024.jpg
    _MG_7336-1024.jpg
    2.8 KB · Views: 0
  • _MG_7334-1024.jpg
    _MG_7334-1024.jpg
    2.9 KB · Views: 0
  • _MG_7244-1024.jpg
    _MG_7244-1024.jpg
    2.2 KB · Views: 0
Thread owner
View attachment 242133


Well, I think it's pretty unlikely this is going to be done by end of December! New job and some family issues have nicked the last couple of months. None the less, I'll pick it back up here unless the authorities would rather I posted elsewhere :)


Jambo
 

Attachments

  • 1451414603135392428184.jpg
    1451414603135392428184.jpg
    2.5 KB · Views: 0
Never mind, but please don't give up on it. I need to see it finished.
 
Don't worry about the time just continue posting the build on here, there's no penaltys for finishing late. It's looking good by the way.
 
Thread owner
Well that's the underside painted and currently drying, for anyone who would like a task that feels pointless may I recommend brush painting Tamiya medium sea grey 2 on top of Halfords grey primer. They're not quite the same but close enough when dry to make you question if you've painted everything correctly...


View attachment 242248


Really enjoying this now I've got a couple of evenings free!


Jambo
 

Attachments

  • 1451517278231-1977650243.jpg
    1451517278231-1977650243.jpg
    2.5 KB · Views: 0
Thread owner
A little progress made, base costs on for the upper surfaces and a little detail work started. Still got to sort armament and some detail and hope to hell that my masking for the canopy was better than some of that I've done elsewhere...


View attachment 242867


Jambo
 

Attachments

  • 1452029147719-1445680529.jpg
    1452029147719-1445680529.jpg
    2.3 KB · Views: 0
Thread owner
\ said:
Ah, some 'upstairs' colour. Looking nice.
Thank you, I'm still working on the phrasing here :)

\ said:
That looks clean and tidy, nice work.
There's rather a lot of paint on the model by the time I was finished, in this case the deep panel lines are probably no bad thing but it could have been worse!


The next steps are going to be a little interesting as back when I last did anything like this I'd just slap the decals on and call it done once it was painted. However, reading on here people seem to go for coats of varnish between paint and decal, and then weathering, and then more varnish. I don't believe I've ever weathered anything so this might be a bit of a learning curve. Perhaps I'll see what it looks like once it's complete and go from there.


I'm a little concerned I'll end up ruining it by trying to be too clever...


Jambo
 
Status
Not open for further replies.
Back
Top