Hi all, I am going to try to fulfill a request for an insight into my painting techniques (humbled I am )
)
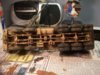
Never an air brushed used, all by brush, Not sure how to break up text to correspond to pics as before
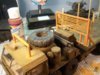
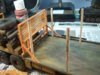
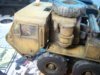
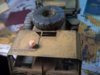
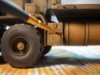
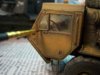
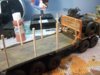
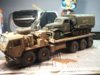
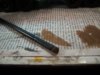
Suffice it to say in short--- this is converted truck in 'sand beige' to be dark washed and eventually brought out to "obnoxious orange" Am using ladies eye shadow brushes (cheap and durable)
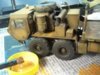
Also paints are just plain old acrylic craft paint (water soluble and cheap) Dry brushing means just that, a very light touch of paint then rub most of it off on a paper towel. Then begin with very light touches at first using a circular stroking motion putting just the most minute amount of paint per layer allowing previous coats to dry well.
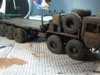
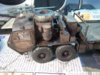
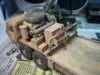
Progression of pics I hope will show the very beginning of a long and painstaking process of eventually reaching a finished product that you could be happy with, but just remember you won't get it in a shot and only with practice and experience will you become proficient at this dwindling technique.
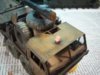
At point of last pic at least three coats of color are down with many many more to go with pin washes in between to preserve integrity of details...Phew....see....I told you, you would be bored to death .....Jim
")
Only ten pics allowed? was twenty wasn't it?View attachment 270584 View attachment 270585 View attachment 270587 View attachment 270588 View attachment 270590 View attachment 270592 View attachment 270593 View attachment 270594 View attachment 270595 View attachment 270596
)Never an air brushed used, all by brush, Not sure how to break up text to correspond to pics as before
Suffice it to say in short--- this is converted truck in 'sand beige' to be dark washed and eventually brought out to "obnoxious orange" Am using ladies eye shadow brushes (cheap and durable)
Also paints are just plain old acrylic craft paint (water soluble and cheap) Dry brushing means just that, a very light touch of paint then rub most of it off on a paper towel. Then begin with very light touches at first using a circular stroking motion putting just the most minute amount of paint per layer allowing previous coats to dry well.
Progression of pics I hope will show the very beginning of a long and painstaking process of eventually reaching a finished product that you could be happy with, but just remember you won't get it in a shot and only with practice and experience will you become proficient at this dwindling technique.
At point of last pic at least three coats of color are down with many many more to go with pin washes in between to preserve integrity of details...Phew
....see....I told you, you would be bored to death.....JimOnly ten pics allowed?
was twenty wasn't it?View attachment 270584 View attachment 270585 View attachment 270587 View attachment 270588 View attachment 270590 View attachment 270592 View attachment 270593 View attachment 270594 View attachment 270595 View attachment 270596Attachments
-
 100_7481.JPG3.1 KB · Views: 0
 -
 100_7492.JPG3.4 KB · Views: 0
 -
 100_7491.JPG3 KB · Views: 0
 -
 100_7490.JPG3 KB · Views: 0
 -
 100_7490.JPG3 KB · Views: 0
 -
 100_7489.JPG2.4 KB · Views: 0
 -
 100_7486.JPG3 KB · Views: 0
 -
 100_7484.JPG3.3 KB · Views: 0
 -
 100_7483.JPG3.2 KB · Views: 0
 -
 100_7482.JPG3.2 KB · Views: 0

")