Theme editor

Scale Model Shop

Ju 87 Stuka B2 Italeri

Status
Not open for further replies.

michaelm

New member
Joined
Dec 13, 2011
Messages
437
Reaction score
0
Points
0
1/3
Thread owner
Well my first thread and first time showing pics of my modelling efforts.

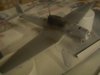
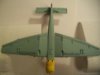
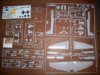
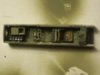
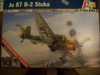
Picked up this kit in the sale at my lms, Wonderland Models, for just £14;99 a bargain I think. Looks really nice with great details and a small fret of PE, another first for me.

Wanted to start a thread with it as I may need your help and advice as I go along so thought it might be a good idea to post pics as I go.

I'm still very much a beginner as only back to this for a few months but never imagined you could have so much fun with a box of plastic bits and some paint. M

View attachment 44663

View attachment 44664

View attachment 44665

View attachment 44666

View attachment 44667

View attachment 157689

View attachment 157690

View attachment 157691

View attachment 157692

View attachment 157693
 

Attachments

  • models 066.jpg
    models 066.jpg
    3.1 KB · Views: 0
  • models 076.jpg
    models 076.jpg
    1.9 KB · Views: 0
  • models 072.jpg
    models 072.jpg
    1.9 KB · Views: 0
  • models 070.jpg
    models 070.jpg
    2.4 KB · Views: 0
  • models 068.jpg
    models 068.jpg
    2.5 KB · Views: 0
just bought same one few days ago... great model what I can see from box...

I will folowing this build with interest :)

Great doned cockpit

Good luck with build

Roman
 
That's a good start Michael, good luck with your build.

Cheers

Patrick
 
Nice start and there's plenty of advice available on here (probably not from me, but from those who actually know what they're doing with aircraft :) )

I also see we frequent the same model shop in town ..... nice shop ... sometimes awquard to find a spot to park in Castle Terrace :)
 
Thread owner
Thanks so much for all your kind words.

I've made some progress and fitted the cockpit into the fuselage and attached the wings, the fit is really pretty good with not too much putty needed at the wing root.

I've also got the engine painted and ready to fit, there is an option to show the engine but I'm going for the closed option.

I think I've got the firewall on a bit squint which is throwing the engine out of line so I'll have to do some remedial work to get it all to line up correctly.

Thanks again for your encouragement M

View attachment 44882

View attachment 44883

View attachment 44884

View attachment 157908

View attachment 157909

View attachment 157910
 

Attachments

  • models 089.jpg
    models 089.jpg
    1.9 KB · Views: 0
  • models 093.jpg
    models 093.jpg
    2 KB · Views: 0
  • models 087.jpg
    models 087.jpg
    1.8 KB · Views: 0
Looking good so far. The engine is quite impressive.

Colin M..
 
Im doing this build right now as well..... i have the tamiya repack version of this kit..... I was supriosed at how well the kit goes together ... the only thing that bothers me is the type of styrene Italieri uses... It is alot more brittle than the Styrene normally used by Tamiya and trumpeter./...
 
Thread owner
Hi Marc, I too think this kit goes together pretty good. Don't have enough experience to comment on the styrene, I had a look at your Mig and its fantastic so would to see what you do with this kit. I'm masking the canopy at the moment so things have slowed a little. M
 
Thread owner
Ok, been a little while since I posted, life gets in the way of modelling sometimes.

Moved on quite a bit now, canopy masking takes me a long time, I'm still getting the hang of this but just about got it done to an ok standard, I think, but of course will not know until I remove it.

I got the airbrush work done although my AB didn't want to play along when it came to the last black/green colour in the camo. I'm using a single action badger airbrush fitted with a colour cup so I don't have to fill a syphon jar every time, I really like the brush, ok its a little basic but I think I'm mastering it and can get a pretty good finish the problem is I use those damn propellant cans, they are the work of the devil and very inconsistent in their air delivery, the kit was a Christmas gift and really needs the addition of a compressor.

I learnt another lesson after breaking off nearly all the 'sticky out bits' on the plane while spraying....leave them 'till after. Got some touching up to do on paint.

I'd like to give this aircraft quite a bit of weathering as I'm led to believe they took a lot of punishment but I'm very unsure of what to do and how to do it, advice please.

Thanks M

View attachment 45466

View attachment 45467

View attachment 45468

View attachment 45469

View attachment 158492

View attachment 158493

View attachment 158494

View attachment 158495
 

Attachments

  • 088.jpg
    088.jpg
    2.1 KB · Views: 0
  • 087.jpg
    087.jpg
    1.9 KB · Views: 0
  • 075.jpg
    075.jpg
    2 KB · Views: 0
  • 089.jpg
    089.jpg
    1.8 KB · Views: 0
Looking great Michael.Sorry to hear about breaking of the little bits hope its an easy fix for you. Weathering would really depend on the year and the theatre of operation, I'm geussing with the yellow nose its Eastern front? Wintertime? The options are many and there are a lot of threads in the how to section that would help a lot I would search there.

http://www.scale-models.co.uk/tutorials/11282-weathering-questions.html
 
Status
Not open for further replies.
Back
Top