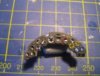
steve, from what pictures ive seen ,although the radio operator had a full size seat id agree with you on just the lap belt.In the pic ive seen you can only see the bottom corner of the seat and theres definitely a belt visible for the lap , if there was a shoulder belt too ,i doubt hed have been able to reach forward and operate the radio equipment.From what i could gather ,the beaufighter observers position was just a lap belt too, it was probably in keeping with the tradition of giving the back seaters a bum deal(!) as far as comfort goes- just look at the wire basket for stuka gunners and the luxurious leather strap stormovik gunners had to balance on!!! cheers tony

You are using an out of date browser. It may not display this or other websites correctly.
You should upgrade or use an alternative browser.
You should upgrade or use an alternative browser.
Ju88 Next on the line
- Thread starter stona
- Start date
- Status
- Not open for further replies.
Thanks Tony,that was my logic too! I'm looking forward to the "anti cavorting chain" on Gladiator111's Swordfish.\ said:i doubt hed have been able to reach forward and operate the radio equipment. tony
Things haven't gone well today. Revell's instructions leave a bit to be desired and I've actually taken the bulkhead back out of the fuselage and decided to go in a different order. The way that Revell would have you do it you can't really "dry fit" the various bits until it is too late to do anything about it AND some of the sub assemblies locate or line up very vaguely. I don't think this is a particularly easy kit to build. It's got nothing to do with the number of parts but rather the way it has been engineered.Having said that it can be done and it's quite good to have a bit of a challenge.
I wouldn't want to put anyone off building it,it's great value for money,but they should be aware it's not a "shake 'n bake". Some of the reviewers were either being paid by Revell or were building a different kit!
Cheers
Steve (off to see if the next wine bottle has more suitable foil)
steve , dont forget yoghurt pot lids too, often they have a slight texture to them as well as being a bit thinner than wine foil-not as much fun to acquire though!!!!! cheers tony:cheers:
Upper cabin has all the bits in,a bit of a touch up required. Trying to get tail wheel assembly done so that the fuselage halves can be joined. I'll do a proper update then.
Cheers
Steve
View attachment 20844
View attachment 133370
Cheers
Steve
View attachment 20844
View attachment 133370
Attachments
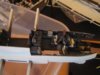
Fuselage joined but needs a bit of fettling to be ready for a photo. I paint a dark colour on the inside of seams which colours the "ooze" on the outside to let me know that I've got a good seam. It doesn't look too clever before a clean up! No decals for instrument panel so I painted it as below.
Also started masking plexi-glass. If you don't like canopy masking you might not want to look at that photo!
Cheers
Steve
View attachment 20882
View attachment 20883
View attachment 133408
View attachment 133409
Also started masking plexi-glass. If you don't like canopy masking you might not want to look at that photo!
Cheers
Steve
View attachment 20882
View attachment 20883
View attachment 133408
View attachment 133409
Attachments
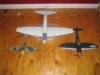
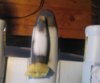
Where am I going to put this!!!!! I've got enough sub assemblies done to dry fit wings and tail assembly. This thing is big. The snap is with a P-47 which is a big model and a Bf109 which is about as small as 1/32 gets. The Ju88 is bigger than a 1/48 B-17.
Cripes
Steve
View attachment 20940
View attachment 133466
Cripes
Steve
View attachment 20940
View attachment 133466
Attachments
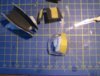
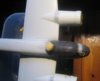
Disaster....ish. Fuselage decided to go for test flight off my table. Broke and loosened a few fixable bits in cockpit including entire bomb aimers assembly. Also had an amazing bit of luck. It landed nose down on the front bubble/gondola which is largely clear parts. Normally I attach these with very strong watch crystal cement but because I couldn't find it I'd used the much weaker Clearfix. What a result! A bit like an F1 car, lots of bits came flying off but nothing broke so really I've just got to stick it all back together. It's cost me a few hours but could have been a LOT worse.
I'm sure this has happened to quite a few of us but I think I've got away with this one. The only bit I can't get back in is an oxygen bottle which I just can't reach and I'll live with that.
Cheers
Steve (looking on the brightside)
I'm sure this has happened to quite a few of us but I think I've got away with this one. The only bit I can't get back in is an oxygen bottle which I just can't reach and I'll live with that.
Cheers
Steve (looking on the brightside)
G
Guest
Guest
It's never nice when that happens Steve-though I bet the look on our faces when we see that slow-motion slide off the table or workbench must be funny! to others! Glad the damage wasn't too bad. Patrick
wow!,could have been a major disaster if it had blitzed the clear nose parts steve, glad it didnt do too much damage. cheers tony
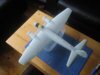
I absolutely have to go to work now so here is a quick snap of the beast with major components assembled. The tailplane is drying and you'll see a lack of any tape etc. The fit of the "big bits" is superb. That is an A3 cutting mat.
Laters
Steve
View attachment 21017
View attachment 133543
Laters
Steve
View attachment 21017
View attachment 133543
Attachments
G
Guest
Guest
lol now that is a big kit! I think I fancy a go at that one!
Patrick
Patrick
An update. I don't normally do bombers and as a result failed to mask the inside of the various plexiglass structures to paint the inside,which in retrospect would have been possible. I've applied the technique I use for my typically smaller fighter hoods.The first colour on the outside of the structure is the colour of the inside of the frames.It should be visible from the inside and hopefully fool the eye. I certainly hope so as there's b*gger all I can do about it now.
A little bit of filling and cleaning up and I'm hoping to get the beast primed later today.
Cheers
Steve
View attachment 21042
View attachment 21043
View attachment 133568
View attachment 133569
A little bit of filling and cleaning up and I'm hoping to get the beast primed later today.
Cheers
Steve
View attachment 21042
View attachment 21043
View attachment 133568
View attachment 133569
Attachments
And primed. Got to leave it a while now before a nice rub down (for the model,not me) and on to pre-shading. I don't always do this but I think I need to on a thing this size.
View attachment 21052
View attachment 133578
View attachment 21052
View attachment 133578
Attachments
G
Guest
Guest
Looking good Steve-it's always nice when a seemingly random collection of parts starts to look like a finished product!
Patrick
Patrick
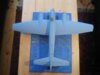
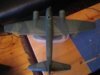
Basic 70/71 over 65 camo is done.It needs a few touch ups and then I may do a bit of an overspray to blend it all together. I've got all afternoon tomorrow to muck about with it though I'd like the first coat of Klear on tomorrow evening......we'll see. I find the model tends to dictate times and that I just go along with it.
Cheers
Steve
View attachment 21169
View attachment 133695
Cheers
Steve
View attachment 21169
View attachment 133695
Attachments
G
Guest
Guest
It looks good Steve though when you say an overspray, what colour will you use? I'm aware of using a light mist to 'tie-in' multi-colour camo on tanks so is this something similar? Thanks Patrick
I may give it a misting of yellow/green. At the moment there is quite a high contrast between the colours (I lightened them quite a bit) but after a few coats of Klear and some varnish that will diminish considerably. I've done this 70/71 scheme a few times and it's all a bit subjective. The contrast was so low on the real thing that a lot of B+W photos used to get interpreted as one colour,anyone who built the old 1/24 Airfix Stuka will have fallen for that one!\ said:It looks good Steve though when you say an overspray, what colour will you use? I'm aware of using a light mist to 'tie-in' multi-colour camo on tanks so is this something similar? Thanks Patrick
Cheers
Steve
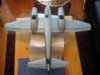
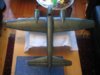
All Klear. Nice and shiny,second coat this morning so hopefully decals tomorrow. I didn't apply any filter but notice how the contrast between the camo colours has reduced. The post shading which previously looked a bit overdone has also blended nicely.
Cheers
Steve
View attachment 21215
View attachment 21216
View attachment 133741
View attachment 133742
Cheers
Steve
View attachment 21215
View attachment 21216
View attachment 133741
View attachment 133742
Attachments
- Status
- Not open for further replies.
Legal Notice
scalemodelling.co.uk is a privately operated online discussion forum. All content posted by members reflects their own views and opinions and does not necessarily represent those of the forum owners or administrators. While reasonable efforts are made to moderate content, no responsibility is accepted for user-generated material. By using this site, you agree to comply with UK law and the forum rules.
Currently on our website
Threads
37,406
Messages
707,863
Members
2,652
Latest member
Waffenträger Auf E-100