Theme editor

Scale Model Shop

Kaman Huskie

Status
Not open for further replies.

Gern

Well-known member
Joined
May 17, 2009
Messages
9,320
Reaction score
235
Points
63
1/3
Thread owner
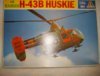
I'm going to have a tilt at this one.

As my temporary employment contract has not been renewed and I've joined the ranks of the unemployed, I've got plenty of time on my hands so I've got half a chance of finishing this.

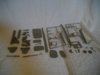
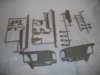
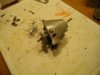
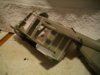
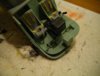
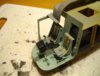
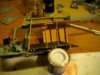
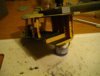
There's a limited amount of detail in the cockpit and none at all in the cargo area so I'll have a go at adding some scratch bits.

Gern

View attachment 53782

View attachment 53783

View attachment 53784

View attachment 53785

View attachment 53786

View attachment 53787

View attachment 166808

View attachment 166809

View attachment 166810

View attachment 166811

View attachment 166812

View attachment 166813
 

Attachments

  • Box.jpg
    Box.jpg
    2.5 KB · Views: 0
  • Sprues 3.jpg
    Sprues 3.jpg
    2.1 KB · Views: 0
  • Sprues 2.jpg
    Sprues 2.jpg
    1.9 KB · Views: 0
  • Sprues 1.jpg
    Sprues 1.jpg
    2.2 KB · Views: 0
  • Instructions.jpg
    Instructions.jpg
    1.6 KB · Views: 0
  • Decals.jpg
    Decals.jpg
    2.3 KB · Views: 0
Nice subject, looks interesting for do scratch build with it. Good luck mate

Polux
 
Brilliant choice dave, a fascinating machine and very rarely seen modelled . I remember the first time I saw a pic of one of these it took me ages to figure out how the side by side rotors didnt chop each other off when started up!!! looking forward to the build , cheers tony p.s. hope something turns up on the job front !
 
Sorry to learn of your employment status. I hope some thing turns up for you soon.

A very different twin boom. I didn't even know there was a twin boomed helicopter!! Nice one.

Ian M
 
Interesting subject Dave. I'm off to find out how it works without self destructing!

Cheers

Steve
 
What a very interesting choise Dave never seen one of these before will watch this come together
 
Sorry to hear about your job Dave, i'll keep me fingers crossed for you mate. As for your build mate, nice choice. Can't wait to see the added detail.

Have fun, John
 
Dave really itching to see this get going! Really unique choice! Sad news about the job front, hope you get a contract renewal quickly!
 
Thread owner
Some progress guys. I've got the rotor mounting assembly done. I had to replace one end of the support strut as it was missing. One version of this kit was apparently motorised - hence the cogs etc. I'll try and get a video showing how the rotors work - to my simple mind it's quite fascinating!

I can't think of any way to deal with the sink marks and ejector marks shown in Pic 4 without losing the detail of the raised rivets. Does anyone have any suggestions?

Gern

View attachment 53828

View attachment 53829

View attachment 53830

View attachment 53831

View attachment 166854

View attachment 166855

View attachment 166856

View attachment 166857
 

Attachments

  • Sink marks.jpg
    Sink marks.jpg
    2.1 KB · Views: 0
  • Rotor mounting 3.jpg
    Rotor mounting 3.jpg
    2.2 KB · Views: 0
  • Rotor mounting 2.jpg
    Rotor mounting 2.jpg
    2.4 KB · Views: 0
  • Rotor mounting 1.jpg
    Rotor mounting 1.jpg
    2.3 KB · Views: 0
Ouch those tail fins are FUBAR! Well only one of two things to do. Either scratch a new pair or fill, sand and re-detail...

Ian M
 
You could drill a couple of small holes in them and set it in a diorama where its being repaired after being shot at .... the mould problems would look like damaged / rippled / dented metalwork
 
Shame about the tail fins, Dave. The helo itself was very well thought of by its crews despite being nick named the Flying Sh*ithouse by some!

Keith
 
OOH! dont you just love old kits? Well sometimes anyway! The fins look a bit of a bugger dave , if it was me ,i would try and get rid of the ejector pins with a dremel and try and fill the sink holes ,but put a thin strip of masking over the line of rivets to try and save them during sanding . If this fails then as Ian says just fill and rescribe , it looks like its mainly the inside faces so might not be noticeable . cheers tony
 
Thread owner
Hi guys. A most enjoyable day adding some details to the cargo area. I know it's not exact but I think it looks OK. I put a 'roof' on the cargo area to hide the lack of engine detail but I had to cut a hatch to make room for the gears on the rotors. I'll scratch some seatbelts from masking tape and wire next.

Thanks for your comments on those fins. I don't have the skills to make new ones so I'm just going to have to clean these up as best I can. I'll still have some dents in the surface but maybe these could be put down to poor maintenance! I did think of trying to show them as battle damage (thanks Colin) but I don't think I'd do it well enough to be believeable.

Gern

View attachment 53901

View attachment 166927
 

Attachments

  • New interior detail.jpg
    New interior detail.jpg
    2.5 KB · Views: 0
Dave that is some difficult detail to try and save on the fins,I've had luck using thin ca as it will pool in the low spots without ruining the details . Looking great so far keep it coming!
 
Great work so far Dave the interior detail you've added looks brill, and what a tip by Trey about the sink holes
 
Thread owner
Got some more done. Ain't it fun when you got lots of time free!?

Made the seatbelts from masking tape and fuse wire and got all the interior painted. I'm ready to button up the fuse' but I'll let the glue and paint dry first.

Trey - Your idea of using thin CA for those dents reminded me that, while I don't have any thin CA, I do have some Mr Surfacer. I'm going to try a little of that and see what improvements I can get.

Gern

PS Just noticed from my pics that I've missed a roll of canvass from the cockpit. I'll add that now.

View attachment 54000

View attachment 54001

View attachment 167026

View attachment 167027
 

Attachments

  • Cockpit 2.jpg
    Cockpit 2.jpg
    2.5 KB · Views: 0
  • Cockpit 1.jpg
    Cockpit 1.jpg
    3.1 KB · Views: 0
Great looking progress Dave! Hope the surfacer does the trick for you!
 
Status
Not open for further replies.
Back
Top