Theme editor

Scale Model Shop

Knockomie

Status
Not open for further replies.

rickoshea52

Well-known member
Joined
Dec 20, 2011
Messages
4,104
Reaction score
70
Points
48
1/3
Thread owner
Seeing as how Polux is building a model railway I thought I might as well create a thread for my own layout. It has been ongoing for a year or two now so I will be cutting and pasting parts from my blog onto this thread here and ther as well as some photo's.

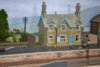
After some time thinking of ideas for a layout on such a small baseboard area, Morar and Garve have always been up there, the March 2012 issue of Model Rail magazine dropped through my letter box with their annual Model Rail Scotland theme including an article on Ardlui for a small space layout.

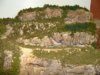
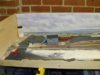
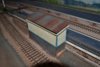
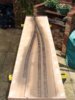
I spent a few weeks researching Morar, Garve and Ardlui to see how I could replicate one of these locations in 6' x 17" - a "representation" could be achieved in this area with additional fiddle yards at either end. Track, points and additional timber was bought and the scenic baseboard is now complete.

View attachment 80549


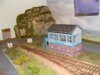
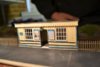
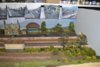
The track plan features a single line into a station with a passing loop and short siding. The station itself is loosely based on Garve but I'm taking inspiration from Ardlui, Achnasheen and Morar. At the moment I haven't made the fiddle yards yet but at the end with the double track there is the scope to extend the station area and close the passing loop but that is for the future. For the time being the scenic area will go through a break at this end.

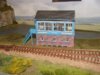
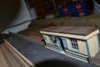
Seeing as I have pinched elements from different locations in Scotland from the West Highlands, the Mallaig line and beyond I obviously need something suitably Scottish but totally distinct from any of the localities from which it is inspired by. I used to live in Forres, a lovely little town a few miles from the Moray coast, on a new housing development called Knockomie Rise - it's got a nice ring to it. But my layout is as flat as a pancake so Rise would probably be inappropriate - Knockomie it is then.

View attachment 80538


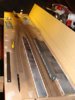
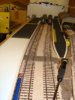
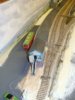
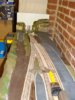
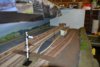
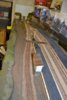
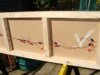
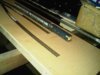
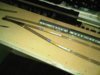
The track is laid and wired for DCC with the track weathered with a spray can of Railmatch frame dirt, my can of sleeper grime was empty and I didn't want to lose time getting some more but the effect is much the same. I painted the rail sides dark rust by brush paying attention to keeping the points clear and only on the viewing side. After painting I tested the track again for DCC but there was a bit of juddering over one section of the pointwork that needs a bit of cleaning.

View attachment 80545

View attachment 80547

View attachment 80548


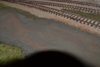
I only had one problem when wiring the track for DCC and that was with the power to the points. After taking some advice from other club members and a bit of soldering they worked perfectly.

View attachment 80546

View attachment 80550

View attachment 193561

View attachment 193568

View attachment 193569

View attachment 193570

View attachment 193571

View attachment 193572

View attachment 193573
 

Attachments

  • DSC_0244.JPG
    DSC_0244.JPG
    2.5 KB · Views: 0
  • DSC04067.JPG
    DSC04067.JPG
    2.9 KB · Views: 0
  • DSC04068.JPG
    DSC04068.JPG
    2.9 KB · Views: 0
  • DSC04069.JPG
    DSC04069.JPG
    2.7 KB · Views: 0
  • DSC04070.JPG
    DSC04070.JPG
    1.8 KB · Views: 0
  • IMG00039-20120212-1624.jpg
    IMG00039-20120212-1624.jpg
    2.7 KB · Views: 0
  • IMG00040-20120212-1624.jpg
    IMG00040-20120212-1624.jpg
    2.7 KB · Views: 0
Nice one Rick.

Could I ask on behalf of all the plastic bashers that know diddly squat about model railways what DCC is?

You can get as technical as you dare, just explain it for us not in the know. :-)

Ian M
 
Thread owner
DCC stands for Digital Command Control and is probably the biggest technological advance in model railways. Traditional model railways were DC or analogue control where the track is wired in sections and to run a train over that track the power had to be routed to it in sections. The limitation to this was that you could only run one train at a time in that section so double heading or coupling a loco up to a stationary loco was difficult.

With DCC the entire track becomes live at all times. The control comes from a microchip installed in the loco, this microchip has a unique "address". So now you can control more than one loco in a section of track or anywhere on your layout. With DCC fitted loco's I can now run double headed trains and couple a loco up to a stationary loco in a siding, yard, shed or station. They can even control directional lights that can be left on while the loco is stationary, not easy to achieve with DC analogue.

Basic DCC chips can cost as little as £10 and fitting them is fairly easy. But the more things you want your chip to do the pricier they are. Some loco's are sold DCC ready, DCC on board or DCC Sound. Yes, I said sound. You can have a chip with an attached micro speaker pre-programmed with sound for any given locomotive.....they're awesome!!!

If I can figure it out I'll post a video with sound of one of my sound loco's.
 
Digital x controller..................that's my guess
 
Looks like you replied a fraction of a second before me. And look how wrong I was...................
 
Thread owner
Just about every model loco made these days in DCC ready, that is they have no chip fitted but have a fitting for one to be installed. Any of those dusty old model trains in your loft are not ready to take a chip without a bit of soldering and wiring.

When you get a chipped loco or fit a chip the address is always to a default setting. You'll need to put your chipped loco on a test track to program it with whatever address you want; usually from 0000 to 9999. I set mine to the first two and last two of the model's running number, e.g. I have a Class 37 numbered 37425 so I'll program it to 3725. This all done with the control unit which is a hand set with various buttons etc on. Sounds complicated but if you can use a Sky TV controller you can get used to a DCC controller.
 
That's a great notice Rick, posting your layout here !!!

I will follow with interest mate :P

Two layout....this forum is more bigger everyday ;)

Cheers

Polux
 
Is it now I confess that I get the wife to program the recording of tv shows....:oops:

Thanks for the very good explanation. Sounds a lot different from my old Hornby three rail oval.

Ian M
 
Thread owner
Plywood sheet was bought and cut for the back and front panels and was fitted when I settled on the landscape I wanted to achiev. I also got busy on some of the scenic features before fitting to the layout. Platforms have been built from the Peco range with Scalescene's platform faces and topping used and I still have to build the curved section which could be tricky. After these have been done and fitted the dreaded ballasting has to be tackled. At least I only have six feet of track to do.

Also in progress is a modified Bachmann Scenecraft Market Hampton station building, a bus shed inspired by the one that used to be at Garve and a few other bits and pieces. Lots of scenery items have been acquired like trees, Woodland Scenics rock moulds and Smooth-it road making kit.

Knockomie was stored in the loft, a loft that gets very warm in the summer. Needless to say the baseboard bowed and all the platform decking paper peeled off so I have brought it back down to the garage and luckily it has returned to its original shape. The decking paper was rejected as not being suitable and I resorted to painting it instead.

The ballasting is complete and 75% of the platforms have been glued in place. I only have the curved section to complete with suitably cut and shaped decking material (plasticard). After some testing to make sure the clearances of the platform edging and ballast is goodI can get into the scenery making.

So the platform is now completely laid. I had to make my own decking from plasticard for the curved section and it has been painted with Woodland Scenics tarmac and the coping stones picked out in slightly varied shades of light beige. Scalescenes stone effect platform edges have been used for the facings.

I have also been busy finishing the ballasting, fitting a barrow crossing, a level crossing and I have laid the road using Woodlands Scenics Smooth-it road kit. I still have to weather the ballast but by and large I am happy with it and the layout still operates as before.

View attachment 80558


View attachment 80557


View attachment 193580

View attachment 193581
 

Attachments

  • DSC04254.JPG
    DSC04254.JPG
    3.7 KB · Views: 0
  • DSC04294.JPG
    DSC04294.JPG
    3.8 KB · Views: 0
Thread owner
This layout also needs some rollng stock. I think I'll create a separate thread for that.
 
Thread owner
I have some more pictures to share of my layout. These were taken over a period of a year so I'll try and get them in chronological order.

View attachment 82905


The placing and marking out of the level crossing. The white tape is from the Woodland's Scenic's road making kit. You lay this 1mm thick tape for the edge of the roads then fill in with a plaster type mix, skim smooth and allow to dry. When it's dried out it can be sanded and painted to the finish you want. I screwed up a bit here as I never thought about a camber from the centre line to the verge so it's as flat as a witches tit.

View attachment 82906


A long shot of the layout showing how the passing loop of the double track merges to a single line and the redundant siding on the extreme left.

View attachment 82907


The road has been laid and painted. The white area is polystyrene packing cut and glued to the baseboard then coated in toilet tissue and diluted PVA. This dries to a nice surface that is ideal for applying grass mat or scatter; I used scatter material.

View attachment 82908


Here you can see the station building placed on the platform for context. The shed to the right is a cut down Ratio carriage shed used to replicate the actual shed at Garve. The original has a pitched roof but Garve is the inspiration and not a like for like recreation. The white strip is also polystyrene.

View attachment 82909


View attachment 82910


I was just playing around here to see how the signal box works with the platform and crossing. There is a bit of "compression" here as the distance between the platform, signal box and crossing on the real thing is much greater.

View attachment 82911


The rocky rock face!

View attachment 195928

View attachment 195929

View attachment 195930

View attachment 195931

View attachment 195932

View attachment 195933

View attachment 195934
 

Attachments

  • DSC04486.JPG
    DSC04486.JPG
    3.7 KB · Views: 0
  • DSC04298.JPG
    DSC04298.JPG
    3.4 KB · Views: 0
  • DSC04300.JPG
    DSC04300.JPG
    4.2 KB · Views: 0
  • DSC04373.JPG
    DSC04373.JPG
    3.2 KB · Views: 0
  • DSC04374.JPG
    DSC04374.JPG
    3.7 KB · Views: 0
  • DSC04375.JPG
    DSC04375.JPG
    3.8 KB · Views: 0
  • DSC04376.JPG
    DSC04376.JPG
    3.4 KB · Views: 0
Thread owner
Some more updates.

View attachment 82912


At one end of the layout the scenic break is created by using a rock face kit from Woodland's Scenic's. This was very easy to use and I really shouldn't have been anxious about it. Mix the plaster material then pour into the re-usable mould provided. When dry remove from the mould and fix to your layout using the plaster bandage supplied. I mounted mine on a block of polystyrene. Following the instructions, dilute the three paints included and wash over to create the rock colour. I used scatter material to create the vegetation.

View attachment 82913


The brown mess on the left is a dirt track leading to the redundant siding.

View attachment 82914


Vegetation added to the tissue coated polystyrene. The cess at the roadside is ballast.View attachment 82916


The signal box has been fixed to the baseboard now. This is a Bachmann Scenecraft ready to plant resin model that has been modified with a new veranda, cladding and toilet. The light blue paint is by and the nameboard is home made using a program from Scalescenes.com

View attachment 82915


Some more detail at the station building which is another Bachmann resin model painted with the Scottish Region blue. The small hut is now fixed but I decided not to use the bike rack. Sometimes less is more. The big shed has been repaired since this was taken.

View attachment 82917


The signal box after fixing and blending in of the scenery. The interior has been detaield with a Langley Models kit.

View attachment 195935

View attachment 195936

View attachment 195937

View attachment 195938

View attachment 195939

View attachment 195940
 

Attachments

  • DSC04491.JPG
    DSC04491.JPG
    3.4 KB · Views: 0
  • DSC05019.JPG
    DSC05019.JPG
    2.8 KB · Views: 0
  • DSC05020.JPG
    DSC05020.JPG
    2.6 KB · Views: 0
  • DSC05021.JPG
    DSC05021.JPG
    2.7 KB · Views: 0
  • DSC04490.JPG
    DSC04490.JPG
    4 KB · Views: 0
  • DSC04489.JPG
    DSC04489.JPG
    3.2 KB · Views: 0
Thread owner
View attachment 82921


The front of the platform shelter.

View attachment 82918


The platform shelter on the passing loop is from Bachmann and modified with a wriggly tin roof and Scottish Region paint work. It is mounted on a wooden block clad in more wriggly tin material from Will's. The signal is from Dapol and when I get it wired up it will be operable from a control panel.

View attachment 82924


With a fence fitted and a lamp from Vollmer the station is starting to look more realistic.

View attachment 82919


The platform shelter detail.

View attachment 82925


The dirt track was made using Tamiya earth material and tonal variations using different shades of cheap acrylic paint. The Mig wet effects has been used to to give the impression of wet areas!

View attachment 82923


The front of the platform shelter and the additional posters and black bumper strips.

View attachment 82920

View attachment 82922

View attachment 195941

View attachment 195942

View attachment 195943

View attachment 195944

View attachment 195945

View attachment 195946

View attachment 195947

View attachment 195948
 

Attachments

  • DSC_0235.JPG
    DSC_0235.JPG
    2.8 KB · Views: 0
  • DSC_0236.JPG
    DSC_0236.JPG
    2.5 KB · Views: 0
  • DSC_0237.JPG
    DSC_0237.JPG
    2.3 KB · Views: 0
  • DSC_0238.JPG
    DSC_0238.JPG
    2.1 KB · Views: 0
  • DSC_0239.JPG
    DSC_0239.JPG
    2.5 KB · Views: 0
  • DSC_0240.JPG
    DSC_0240.JPG
    2.3 KB · Views: 0
  • DSC_0241.JPG
    DSC_0241.JPG
    2.7 KB · Views: 0
  • DSC_0242.JPG
    DSC_0242.JPG
    1.7 KB · Views: 0
Thread owner
View attachment 82929


More detail around the station building with the addition a a lamp hut, telegraph pole, litter bin and platform fencing. The string is just there so that I can guide the wires for the platform lights through the void between the platform deck and baseboard surface.

View attachment 82930


Lots more trees and foliage now. The hole in the panel on the right is the scenic break that transitions the scenic track into the fiddle yard. There will be a footbridge here to help disguise this. Future plans include the possibility of inserting another board here to allow the whole of the station and passing loop to be modelled.

View attachment 82931


A little bit of scenic interest for the spectator.

View attachment 195952

View attachment 195953

View attachment 195954
 

Attachments

  • i01615.jpg
    i01615.jpg
    2.5 KB · Views: 0
  • i01620.jpg
    i01620.jpg
    2.7 KB · Views: 0
  • i01629.jpg
    i01629.jpg
    2.1 KB · Views: 0
Status
Not open for further replies.
Back
Top