Theme editor

Scale Model Shop

Kwajalein Atoll..February 1944 - An additional build bit!

Status
Not open for further replies.
Much better without the stones.

Have you tried to tear off snall piece of paper from cardboard so that it shows a more raw material? Kind of if putty (sorry don't know the proper name) covering the concrete has fallen off.

Francesco
 
Time I caught up on this one Ron and now that I have I can honestly say that this is going to be another one of your none stop amazing builds mate. Excellent detail as usual.

Cheers

Andy
 
That looks the business Ron.

I've had another 10/15 minutes looking around for relevant images for you but they're like hens teeth, so I think staying with what you're going for now will be the best option and it'll look bang on anyway knowing you.

For information .. The term ''hens teeth'' will soon be null and void as scientists are now reverse engineering chickens by halting and forcing certain genomes, the is will result in chickens with dinosaur attributes .. One of which will be teeth (of sorts)

Geeky paeleotological lesson here endeth. :) :) :) :)
 
Looks real nice Ron and better without the stones, chickens with teeth eh..... well i think i will change my diet to toffu. they already run like linford christie can you imagine if they bit you back.

scott
 
Hi Ron, this may be of interest, bunkers and other structures from your battle. http://www.pbase.com/nowhereatoll/the_bunkers_of_roi_namur
 
Thread owner
Brilliant, helpful and diverse posts boys, thanks.

A special thanks to Joe for taking the time to post the superb bunker link....Bit late for this dio., but I've saved it to my favourites...Thanks again Joe.

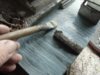
O.k., here is the latest progress...as it's throwing it down here, I've been in the shed throwing PVA around.

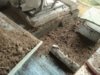
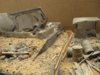
I've added some life to the remaining plywood by covering it with some sweepings from the drive.

Here's how....

It's very simple and effective.

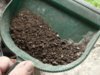
Soak the chosen area with watered down PVA. Get your sweepings, whatever, in a dust pan. Then sprinkle the contents over the PVA and leave for a few minutes. Turn the dio. over and gently tap the base. Some of the stuff will stay on and some won't.

Let this dry and take a look and if required, repeat the process......When doing this kind of thing, don't be fussy...A:- where the PVA goes. And B:- where you throw the sweepings, just go for it. If you fiddle fart around the effect will be lost!

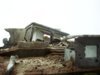
See in the last picture how through not fiddling with the PVA, the sweepings have gathered in corners and crept up the walls a bit. I think this looks more natural than just a flat surface, particularily for this diorama.

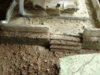
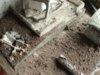
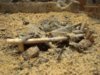
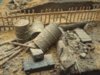
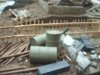
Using the same method, I sprinkled some dry tile adhesive around the building to get a sort of concrete lumps and dust effect. Finally, I've replaced the rubble etc around the main building.

Here are the stage pictures so far...Still plenty to do, but as usually happens with me, I start off with precious little idea of what I'm going to do and now they are piling in!

View attachment 69503

View attachment 69504

View attachment 69505

View attachment 69506

View attachment 69507

View attachment 69508


Starting to take shape now, and thanks again for your excellent input so far. I appreciate them all.

Cheers,

Ron

View attachment 182529

View attachment 182530

View attachment 182531

View attachment 182532

View attachment 182533

View attachment 182534
 

Attachments

  • Kwajalein Atoll,  1944 038.jpg
    Kwajalein Atoll, 1944 038.jpg
    2.8 KB · Views: 0
  • Kwajalein Atoll,  1944 043.jpg
    Kwajalein Atoll, 1944 043.jpg
    2.3 KB · Views: 0
  • Kwajalein Atoll,  1944 041.jpg
    Kwajalein Atoll, 1944 041.jpg
    3 KB · Views: 0
  • Kwajalein Atoll,  1944 037.jpg
    Kwajalein Atoll, 1944 037.jpg
    3.2 KB · Views: 0
  • Kwajalein Atoll,  1944 040.jpg
    Kwajalein Atoll, 1944 040.jpg
    3.1 KB · Views: 0
  • Kwajalein Atoll,  1944 039.jpg
    Kwajalein Atoll, 1944 039.jpg
    3 KB · Views: 0
Very nice Ron and i like the pics on how its done...gold. Like others have said i too like the weathering on the concrete.
 
Thread owner
Thanks chaps, I'm glad it passes muster...

I've just completed the next stage...I'm trying to get that just bombarded look. and adding a bit of detail when ideas came along.

The picket fence is thin slivers of coffee stirrer and the fence posts, cocktail sticks. The other bits are from my spares box...

I've been staring at the thing for a few days now as something was niggling me. It came to me this morning...Sand! I reasoned the bombardment would have churned up the sand and part covered any soil.

I forgot these Atolls are mostly sand, so I needed to get me some. I have some building sand, but this is far to red. Then I had a eurica moment as I wandered around the garden. I spotted some pieces of buff coloured stone amongst the gravel path, so I brought some into the garage and pounded them with a hammer. Perfect!

I then 'borrowed' a small spray from her, filled it with very watered down PVA, sprayed the base and then literally chucked the 'sand' onto everything. Then using an old paint brush, removed the stuff where it hadn't stuck.

The first picture was just a play around with stuff.

I've included the finished destroyed MG pit as well. The fence needs a bit more wrecking, but I'll sit back and have a fresh look later......

Here is the result so far.....Can anyone spot the mistake, which I've only just spotted?......Bl***y photos!

Reclining chair at Andy's build for the winner!!

View attachment 69533

View attachment 69534

View attachment 69535

View attachment 69536


Thanks for looking,

Ron

View attachment 182559

View attachment 182560

View attachment 182561

View attachment 182562
 

Attachments

  • Kwajalein Atoll,  1944 048.jpg
    Kwajalein Atoll, 1944 048.jpg
    3.3 KB · Views: 0
  • Kwajalein Atoll,  1944 046.jpg
    Kwajalein Atoll, 1944 046.jpg
    3.2 KB · Views: 0
  • Kwajalein Atoll,  1944 045.jpg
    Kwajalein Atoll, 1944 045.jpg
    3.3 KB · Views: 0
  • Kwajalein Atoll,  1944 047.jpg
    Kwajalein Atoll, 1944 047.jpg
    2.9 KB · Views: 0
Hmm is it - handle on box in second photo is defying gravity?

This is looking great, by the way. Can't decide if this diorama (and a couple of others I've seen here) will inspire me to try one for myself one day, or just intimidate me into sticking with new tool single-seat fighters and nothing else...!
 
Thread owner
\ said:
Hmm is it - handle on box in second photo is defying gravity?
Top man Alasdair, correct. In fact the whole box is upside down....Who's a numpty then.

Reclining chair in the post and thanks for the comments.

Ron
 
Hi Ron,

I am soooo sorry for my lateness, yet again, you have surpassed yourself and created such a marvellous capture of time in 3D view...

Also, thank you for sharing some of your hints and tips with us, which, one of these days I will finally get round to using...

Andy...
 
Thread owner
Thanks for the posts chaps, bit late but thanks anyway!

I've turned my attention to the figures. These are Dragon 1/35 U.S marines.......What a ball ache!

16 pieces for one figure, and that's just for the body, never mind the helmet and equipment....It's just crazy, totally unnecessary and just plain gimmicky, even the head is split in two! There are so many seams to fill, the figure looks like a patchwork quilt....Even when stuck together, the stance is not too clever.

Very disappointing, and I certainly won't be buying any more 1/35 Dragon figures.

By comparison, I have a set of Master Box U.S Marines and each 'body' is made up of just 6 pieces, superb fit first time and cracking all round figures.......and far less money than Dragon.

I doubt if I'll use the Dragon figures in the diorama, but revert to my favourite Master Box ones.....

I need a holiday!!

Cheers,

Ron
 
Status
Not open for further replies.
Back
Top