Rick thanks for the compliment have a had much bench time lately been working a lot

You are using an out of date browser. It may not display this or other websites correctly.
You should upgrade or use an alternative browser.
You should upgrade or use an alternative browser.
Lee Drennen’s 1/72 B-25 Mitchell Re-Build
- Thread starter Lee Drennen
- Start date
Thanks Paul
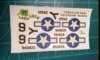
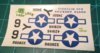
Well after almost a month in the window here’s the results. I think the look great. Wish we had more sun would have cut the time down more I think they bleached out well we’re supposed to have five days of heat and high humidity so I will not give these a coat of sealer till the humidity goes down because I paint outside.
Before View attachment 350483
After
View attachment 350484
Before View attachment 350483
After
View attachment 350484
Attachments
Attachments
Thanks Rick hope it turn out we’ll see in the morning thanks for stopping by
Hi Lee, progress looks good and nice to see it getting the detail treatment.
I had tried the sun for my decals without any results until I realised that my windows were treated with a film of UV protection. I will have to tape the bag outside the window now to try. :smiling2:
Cheers,
Richard
I had tried the sun for my decals without any results until I realised that my windows were treated with a film of UV protection. I will have to tape the bag outside the window now to try. :smiling2:
Cheers,
Richard
G
Guest
Guest
Good bit of bleaching there Lee. I did the same with some of my oil paintings where the white had turned yellow due to the presence of unrefined linseed oil (cheap paint).
Been looking at the Mitchells in the new Catch 22 on TV. The bomb aimer's cabin at the front was quite a unique feature.
Been looking at the Mitchells in the new Catch 22 on TV. The bomb aimer's cabin at the front was quite a unique feature.
Richard. Thanks I think I would worry about the weather outside the window
Peter. Thanks for stopping by and the complement. This is the first time I tried this figured I would wait till summer when the suns closer just had a lot of cloudy days now it’s to humid to paint
Peter. Thanks for stopping by and the complement. This is the first time I tried this figured I would wait till summer when the suns closer just had a lot of cloudy days now it’s to humid to paint
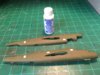
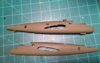
Windows look good time to glue it together. I know there’s a bad seam at the top but I’m just gonna have to live with it
View attachment 350564View attachment 350565
View attachment 350564View attachment 350565
Attachments
Added the wings after all the weight I put in the fuselage it’s still a tail sitter


You might try filling up the nose gear well after you get the gear assembled to the fuselage. if that doesn't work try thin lead sheet under the cockpit floor or in the bombardiers compt. Good luck Lee. Rick H.
G
Guest
Guest
Just saw this and had a reread through.
It's has been some time since this was started did it just get put away and forgotten Lee.
Will be good to see it reborn in it's full colours .
It's has been some time since this was started did it just get put away and forgotten Lee.
Will be good to see it reborn in it's full colours .
Rick I’ll try it I’ve got a lot of weight near the nose already
John Thanks Yes I got frustrated at it and put it away for awhile glad you stoped by
Jim. Yes that seam is bothering me too Thanks the complement
John Thanks Yes I got frustrated at it and put it away for awhile glad you stoped by
Jim. Yes that seam is bothering me too Thanks the complement
This afternoon I was Spring Cleaning and found this old build. I was so annoyed by that seam gap down the middle of the fuselage I almost trashed it but I kept it. So I decided to do some work on the seam and the rest of it. I think I’ll try to just finish this one after all I’ve had it since I was about 16 years old.


 Fixed the seam the best I could and re painted it I’m done with it and moving on
 Detailed the Engines using a Pencil for a metal look
 Clear Coated those Decals I Bleached out we’ll see if they work
 Lost the piece I made for the nose gun so I’m going to use the Original one that came with the kit. More later.
Fixed the seam the best I could and re painted it I’m done with it and moving on Detailed the Engines using a Pencil for a metal look Clear Coated those Decals I Bleached out we’ll see if they work Lost the piece I made for the nose gun so I’m going to use the Original one that came with the kit. More later.Rick you made a “Funny” thanks for stopping by and watching me get this off the bucket list.Now it "seams" to me that it was inevitable that you find this old kit and finish it.......that is one more you will be able to scratch off your "Bucket List" Lee.:thumb2: Rick H.
Added some more parts now I’m calling it a night.


 Added the Engine covers


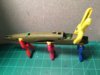
 Made a stand and added the MG.
Added the Engine covers Made a stand and added the MG.Legal Notice
scalemodelling.co.uk is a privately operated online discussion forum. All content posted by members reflects their own views and opinions and does not necessarily represent those of the forum owners or administrators. While reasonable efforts are made to moderate content, no responsibility is accepted for user-generated material. By using this site, you agree to comply with UK law and the forum rules.