Theme editor

Scale Model Shop

Lee Drennen’s 1/72 Sturmtiger Cmk/ Revell Conversion

Lee Drennen

New member
SMF Supporters
Joined
Apr 29, 2018
Messages
7,746
Reaction score
131
Points
0
1/3
Thread owner
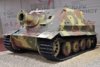
I really enjoyed building conversion kits this is my first time building a tank conversion,I always liked the looks of this tank. I used the Revell Tiger I for this and the conversion as a Cmk. This is what I have done so far. Enjoy the pics. Lee

4B67EA7B-EC50-4F3F-8C40-F85FB24CE5F0.jpeg673F5F13-B0A6-4C5D-A534-74B735684140.jpegAD3EB7AE-DF55-49E7-8F51-2A05E6F1B6FC.jpeg64A946D9-044E-4D73-B749-953DC2A904C8.jpeg7BD66FDC-EA4C-4DDC-B5F6-A559233742DE.jpegB9A42D50-E173-4BF5-8615-3A9700F9BA9D.jpegFD4F96D1-85CD-4AC2-8D57-C9DCD4A41953.jpeg
 
Hi Lee, I have this conversion in the stash along with a Bergepanther. They look like nice kits

You have made a bit of a boo boo though - can I suggest you need to reference real photos a bit more

The superstructure should hang over the edges of the original tank hull - you have gone and sanded the edges off making it flush with the sides. This means the upper hull is no longer the correct shape and looks a bit odd with those rounded lower edges. They should have been sharp and crisp as per the original resin in your third photo

It could probably be fixed by CA'ing some micro strip to the side to make the stepped edge and then filling to get the shape back
 
Thread owner
Thanks Simon
I thought it was suppose to be flush I’ll try to strip on it and fix it.
 
Ah! The joys of referencing. I spend more time looking at B&W photos than I do modelling.:smiling2: I am sure you will be able to make the necessary changes. Well done:thumb2:
 
Thread owner
Steve tell me about it. Specially when the mold block ends and the part begins. And you never built one. Thanks

Simon is this better? It’s not a bad conversion but you know how Resin does sometimes. Thanks for the pointer.

B9F8E9F3-E81A-4A0E-A9DA-DCD337620016.jpeg5D6BD760-5921-4763-8EA1-C06BC5E6EED4.jpeg90253153-8FEF-4C96-87BF-DB6646500834.jpeg279B67BD-BF5F-493A-AA67-2BC8A79FE88E.jpeg
 
Hi Lee,
You need to basically recreate the sharp corners of the resin that you sanded off

If this link works you should see a pic of how it should end up
Sturm

You look to have a good start there - the top edge of the strip needs filling and then the whole lot sanding down so that the slope of the sides goes right down to the lower edge of the plastic

Hope that makes sense
 
Thread owner
I’ve decided to revisit this build despite its shortcomings I’ve done what I can to correct the resident cast hole so I’m moving on with the build. Today I’ve added a few body parts, Wheels and the Barrel
1BD1FC41-1FF2-4AF4-8EAD-61CD23AC07B1.jpeg1165E4F0-5FE4-4D11-A539-7F2E46B2D08E.jpegD23BE69F-759E-4A84-8291-D3B930B2DCD0.jpegAC75B1C6-F5D1-4025-BC5B-EA04FDF2D81B.jpeg081BF18B-EE3B-486F-B31C-32015C355FF1.jpeg78487AA2-9AB1-4631-A06B-AE7E78777A40.jpeg81B72985-0D07-477B-B567-DF1D09ED6771.jpeg
 
Lee - good to see this on the go again but it has some problems. The front corners of the resin hull should come down to the bottom of the kit sponsons not stop part way up - they need extending

The securing plates at the front corners with the two big bolt heads look to be on the wrong side and turned through 90deg - the bolts should be vertical on the rear edge of the plate and the bottom edge should also be level with the bottom edge of the sponson

The upper hull sides still need fairing in with the plastic strips otherwise there will be a visible step
 
Thread owner
Simon. Thanks that’s the way the CMK instructions show how they went on I’ll will try to correct that. As far as the strips go that’s as good as it get for me I’m going try to put the bolt heads back on the bottom sides but no promises this is a very back casting with lots of issues I’m doing my best with what I have to work with
 
Hi Lee - not the best kit it would seem. Looks like mine will be getting a rebuild if it ever makes it out of the stash

View attachment 377371
reference photo of the Kubinka example courtesy of wiki

for the conical bolt heads file a cone shape on the end of a suitably sized piece of rod then slice off
 

Attachments

  • %80%93_Patriot_Museum%2C_Kubinka_%2838240137396%29.jpg
    %80%93_Patriot_Museum%2C_Kubinka_%2838240137396%29.jpg
    3.2 KB · Views: 0
Thread owner
Simon. Thanks for all your help I corrected the side plates but I would have been better off to just made new ones. Thanks for the tip how to make the bolt heads I have a piece of rod I think will work. I would buy the trumpeter kit before I would spend the money to deal with this nightmare but I would like to try to finish it. Thanks again
 
Thread owner
Today I finished up putting on the tracks and re-worked the front area also made some new bolts for the sides. I will try to cone shape these when they’re fully set up but no promises
23085A2C-BB27-481C-BCBB-CDC6A75E1608.jpegB57E9541-F050-4131-963F-1794A015D32D.jpeg5CF3A3DE-3260-4DFD-B5D3-B4C135DBE921.jpegF5953B0F-8E96-4399-A9C9-A9FC6723499B.jpeg17D7884A-BAAC-43CC-A124-85ED4D8DD49B.jpeg
 
Lee - rather you than me trying to shape the bolts once in place :surprised:

Good luck
 
I had much the same thought … I had to scroll back up and re-read your advice to make sure I wasn’t missing something about how to make them conical while they’re already on the model :)
 
Thread owner
I Doubt if I try shape these in a cone it was all I could do to cut and glue them in place with the severe Arthritis in my hands I will clean them up the best I can and call it a day
 
Thread owner
Simon. Been battling it for years the last two years my hands are getting worse that’s why I would like to try to wrap up all my 1/72 scale builds I want to get done and move to a bigger scale like 1/48
 
Thread owner
Think I’m going to call it a day on this guy. I even up the bolts and added the small crane.

1FBA77A4-A9F6-49CB-B107-237CCD1BD55B.jpegEDA37F8D-B983-4E6C-A69F-24183AF0F4B1.jpeg621702BA-BA34-4AA4-95C7-2297020AD342.jpeg
 
Back
Top