Theme editor

Scale Model Shop

Making a 1/35 scale diorama

Status
Not open for further replies.
Thread owner
O.K. In this instalment I will concentrate on the pillbox.

I have removed the bridge rail as I kept knocking the bl***y thing off!

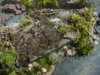
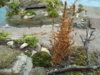
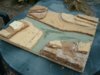
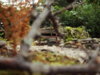
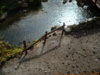
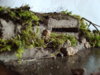
First off we go into the garden and gather some suitable materials...Various mosses and scale 'dead trees' (twigs to you and me)

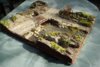
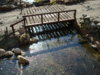
Place the moss on the pill box until you are happy with the position then a dab of neat P.V.A. and gently press the moss into it. Believe it or not the stuff continues to grow!!

Now add your dead trees as you see fit. (photos 1/2 shows this stage done) You can always add stuff later should you choose.

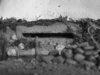
Now to the rear of the structure.

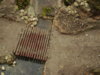
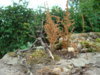
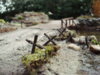
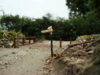
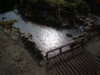
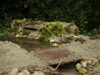
A bit more veg. and sticks and fit the door. Now have fun with 'extras' I have added some cut logs and a couple of ammo crates for starters. (Photo 3.)

Round to the front.

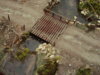
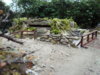
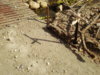
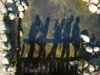
Make up some scale barbed wire. For this I use multi core wire from almost any domestic electric appliance. Split open the cable and select a piece of wire about 9" long, wrap it around a pencil and hold it for a while until it holds it's shape then dip it in black paint ( I use water based shed paint as it is the right thickness for this job. Photo 4) allow to dry then just drape it around the pillbox where you like.

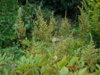
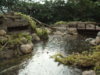
Add a bit more greenery,rocks and debris and thats the P.B. done for a while. Photos 5,6,7 show this stage but later you will want to have a look and see if you can improve it.

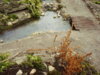
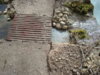
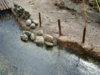
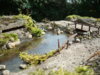
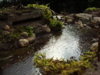
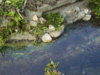
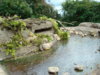
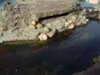
Before I added the vegetation I gave the stream another lick...see how the water is starting to get a bit of depth now.

Next time I will be adding more greenery to the diorama in general and adding inspirational bits and pieces to improve the overall effect.

I hope you can stay with it as it is nearly complete now!!

Ron.

View attachment 19467

View attachment 19468

View attachment 19469

View attachment 19470

View attachment 19471

View attachment 19472

View attachment 19473

View attachment 19474

View attachment 19475

View attachment 131993

View attachment 131994

View attachment 131995

View attachment 131996

View attachment 131997

View attachment 131998

View attachment 131999

View attachment 132000

View attachment 132001
 

Attachments

  • diorama 049.jpg
    diorama 049.jpg
    3.4 KB · Views: 0
  • diorama 064.jpg
    diorama 064.jpg
    3.1 KB · Views: 0
  • diorama 069.jpg
    diorama 069.jpg
    3.6 KB · Views: 0
  • diorama 080.jpg
    diorama 080.jpg
    2 KB · Views: 0
  • diorama 087.jpg
    diorama 087.jpg
    3.3 KB · Views: 0
  • diorama 102.jpg
    diorama 102.jpg
    3.5 KB · Views: 0
  • diorama 089.jpg
    diorama 089.jpg
    2.4 KB · Views: 0
  • diorama 040.jpg
    diorama 040.jpg
    2.6 KB · Views: 0
  • diorama 044.jpg
    diorama 044.jpg
    3.4 KB · Views: 0
Thread owner
\ said:
Loving it Ron what vehicles are you putting into it mate?Andy
I've been having so much fun with this build Andy, that I havn't given much thought to the vehicle side of things, but I can feel that lil' ol' Tiger Tank urge coming on...Who knows?

That was some quick reply to this instalment mate. I had only just posted it and you replied!!!!!!!!!!

Ron
 
\ said:
I've been having so much fun with this build Andy, that I havn't given much thought to the vehicle side of things, but I can feel that lil' ol' Tiger Tank urge coming on...Who knows?That was some quick reply to this instalment mate. I had only just posted it and you replied!!!!!!!!!!

Ron
I know mate, i was patiently waiting for you to get rid of the marigolds lol
 
its coming on now ron, the stream looks brilliant,liking the barbed wire too! maybe we could start a thread listing all the unorthodox materials useful for modellers ie your electrical wire for barbed wire.i know i use loads of stuff that people would never expect to be used for a model. ill have a look and see if we can do one that people can keep adding to,im sure it would be useful for everyone.:thinking:cheers tony
 
Thread owner
\ said:
its coming on now ron, the stream looks brilliant,liking the barbed wire too! maybe we could start a thread listing all the unorthodox materials useful for modellers ie your electrical wire for barbed wire.i know i use loads of stuff that people would never expect to be used for a model. ill have a look and see if we can do one that people can keep adding to,im sure it would be useful for everyone.:thinking:cheers tony
Good idea Tony. As you may have gathered from reading my guff, I'm the worlds worst when it comes to buying things for my models, prefering to adapt whwt I have lying around.

I am sure there are like minded people out there.....Being a cheap skate I could fill at least three pages alone!!!!!!!

Ron
 
Thread owner
This is the penultimate instalment of this build and is to do with adding detail such as trees, more greenery and bits and bobs.

Photo 1 shows the completed rear of the pill box. I have added more logs, some jerry cans and a pee bucket!

Photo 2 is a top view of the finished P.G.

In photos 3/4 I have added the vegetation (moss), fallen trees (twigs from the garden) some more rubble(from the garden path) and scratched some track marks on the road, the jury is out on this last bit...

In the next picture I have glued in some fence posts made from matches and painted with shed paint.

The next four pictures show the 'trees' in position plus more moss and 'twigs' The first is a good example of four different kinds of moss I have used. The next is the same group from another angle. Yes, I know they are brown but it is autumn and in any case the wife won't let me snip new stuff yet, but I have a cunning plan!!!

The third shows the actual plant where I get my 'trees' from. It's called an Astilbe and it always produces an abundance of miniture conifer type trees of various sizes.

The last is just a general shot. Where is the wall? I have got sequence of shots a bit out, sorry.

Now is the time to sit back, have a beer and think how you can improve or add to your diorama.

In my last instalment I am sure to come up with something so I will include them in the final batch of photos in a few days time. Once again thank you for followng this build so far.

Ron

View attachment 19542

View attachment 19543

View attachment 19544

View attachment 19545

View attachment 19546

View attachment 19547

View attachment 19548

View attachment 19549

View attachment 19550

View attachment 132068

View attachment 132069

View attachment 132070

View attachment 132071

View attachment 132072

View attachment 132073

View attachment 132074

View attachment 132075

View attachment 132076
 

Attachments

  • diorama 073.jpg
    diorama 073.jpg
    3.3 KB · Views: 0
  • diorama 095.jpg
    diorama 095.jpg
    3.7 KB · Views: 0
  • diorama 103.jpg
    diorama 103.jpg
    3.7 KB · Views: 0
  • diorama 101.jpg
    diorama 101.jpg
    3.1 KB · Views: 0
  • diorama 066.jpg
    diorama 066.jpg
    2.8 KB · Views: 0
  • diorama 096.jpg
    diorama 096.jpg
    3 KB · Views: 0
  • diorama 105.jpg
    diorama 105.jpg
    3.5 KB · Views: 0
  • diorama 106.jpg
    diorama 106.jpg
    3.8 KB · Views: 0
  • diorama 107.jpg
    diorama 107.jpg
    3.6 KB · Views: 0
Thats really cool Ron, where do you put these things when you have built them?

Andy
 
Thread owner
\ said:
Thats really cool Ron, where do you put these things when you have built them?Andy
Nice to see you are still hanging on in there, Andy.

Sometimes I take some pictures then I cannibalize them for future dioramas.

If I really like the end result they go on my 'big' shelf in the shed!!

To get a bit of beer money I have considered trying to flog them but postage would be a big problem, so in the shed they will probably stay until the day comes when my sons can have the pleasure of sorting them out!!

Ron
 
Thread owner
\ said:
Fantastic Ron :music_tooCan i ask, what have you used for the river please?

John.
Thanks for the words of encouragement, John.

The river effect is mentioned in the earlier stages, but briefly I used different colours of shed paint stippled on. Then as many coats of varnish as you like....With this diorama every time I pass it I give it a quick coat. It only take a few seconds. The more you give it the deeper the water seems to look.

It's fool proof and works every time.

Hope this helps you.

By the way I am STILL trying for the perfect grass (what a sad person I am!)

Ron :ranting2:
 
Thread owner
This is the last instalment of this build. I hope you have enjoyed following it and have picked up a few tips and advise along the way.

After a beer and seeing if I could add a bit more 'life' to the diorama I have added...

A sign post made with matches.

More barbed wire on moveable cross pieces, again with matches.

A final coat of varnish.

A broken fence rail complete with split, out of balsa scrap and a few bits and bobs.

I was not happy with the road so I sprinkled some more rubble on it then dragged my finger along, this action moved the stuff to the edges and middle. This made the road look 'used'

I hope you like the last set of pickies.

Still thinking about armour for it, maybe soon.

Ron

View attachment 19585

View attachment 19586

View attachment 19587

View attachment 19588

View attachment 19589

View attachment 19590

View attachment 19591

View attachment 19592

View attachment 19593

View attachment 19594

View attachment 132111

View attachment 132112

View attachment 132113

View attachment 132114

View attachment 132115

View attachment 132116

View attachment 132117

View attachment 132118

View attachment 132119

View attachment 132120
 

Attachments

  • fin. dio.sept 2009 101.jpg
    fin. dio.sept 2009 101.jpg
    3.4 KB · Views: 0
  • fin. dio.sept 2009 094.jpg
    fin. dio.sept 2009 094.jpg
    3.1 KB · Views: 0
  • fin. dio.sept 2009 085.jpg
    fin. dio.sept 2009 085.jpg
    3.7 KB · Views: 0
  • fin. dio.sept 2009 064.jpg
    fin. dio.sept 2009 064.jpg
    3.2 KB · Views: 0
  • fin. dio.sept 2009 071.jpg
    fin. dio.sept 2009 071.jpg
    3 KB · Views: 0
  • diorama 005.jpg
    diorama 005.jpg
    2.8 KB · Views: 0
  • fin. dio.sept 2009 104.jpg
    fin. dio.sept 2009 104.jpg
    2.8 KB · Views: 0
  • fin. dio.sept 2009 051.jpg
    fin. dio.sept 2009 051.jpg
    3.3 KB · Views: 0
  • fin. dio.sept 2009 054.jpg
    fin. dio.sept 2009 054.jpg
    2.9 KB · Views: 0
  • fin. dio.sept 2009 038.jpg
    fin. dio.sept 2009 038.jpg
    3.4 KB · Views: 0
Unbelievable work mate. You have made a fantastic job of this one. The water effect is stunning.

Well done

Andy
 
Hi Ron I've have to echo Andy mate this is superb, and to see it built from the base up is cool this has inspired me to get my finger out and start the dio i've been planning for months, an excellent job well done and keep up the good work.

scott
 
Thread owner
\ said:
This is the last instalment of this build. I hope you have enjoyed following it and have picked up a few tips and advise along the way.After a beer and seeing if I could add a bit more 'life' to the diorama I have added...

A sign post made with matches.

More barbed wire on moveable cross pieces, again with matches.

A final coat of varnish.

A broken fence rail complete with split, out of balsa scrap and a few bits and bobs.

I was not happy with the road so I sprinkled some more rubble on it then dragged my finger along, this action moved the stuff to the edges and middle. This made the road look 'used'

I hope you like the last set of pickies.

The sun came out briefly yesterday and I couldn't resist a 'play'!

This set of photos is just for fun, but turned out to be a nice study of shade and shadows.

I hope you don't mind the slight deviation from the actual build!

I now have a clear idea for some activity for the diorama....

Guess who's coming for tea !!!?

Ron
View attachment 19595

View attachment 19596

View attachment 19597

View attachment 19598

View attachment 19599

View attachment 19600

View attachment 19601

View attachment 19602

View attachment 19603

View attachment 132121

View attachment 132122

View attachment 132123

View attachment 132124

View attachment 132125

View attachment 132126

View attachment 132127

View attachment 132128

View attachment 132129
 

Attachments

  • fin. dio.sept 2009 040.jpg
    fin. dio.sept 2009 040.jpg
    3.1 KB · Views: 0
  • fin. dio.sept 2009 033.jpg
    fin. dio.sept 2009 033.jpg
    3.4 KB · Views: 0
  • fin. dio.sept 2009 064.jpg
    fin. dio.sept 2009 064.jpg
    3.2 KB · Views: 0
  • fin. dio.sept 2009 080.jpg
    fin. dio.sept 2009 080.jpg
    2.4 KB · Views: 0
  • fin. dio.sept 2009 089.jpg
    fin. dio.sept 2009 089.jpg
    3.4 KB · Views: 0
  • fin. dio.sept 2009 094.jpg
    fin. dio.sept 2009 094.jpg
    3.1 KB · Views: 0
  • fin. dio.sept 2009 083.jpg
    fin. dio.sept 2009 083.jpg
    2.9 KB · Views: 0
  • fin. dio.sept 2009 108.jpg
    fin. dio.sept 2009 108.jpg
    3.5 KB · Views: 0
  • fin. dio.sept 2009 114.jpg
    fin. dio.sept 2009 114.jpg
    3.6 KB · Views: 0
Absolutely stunning work. I'm not sure I'd welcome your tea-time visitors though!

Do you reckon that those guys would consider that bridge to be OK for something small - say a Kubelwagen or Kettenkrad? What would happen if it wasn't?

Gern
 
Thread owner
\ said:
Absolutely stunning work. I'm not sure I'd welcome your tea-time visitors though!Do you reckon that those guys would consider that bridge to be OK for something small - say a Kubelwagen or Kettenkrad? What would happen if it wasn't?

Gern
Thanks for the knd words, much appreciated. That's a good point you have made. However, when they invaded France, the German High Command issued a directive that all strategic bridges where to be guarded AND strengthened to allow the passage of armour.

Ow's about that for :thinking: on your feet, eh, Gern?!!! lol

Ron
 
Thread owner
\ said:
Absolutely stunning work. I'm not sure I'd welcome your tea-time visitors though!Do you reckon that those guys would consider that bridge to be OK for something small - say a Kubelwagen or Kettenkrad? What would happen if it wasn't?

Gern
Thank you for the comment, much appreciated. That's a good point you have made. However, after they invaded France, the German High Command issued a directive that all strategic bridges were to be guarded AND strengthend to allow the passage of armour.

Ow's about that for :thinking: on your feet, Gern?!!! lol

Just noticed I've duplicated a couple of photos, oops!

Ron
 
Ooops!

Sorry Ron.

I should have noticed that this must be a strategic bridge. Why else would it be guarded by a pillbox!

Silly me! I shall go and hide my head in shame 'til I get over the embarrassment of such a simple error :shoot:

Gern
 
looks fantastic now its done ,ron.brilliant camera work too! i cant wait to see it with the armour +figures in it,hope we get another sunny day to take the photos! cheers tony:bravo:
 
Status
Not open for further replies.
Back
Top