Theme editor

Scale Model Shop

Making a miniature wood-frame aircraft fuselage 100mm long. Suggestions please???

MrDatsun

New member
Joined
Jul 9, 2026
Messages
7
Reaction score
4
Points
3
First Name
Simon
Location
Londres
1/3
Thread owner
Hi. My first time posting here. Please bear with me. Hope this is the right forum to ask/

I'm trying to make a scale dirigible from the early 20th C. I have made the balloon, but am having immense trouble with the fuselage due to the tiny scale. I dont know the precise scale but imagine the inflatable part os 150mm long and the fuselage is 100mm long.

I'm working with stretched plastic sprues. These are approx. 0.5mm thick. Maybe a touch less.

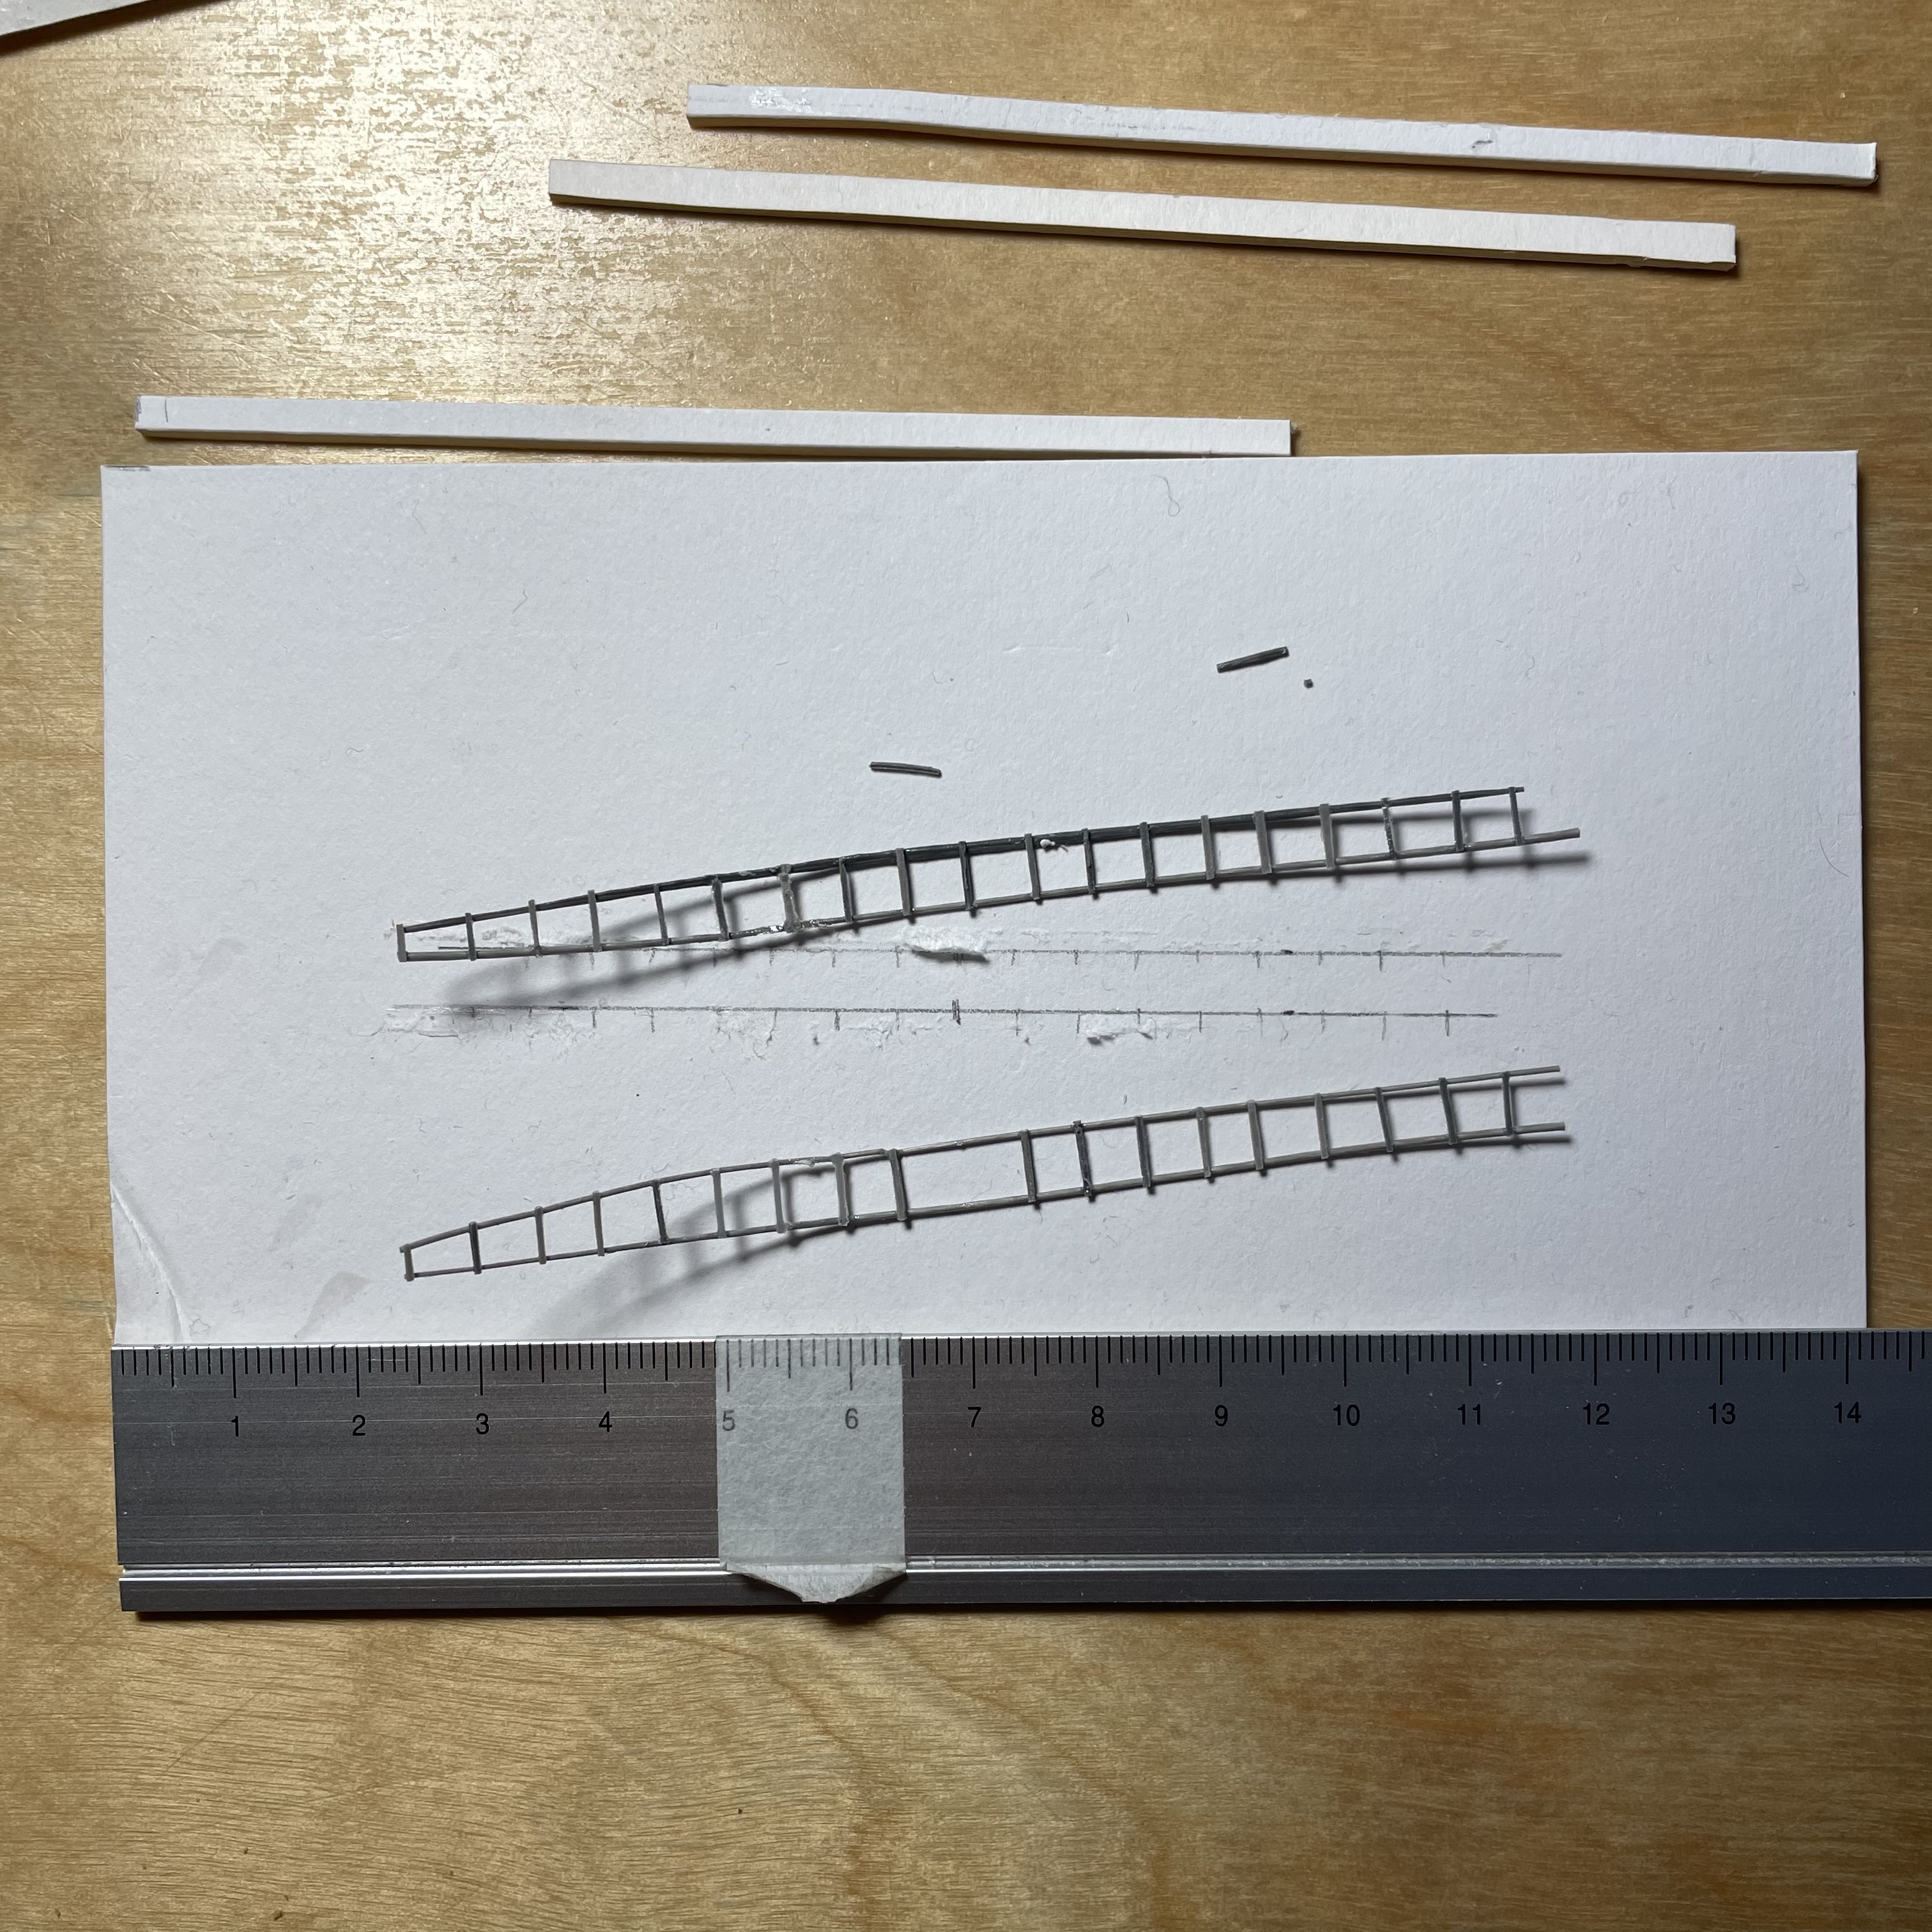
So far – I tape/bluetack the length-wise sprues down on a sheet of glass over a paper plan. I then lay the verticals along and underneath the length and glue them with spots of Tamiya thin cement. Then trim them. One made for each side of the fuselage.

Then I need to put the two sides together and glue sprues across the two sides all along their lengths. This is where it goes wrong. There is no strength. The size of the model means the sides might not match perfectly making it hard to mount them upright held down or held together with card strip rigs during manufacture.

The whole thing is very fiddly. Accuracy and consistency is a problem. And the structure warps, is delicate and everything prone to fall apart.

My process is driving me nuts – and I wonder whether anyone here has some ideas how to approach this project? I'm open to a completely new materials and approach.

050414-F-1234P-031.JPG


IMG-9277.jpg
 
Using very small dabs of CA rather than TET may hold things together better and give the whole thing more strength?

I've found TET not to be that good/strong if the contact point is very small.....
 
Thread owner
Using very small dabs of CA rather than TET may hold things together better and give the whole thing more strength?

I've found TET not to be that good/strong if the contact point is very small.....
Oh. Sound interesting. CA?

And yes it does fall apart – or the cement actually melts holes in the struts.

EDIT. Ah 'Superglue' ?
 
Oh. Sound interesting. CA?
Superglue (CyanoAcrylate), you can get thin CA, medium and thick, so different types and some set immediately, some give you 30 secs to move things and some give even longer 1min, etc, so theres lots of different types out there. I tend to use a medium thick CA which gives about 30 secs to move things, then sets hard. Cheers

NB: for very small stuff like yours I'd use a cocktail stick or some other very thin implement to apply the small dabs of glue.
 
Working with stretched plastic sprues can present numerous problems as when you stretch the sprue it will still retain the original shape, the sprue during a long stretch will often start cooling along its length resulting in thicker parts of the sprue..

I see you have a rudimentary drawing consisting of length and cross members. And trying to glue on this is going to mean even more problems.

I am going to take it that you are in the UK, so your best shot is to obtain some plastic rod, this can either be square or round and come in lengths over 100mm, with a thickness below 1mm, or if you prefer over 1mm either square or round.
I obtain my rod from a company called EMA Model Supplies in the UK. I have no association with them apart from being a satisfied customer.
Next your drawing, get some clear cellephane either a kit sprue bag or even 'cling film' as used in cooking, tape your drawing down and then tape the clear film over the top of that. This will then give you the base to tape your rod to the clear film, then cement your cross members to the rod using either liquid cement or c/a. And build up yout frame this way, and once dry you can remove the clear film with the frame on and lay another sheet of clear over your drawing again and repeat untill you have all four sides constructed.
I first used this method when scratchbuilding an SBG bridge to go with the newly released Tamiya Churchill in 1980, and still use it today.. HTH.
 
Thread owner
Working with stretched plastic sprues can present numerous problems as when you stretch the sprue it will still retain the original shape, the sprue during a long stretch will often start cooling along its length resulting in thicker parts of the sprue..

I see you have a rudimentary drawing consisting of length and cross members. And trying to glue on this is going to mean even more problems.

I am going to take it that you are in the UK, so your best shot is to obtain some plastic rod, this can either be square or round and come in lengths over 100mm, with a thickness below 1mm, or if you prefer over 1mm either square or round.
I obtain my rod from a company called EMA Model Supplies in the UK. I have no association with them apart from being a satisfied customer.
Next your drawing, get some clear cellephane either a kit sprue bag or even 'cling film' as used in cooking, tape your drawing down and then tape the clear film over the top of that. This will then give you the base to tape your rod to the clear film, then cement your cross members to the rod using either liquid cement or c/a. And build up yout frame this way, and once dry you can remove the clear film with the frame on and lay another sheet of clear over your drawing again and repeat untill you have all four sides constructed.
I first used this method when scratchbuilding an SBG bridge to go with the newly released Tamiya Churchill in 1980, and still use it today.. HTH.
You're right. I do have some rod. It's .020". I could not get square at the time, perhaps EMA will have it.

My photo is misleading. As it's the one I started trying mount the ready-made sides vertically on.

As you say – I used cellophane and then later sheet glass over my plan to glue together and get what you can see (the two sides). It's a good way.

Combining the two sides remain a stragetic problem though.
 
Thread owner
Working with stretched plastic sprues can present numerous problems as when you stretch the sprue it will still retain the original shape, the sprue during a long stretch will often start cooling along its length resulting in thicker parts of the sprue..

I see you have a rudimentary drawing consisting of length and cross members. And trying to glue on this is going to mean even more problems.

I am going to take it that you are in the UK, so your best shot is to obtain some plastic rod, this can either be square or round and come in lengths over 100mm, with a thickness below 1mm, or if you prefer over 1mm either square or round.
I obtain my rod from a company called EMA Model Supplies in the UK. I have no association with them apart from being a satisfied customer.
Next your drawing, get some clear cellephane either a kit sprue bag or even 'cling film' as used in cooking, tape your drawing down and then tape the clear film over the top of that. This will then give you the base to tape your rod to the clear film, then cement your cross members to the rod using either liquid cement or c/a. And build up yout frame this way, and once dry you can remove the clear film with the frame on and lay another sheet of clear over your drawing again and repeat untill you have all four sides constructed.
I first used this method when scratchbuilding an SBG bridge to go with the newly released Tamiya Churchill in 1980, and still use it today.. HTH.
I found the square rod at 0.5mm and 0.3mm at your supplier. I'm not sure why I stopped using the rod I had after my prototype. Perhaps as what I could find was just too thick. But the 0.5mm should match perfectly.

Also as you suggest the fact that this material will actually lie straight will be a huge advantage.

Thank-you for the suggestion.

Thr SBG bridge sounds like it was good project

Here's the prototype I made a while back with AK Styrene 1mm square rod. It looks crude, but perhaps with the thinner square polystyrene rod and my improving technique, it will get better.

IMG-9279.jpg
 
Last edited:
Is this to go inside the balloon where it won't be seen? If so, why not make a box using sheet polystyrene. This would be much stronger and easier to make. You could continue to use strip to make the tapered ends and the ends of your central box section would give you a solid base for the triangles.

I don't know what size your central section is, but it may even be possible to buy square section styrene tube which would only need to be cut to the correct length.

If you need the framework to show through the skin of your balloon, make the central box slightly too small and add ribs using thin strips of styrene.
 
Is this to go inside the balloon where it won't be seen? If so, why not make a box using sheet polystyrene. This would be much stronger and easier to make. You could continue to use strip to make the tapered ends and the ends of your central box section would give you a solid base for the triangles.
I don't know what size your central section is, but it may even be possible to buy square section styrene tube which would only need to be cut to the correct length.
If you need the framework to show through the skin of your balloon, make the central box slightly too small and add ribs using thin strips of styrene.
See post #1, its on the outside, underneath the balloon.... Cheers
 
Thread owner
Is this to go inside the balloon where it won't be seen? If so, why not make a box using sheet polystyrene. This would be much stronger and easier to make. You could continue to use strip to make the tapered ends and the ends of your central box section would give you a solid base for the triangles.

I don't know what size your central section is, but it may even be possible to buy square section styrene tube which would only need to be cut to the correct length.

If you need the framework to show through the skin of your balloon, make the central box slightly too small and add ribs using thin strips of styrene.
Good suggestions, but it’s the fuselage hanging underneath the balloon .
 
Back
Top