Theme editor

Scale Model Shop

MENG - T90A (This is going to take a while.....)

Status
Not open for further replies.
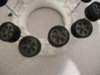
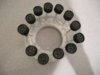
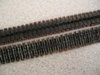
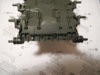
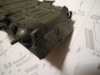
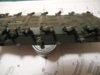
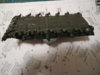
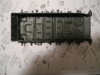
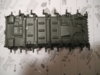
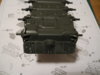
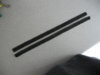
I agree with the magic tracks, i used to wonder why anyone would use the "workable" ones, when i used them they never quite fit and because you have to force them together they break and end up bent and not straight. (my experience) Magic tracks tho! when i got them i was slightly bothered because there were 5 sprues with f-loads of bits to cut off and trim and then glue and i thought nah... this is going to end badly. But i have to say out of all 3 types iv used i have to say magic tracks are by far the most enjoyable and the best to work with. And the most detailed. They sag, they hold together, they can be as long as you want, they are straight... they are just great. Plus i built the model first, started painting parts that needed painting before gluing then when those were drying i worked on the tracks.


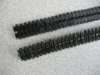
Sprue at a time, cut them off, clean them up, line them up, glue a line of 10 bottom parts and then just drop the tops of them on and end up with a nice line of track, done them in groups of 10 so i could let them dry without touching them and once all that was done i joined 10 groups of 10 :)


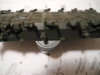
Quite relaxing! Cant wait to see a pic once they are finished.

\ said:
I always use water based acrylics {craft crap} mix my own colors , so easy to work with and cheaper than dirt. Holds right to un-primed plastic and never leaves a sticky - shiny surface always a nice flat finish. Great for washes and highlighting too. Oils and thinners? Yuck:oops:........................Jim;)View attachment 129703
I think ill need to invest in acrylics lol :) or just a black one for unprimed plastic and tracks ect. Can you just brush them on or are they too thin that they need airbrushed?
 
Woo! looks good! Bet you your next build has rubber tracks and ull wish they looked as good as the magic ones :)


Keep it up!
 
Thread owner
I attacked the tracks with some matt black............. Dry brushed some "Steel" on the highpoints and applied a little rust...... They'll get a bit more treatment once they are on.....


View attachment 118371


The wheels are assembled and the tyres on the "roadwheels" have a couple of coats of "Nato Black" on them...... The wheels will get paint a bit later when I start painting the hull and topsides ........ Meng thoughtfully provide a mask for painting the wheels .......... The tyres have a fine tread pattern (a bit difficult to see in the photos) and the seam running around the middle of each tyre is part of it. I've not been negligent in the cleaning up :rolleyes:


View attachment 118371

View attachment 118372

View attachment 118373


..............and I've started work on the hull and some of the components that go on it......... But tonight I'm too knackered to do much......... Been a togh day at work.:confused:

View attachment 231394

View attachment 231395

View attachment 231396
 

Attachments

  • DSCN2008.JPG
    DSCN2008.JPG
    2.4 KB · Views: 0
  • DSCN2006.JPG
    DSCN2006.JPG
    2.3 KB · Views: 0
  • DSCN2013.JPG
    DSCN2013.JPG
    2.7 KB · Views: 0
Looking good know how you feel same with my kits at the moment to cream crackered when I finish work..look forward to seeing more
 
Thread owner
Thanks John......... Normally I can put in an hour or so. But tonight I was just looking at it........... and all I really achieved was cutting a few bits off the sprue and then really couldn't be arsed to clean them up........ So they are in a takeaway container ready for tomorrow........ Hopefully. :)
 
Thread owner
The Hull is finished. Suspension is all in and everything moves as it should :D ......... It can get a coat of primer tomorrow.


I'm rather hoping that I can build the complete top deck with side skirts and slot it onto the hull .......... That isn't how the destructions show it but it'd mean I can finish & detail the hull, fit the tracks and not have to worry over masking for the camo when I do it............... At the moment, I can't see any reason why I cant do it that way........ But, maybe someone who has already built this kit will tell me that is a bad idea.


View attachment 118782

View attachment 118783

View attachment 118784

View attachment 118785

View attachment 118786

View attachment 118787

View attachment 118788

View attachment 118789

View attachment 118790

View attachment 118791

View attachment 118792


View attachment 231804

View attachment 231805

View attachment 231806

View attachment 231807

View attachment 231808

View attachment 231809

View attachment 231810

View attachment 231811

View attachment 231812

View attachment 231813

View attachment 231814
 

Attachments

  • DSCN2024.JPG
    DSCN2024.JPG
    2.5 KB · Views: 0
  • DSCN2023.JPG
    DSCN2023.JPG
    2.4 KB · Views: 0
  • DSCN2022.JPG
    DSCN2022.JPG
    2.4 KB · Views: 0
  • DSCN2021.JPG
    DSCN2021.JPG
    2.3 KB · Views: 0
  • DSCN2020.JPG
    DSCN2020.JPG
    2.4 KB · Views: 0
  • DSCN2019.JPG
    DSCN2019.JPG
    2.5 KB · Views: 0
  • DSCN2018.JPG
    DSCN2018.JPG
    2.5 KB · Views: 0
  • DSCN2017.JPG
    DSCN2017.JPG
    2.5 KB · Views: 0
  • DSCN2016.JPG
    DSCN2016.JPG
    2.4 KB · Views: 0
  • DSCN2015.JPG
    DSCN2015.JPG
    2.6 KB · Views: 0
  • DSCN2025.JPG
    DSCN2025.JPG
    2.4 KB · Views: 0
Looks good Peter! And a Poundshop primer man! Excellent choice :)


However, do not fit the upper hull & side skirts before fitting the hull. I did that with a Bronco T-99 & it was impossible to thread the tracks through the gap.


That's why the T-99 is hiding in a box in the cupboard of doom!
 
\ said:
Thanks guys for your support........ It's much appreciated.
I've finally finished the marathon track build........ Two tracks, each one is 81 links long. I must confess, I'm glad that is behind me. :D


View attachment 129734 View attachment 129735
Nice job on the tracks Peter, you have a lot more patience than me I think I would have binned them LOL.. :D


John.
 
Status
Not open for further replies.
Back
Top