Theme editor

Scale Model Shop

Merkava MkIV

Mickc1440

Active member
SMF Supporters
Joined
Apr 27, 2018
Messages
4,876
Reaction score
148
Points
63
Age
63
1/3
Thread owner
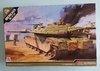
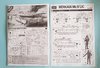
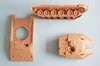
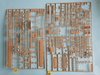
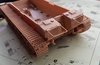
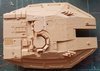
This will be the next project to return to the desk. Originally started on the other site as build it or bin it, its now seen the light of day again. I bought it as part of a set from a chap on an auction site, he had started it and it was in a bit of a mess. Parts in the wrong place, badly fitted and not cleaned up. The overwhelming opinion was to go with it and it was saved. It took a lot of work to get it to its current state and I've also invested in some additional PE. Its my first ever IDF build so a whole change of country for me so here goes.
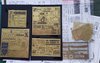
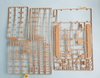
View attachment 320603View attachment 320604View attachment 320611View attachment 320609View attachment 320610View attachment 320606
 

Attachments

  • 1.jpg
    1.jpg
    3.1 KB · Views: 0
  • 2.jpg
    2.jpg
    2.7 KB · Views: 0
  • 5.jpg
    5.jpg
    2.2 KB · Views: 0
  • 7.jpg
    7.jpg
    3 KB · Views: 0
  • 8.jpg
    8.jpg
    2.8 KB · Views: 0
  • 6.jpg
    6.jpg
    2.7 KB · Views: 0
Thread owner
Welcome along Colin. I've seen several builds and really like the shape of this tank. Having seen how complex some of the PE is it definitely won't be a fast build (but then none of mine are) It has since been opined in the stash by a Mk II
 
Substantial amount of etch there Mick - should be fun

The ball and chain armour also looks like it will be a challenge - if I'm reading this right it looks like you have to shave hemispheres off the sprue

Should look great if it all comes together :thumb2:

I have a few Merkava in the stash - Mk1, 2 and either a 3 or 4 all in 35th and a few 3's and 4's in 72nd
Really should build one or two at some point :smiling4:
 
Hi Mick good luck with rebuilding her, I think you need more PE though :smiling3:. I sometimes think it more satisfying rebuilding/saving a kit or is that just me.
Pete.
 
Morning Mick.
I'll join Simon, he can explain the PE ! Looks a frightening amount to me. Good luck.
John .
 
Hi Mick good luck with rebuilding her, I think you need more PE though :smiling3:. I sometimes think it more satisfying rebuilding/saving a kit or is that just me.
Pete.

Pete you just like PE and a challenge.:smiling2:
John.
 
WOW! What a kit Mick!! Looks like you have quite a challenge ahead of you. I wish you all the best with it. I am a big fan of IDF so I will be watching on avidly. Will you be doing one of your legendary dios or just on a base??
 
Thread owner
Thanks gents, the balls for the armour are moulded to the frame but I've bought some tiny beads to try and use instead. As for its final base??? we shall see.
 
Mick,
Good to see this is still in your collection, loads of brass to go with it, gallons of c/a, great stuff.
You can buy the ball and chain set for this or the Mk.III it fits either with a little work. Are you going for non slip or leaving it as is?
Got the chair out and will watch with great interest.
Cheers, Mike.
 
Remember you getting this Mick so interested to watch you make it look pretty with all the Shiny stuff!
Good luck, and may the force be with you? :tongue-out3:
 
Hi Mick
Looks a nice kit. I am sure you will rescue it. All that PE will slow down progress but will certainly raise this to another level.
Jim
 
Thread owner
Many thanks for joining the watchers. I have a plan for the ball and chains and no additional anti slip on this one. To go forward I’ve had to go back again. The rear baskets were taken apart ready for the PE but found there were more parts missing, they aren’t in the box so no idea what happened to them. They were only supports so I’ve made them out of plastic rod. The frames have been re attached now.
View attachment 321115
 

Attachments

  • 41459687-AB6A-46EE-B7D1-6CD5A30EA6EC.jpeg
    41459687-AB6A-46EE-B7D1-6CD5A30EA6EC.jpeg
    2.7 KB · Views: 0
Thread owner
Time to focus, spent to much time building up PE only to find several bits weren’t required. Working my usual way now step by step and referring to the PE instructions as I go. Due to more missing bits and poor assembly I’m building this one buttoned up. Had to chop the commanders hatch into its constituent parts then re build. Added the lifting rings and the hatch. Upward and onward.
View attachment 325219
 

Attachments

  • 17AA7FBE-E4A5-4EEA-8077-369606A644F5.jpeg
    17AA7FBE-E4A5-4EEA-8077-369606A644F5.jpeg
    2.9 KB · Views: 0
Hi Mick glad to see you are sticking with it, it's coming together slowly but surely.
Keep with it mate.
Pete.
 
this is going to be very interesting... grabbing a chair.... :smiling::smiling::smiling:
 
Back
Top