Thanks Joe. Your comments are very much appreciated.\ said:Great work so far Peter. Looks like you got the hang of that PE work, very nicely done.

You are using an out of date browser. It may not display this or other websites correctly.
You should upgrade or use an alternative browser.
You should upgrade or use an alternative browser.
Mig 21 PF - 1.48 (Eduard Profilpack)
- Thread starter takeslousyphotos
- Start date
- Status
- Not open for further replies.
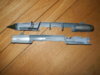
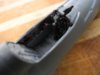
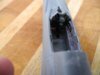
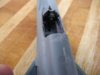
The various assemblies are now in the fuselage half ............... I've dry fitted the two halves together and they are a good tight fit. The seams seem to align perfectly so I don't think we are going to be filling much if any......... Alve already painted the nose and applied the decal, two coats of matt. As that would be impossible to paint once the fuselage is together....... I have a card tube that'll slide over it to mask it when I prime and paint............ Now I know there is plenty of room for a nose weight I can do that then button it up.
View attachment 116232
View attachment 116233
View attachment 116234
View attachment 116235
View attachment 229255
View attachment 229256
View attachment 229257
View attachment 229258
View attachment 116232
View attachment 116233
View attachment 116234
View attachment 116235
View attachment 229255
View attachment 229256
View attachment 229257
View attachment 229258
Attachments
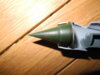
ooh, good idea on the cone - wait, I use a brush! Still, better to paint the cone and put the decal on before fitting... You can put the weight in the cone too by the looks of it.
That cockpit is looking excellent and after spending what seems like the last 6 weekends doing anything but models, it's football season kick-off and I am going to embed myself in the man-cave - my wife is going to need a large pry bar to get me out of it Grrr - well so long as she doesn't see this
That cockpit is looking excellent and after spending what seems like the last 6 weekends doing anything but models, it's football season kick-off and I am going to embed myself in the man-cave - my wife is going to need a large pry bar to get me out of it Grrr - well so long as she doesn't see this
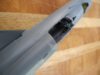
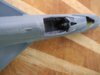
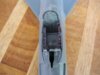
Is that it, all that moaning for 3 bits of plastic\ said:1st stage of the cockpit is done. Not much to it.............. The PE for the instruments behaved itself, so I'm quite happy with the result............... The side instrument/control panels are the next assembly and fit into the fuselage sides rather than the cockpit floor. ........ If I could take a decent photo I'd be even happier.
")
 and a bit of black paint. Seriously its looking good chap, crack on - watching this one
You are forgiven.\ said:...... And i posted my post and then the other photos popped up
Thanks Joe ....... It's the only way I could see to do it.\ said:Great looking work Peter. Good idea using a tube over the nose cone.
G
Guest
Guest
I like the stenciling on the green nose cone. A nice but subtle contrast between the red and dark green. Nice work there. I would like to see how the fuselage goes together and how much of the pit can be seen in the end.
Just an odd thought - can you pack the actual hollow of the nose cone with the weight powder stuff and leave it? technically, you will need less weight if you go more forward, which is what the nose cone is-the most forward part of the aircraft
John
Just an odd thought - can you pack the actual hollow of the nose cone with the weight powder stuff and leave it? technically, you will need less weight if you go more forward, which is what the nose cone is-the most forward part of the aircraft
John
I use a brush as well Neil, but there will be a sprayed primer coat, and sealing coat out of a can.......... Thanks for the comments.\ said:ooh, good idea on the cone - wait, I use a brush! Still, better to paint the cone and put the decal on before fitting... You can put the weight in the cone too by the looks of it.
That cockpit is looking excellent and after spending what seems like the last 6 weekends doing anything but models, it's football season kick-off and I am going to embed myself in the man-cave - my wife is going to need a large pry bar to get me out of it Grrr - well so long as she doesn't see this
....... Better to arrive late than never at all Adrian............ Good to have you along,, and thanks for yopur kind comment.\ said:Pulled up my chair a bit late, but I like your work
Adrian
I fear there isn't going to be much on show one it's buttoned up, unless you peer in closely ........ As for the weight I thought maybe just shoving some Miliput in there would be heavy enough?\ said:I like the stenciling on the green nose cone. A nice but subtle contrast between the red and dark green. Nice work there. I would like to see how the fuselage goes together and how much of the pit can be seen in the end.
Just an odd thought - can you pack the actual hollow of the nose cone with the weight powder stuff and leave it? technically, you will need less weight if you go more forward, which is what the nose cone is-the most forward part of the aircraft
John
G
Guest
Guest
yeah-you're probably right- but I always like to be on the safe side and chuck in as much as I can without breaking the undercarriage!\ said:I fear there isn't going to be much on show one it's buttoned up, unless you peer in closely ........ As for the weight I thought maybe just shoving some Miliput in there would be heavy enough?

Thank wou\ said:You are forgiven.
G
Guest
Guest
Hope I haven't missed the band wagon Peter, only just seen this, through Neil's link on his cricket comments post. That cockpit looks fantastic and so does the rest so far. I take it that it isn't an ejector seat? Kami kazie pilots don't need them anyway. 
Anyway, I'm on board with this now. Keep up the good work.
Anyway, I'm on board with this now. Keep up the good work.
No worries Geoff.......... There's still plenty of time on this mate.............. Thanks for your comments.\ said:Hope I haven't missed the band wagon Peter, only just seen this, through Neil's link on his cricket comments post. That cockpit looks fantastic and so does the rest so far. I take it that it isn't an ejector seat? Kami kazie pilots don't need them anyway.
Anyway, I'm on board with this now. Keep up the good work.
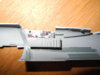
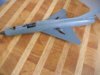
I have the fuselage buttoned up and the top fairing and tail on..........
View attachment 116583
View attachment 116584
View attachment 116585
View attachment 116586
View attachment 116587
View attachment 116588
View attachment 116589
View attachment 116590
View attachment 229606
View attachment 229607
View attachment 229608
View attachment 229609
View attachment 229610
View attachment 229611
View attachment 229612
View attachment 229613
Attachments
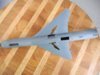
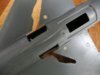
.......and now I have a question???? I hope someone can answer. On the underside inboard wings there are two lights.The kit supplies two masks which are on and I need to paint from behind before I apply the paint for the undercarriage wells. So, the question these two lights. Would the be floods of some kind or underside navigation lights ???? .......... My gut feellng is that they are flood lights to aid underside inspection / arming ......... But I really don't know.
View attachment 116591
View attachment 229614
View attachment 116591
View attachment 229614
Attachments
rickoshea52
Active member
1/3
They are probably landing lights that extend out and face forward when the gear is down. On some Boeing 737's this type of light is fitted to the flap fairings.
View attachment 116594
View attachment 116595
View attachment 229617
View attachment 229618
View attachment 116594
View attachment 116595
View attachment 229617
View attachment 229618
Attachments

- Status
- Not open for further replies.
Legal Notice
scalemodelling.co.uk is a privately operated online discussion forum. All content posted by members reflects their own views and opinions and does not necessarily represent those of the forum owners or administrators. While reasonable efforts are made to moderate content, no responsibility is accepted for user-generated material. By using this site, you agree to comply with UK law and the forum rules.