Theme editor

Scale Model Shop

Mini Art MkIII Valentine V in 1/35

Status
Not open for further replies.
Ian, sorry from me too for the thread hi-jack.

Here's a way to do your 'squiggles'. I used this method for the awkward cammo. on my 1/72 Balkans Bf109......

It's reasonably easy and quick.

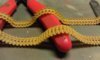
Get a 2H pencil (or harder) lightly mark where you want the lines.

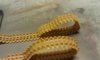
You will need a flat / Chisel headed brush the same width as the cammo. lines.

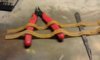
You will only get one chance at it 'cos it's impossible to go over the lines exactly a second time. So in one go, paint your lines, keeping the brush as close to the centre of the pencil line as you can.

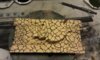
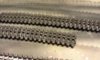
To achieve the different thicknesses of the lines as in the picture, twist the flat head brush as you go and use the edge, then twist back for a wider spread.....Rather like doing Italic lettering.

Because a pencil is used, the paint will easily obliterate the guide lines. Have a practice first!

Also, if you use white tac, you might end up with a soft edge, whereas, as you point out, it should be hard......Looks like the brush fella!

Best of luck whatever method you decide on.

Cheers,

Ron
 
Thread owner
Spent most of the evening treeing up the tools and other lose parts that need paint before being stuck to the main construction. Plus putting on all the external handles. I have actually painted a whole tank once, and only found I had not glued the handles on until I went to weather the darn thing. Trying not to make that mistake again!!!

Had a hunt around for an appropriate colour and settled on Vallejo dark sand #123 for the base and camo olive green #096 for the squiggly bits.

So the big bits are now painted with the base colour.

While that is setting hard, I will take a look at those tracks. Now the kit does come with individual link tracks but they need glueing together. I also have a set of Bronco models tracks which by the look of things do not need glue to hold them together. They look a tiny bit better as well. having said that the kits tracks also look very good.

I will do a lenght of each and then chose which ones to use.

In the meantime you can look at the painted bits.

View attachment 40119 View attachment 40120 View attachment 40118

Lurking amongst the fiddly bits is the 'wooden' box that also got painted this afternoon after work. Oil pains over light tan Vallejo. Then as the thinly applied oils where almost dry (its been on top of the desk lamp, nice and warm but not hot....) It got a couple of passes with an old tooth brush.

Right thats it for today. Telly time!

Ian M

View attachment 43906

View attachment 43907

View attachment 43908

View attachment 156932

View attachment 156933

View attachment 156934
 

Attachments

  • First coat bits.jpg
    First coat bits.jpg
    2.7 KB · Views: 0
  • First coat wheels.jpg
    First coat wheels.jpg
    2.1 KB · Views: 0
  • First coat hull.jpg
    First coat hull.jpg
    2.5 KB · Views: 0
Lovely work Ian. That wooden box looks just right & the tools with separate heads look very good.

Patrick
 
Looking very good at this stage Ian, great work on this mate.Looking forward to the finished Item.
 
Thread owner
Well been cutting tracks and seeing how they look and fix. The Bronco win hands down. They just click together. OK some of them are a bit lose due to the tiny tap that suffers as you press them together, but the stay together well enough to be able to pose them over the wheels, then glue them up with liquid poly I guess. Time will tell on that one but I know that they will not stay together without some glueing...

I did manage to drop on of the return wheels while preparing to paint the tyres. I heard it hit the floor then that fatal tic tic roll bounce.

I just spent the last ten minutes crawling around the floor with a flash light. Dude I have some serious dust bunnies under my desk!!!! Hovering is banned from this room!!!

The good news is I not only found the wheel (under my wifes desk) but I also found the tail fin from my Avro 504 that I lost like three months before Christmas hiding under the filing cabinet!!!

Right I got some tyres to paint.

Byeeeeee

Ian M
 
Thread owner
Track day

Well not that kind of track day, these ones.

I got the last few links sorted today and went direct to paint.

I will say that these went together real easy and are totally flexible- not one drop of glue! They just clip together, brilliant.

Enough waffle here are the pictures:

View attachment 40245 View attachment 40246 View attachment 40247

I found that with a good side cutter I could cut the links off the trees with almost no need to sand the cut off.

As I said, these particular links just clip together so the assembly was quite quick and glue free. As you can see they are nice a bendy.

View attachment 40248 View attachment 40249

A base coat of burned Iron Alclad II with a light dusting of Light burnt iron over the top. The inside centre contact area were the road wheels are in contact, got a dusting of steel.

View attachment 40250 View attachment 40251

They where finished off with a dry brushed Humbrol metal coat allu on the rest of the contact surfaces.

I have also started on a base... I want to pose the suspension so you can see the way the boogies work to follow the ground. More about that later.

Ian M

View attachment 44027

View attachment 44028

View attachment 44029

View attachment 44030

View attachment 44031

View attachment 44032

View attachment 44033

View attachment 157053

View attachment 157054

View attachment 157055

View attachment 157056

View attachment 157057

View attachment 157058

View attachment 157059
 

Attachments

  • 17 Tracks painted.jpg
    17 Tracks painted.jpg
    2.4 KB · Views: 0
  • 16 Tracks painted.jpg
    16 Tracks painted.jpg
    2.5 KB · Views: 0
  • 15 tracks painted.jpg
    15 tracks painted.jpg
    2.6 KB · Views: 0
  • 14 tracks painted.jpg
    14 tracks painted.jpg
    2.4 KB · Views: 0
  • 13 Tracks.jpg
    13 Tracks.jpg
    2 KB · Views: 0
  • 12 Tracks.jpg
    12 Tracks.jpg
    2.3 KB · Views: 0
  • 11 Track.jpg
    11 Track.jpg
    2.1 KB · Views: 0
Great tracks Ian, they're looking very realistic. It's always nice when they go together so easily!

Patrick
 
Thread owner
OK my eyes have gone all funny!

Sat down at the bench to see where we are at. Before I knew it, I had found a brush and was mixing paint. Oh well I might as well get on with it I thought.....

Any way after a couple of hours I had wonky eyes and this:

View attachment 40272 View attachment 40273 View attachment 40274

So the next stage will be the weathering.

What do you think?

Ian M

View attachment 44049

View attachment 44050

View attachment 44051

View attachment 157075

View attachment 157076

View attachment 157077
 

Attachments

  • 19 camo 2.jpg
    19 camo 2.jpg
    2.5 KB · Views: 0
  • 18 Camo 1.jpg
    18 Camo 1.jpg
    2.5 KB · Views: 0
  • 20 camo3.jpg
    20 camo3.jpg
    2.7 KB · Views: 0
Hand painting that camo must have been a job and a half It looks great!

From the air it would be lost on a cracked desert floor. I can see how your eyes went loopy......the effect on the ol' peepers is similar to that of 'dazzle' paint schemes used on ships.
 
Very good Ian! Hats off to you for trying that freehand, I'd have bottled it & sprayed it!

Patrick
 
Ian, my hat goes off to you mate, that is one spot on painting and no mistake....

In my opinion, it's certainly the best tank cammo work I've seen and I doubt it will be beaten.

I don't usually pile on the praise so much, but this quite exceptional..

Very well done.....big 5 for the cammo alone!

Ron
 
Thread owner
Thanks Ron! I wonder what you will say after its been tidied up?!?!?!

Looking at the larger than life photos I can see there are a few places that need a quick tidy/touch up.

I will give it the once over tomorrow and then seal it down before the weathering ruins it.

Ian M
 
Thread owner
\ said:
Hand painting that camo must have been a job and a half It looks great! From the air it would be lost on a cracked desert floor. I can see how your eyes went loopy......the effect on the ol' peepers is similar to that of 'dazzle' paint schemes used on ships.
This camouflage is unique to the Island of Malta. At the time most of the buildings and all forms of wall were made from dry stone walling, as there was so much of the stuff, being a rocky island.

Ian M
 
Status
Not open for further replies.
Back
Top