Theme editor

Scale Model Shop

Neil's Airfix 1-32 Multipose German Infantry

Status
Not open for further replies.
Thread owner
IAre you sure it won’t fit between his arm and his side, so that the rear end is behind him like it should be, and the head only just in front of his hand?
Well if I was trying I might think about it, but frankly this particular build is so far off the scale I just want to get finished and do it properly the next time around!

Thanks for the translation, by the way, Jakko. I'm pleased to find I wasn't too far off the mark after all this time!
Neil
 
Thread owner
Hello everyone

All the equipment has been painted now, and I know I said I was going to follow the instructions, but I just couldn’t!

Firstly, the brown is just too pale for a rifle, and a big problem is that there is no gunmetal paint-only black.
View attachment 337654
So I washed the whole gun with black to darken the brown and blacken the barrel. I remember reading in The Great Escape or Colditz Story about how the POWs used pencil lead to colour a wooden Luger so I tried it out and it worked like a charm! – I assume using a pencil can be considered to be within the rules of the GB…?

So I did it with the MP40 and the MG42 as well
View attachment 337655 View attachment 337656 View attachment 337657

The Panzerfaust is supposed to be black according to the instructions as well......Nah!

I must say I am not really having trouble with the paints themselves, just with the choice of colours. They thin out nicely with water and I've even been able to make washes. I made the mistake of leaving the lid open on one, though, and I only just saved it in time from becoming a flesh-coloured crayon!
more soon
Neil
 

Attachments

  • IMG_20190421_103411589.jpg
    IMG_20190421_103411589.jpg
    1.8 KB · Views: 0
  • IMG_20190423_202454632.jpg
    IMG_20190423_202454632.jpg
    1.8 KB · Views: 0
  • IMG_20190423_201941828.jpg
    IMG_20190423_201941828.jpg
    1.3 KB · Views: 0
  • IMG_20190423_202154473.jpg
    IMG_20190423_202154473.jpg
    1.7 KB · Views: 0
I think pencil lead is permissible Neil, though I'd probably cheat like crazy anyway!
 
Thread owner
Thanks Peter and Ralph.

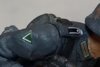
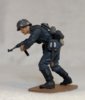
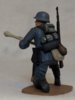
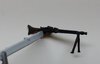
The instructions say the gas mask canisters should be the same grey as the uniforms, but I mixed a darker shade and washed them with black.
View attachment 337686
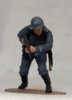
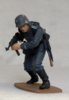
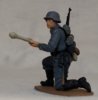
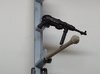
The mess tins are supposed to be black but they were actually bare metal or field grey painted, so I mixed a light grey and washed them with black.
View attachment 337687

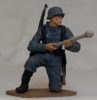
The bread bags are also supposed to be black, but I painted them in the light beige supplied.

The canteens are brown as per the instructions, but I did the cups with the pencil.

The rolled ponchos have this spurious camouflage made of light brown and beige over grey, so I did that in the absence of any other options
View attachment 337688
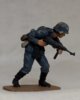
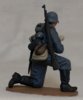
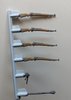
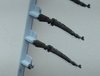
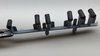
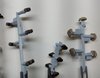
I did as I was told for the bayonets, entrenching tools and cartridge pouches- black, with brown handles for the entrenching tools….

And I enhanced the spades with my trusty pencil.
View attachment 337689
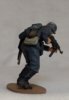
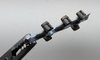
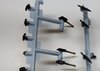
I was a good boy with the officer’s equipment too
View attachment 337691

It must be fairly obvious that I had to succumb to some brush surgery in the end.

I was only using the smaller of the two brushes and it was gradually getting mankier and mankier. It got to the state when it was only any good for the camouflage splodges on the ponchos and helmet covers.
So I gave it a haircut (Sorry about the focus)
View attachment 337693
And that enabled me to do the thinner straps etc.

I knew I would have to do it , I just had to time it right and get everything else done with it in its full hairiness first.
thanks for looking
Neil
 

Attachments

  • IMG_20190423_202630617_BURST000_COVER_TOP.jpg
    IMG_20190423_202630617_BURST000_COVER_TOP.jpg
    1.7 KB · Views: 0
  • IMG_20190423_202605801.jpg
    IMG_20190423_202605801.jpg
    1.6 KB · Views: 0
  • IMG_20190423_201848450.jpg
    IMG_20190423_201848450.jpg
    2.3 KB · Views: 0
  • IMG_20190423_201741402.jpg
    IMG_20190423_201741402.jpg
    2.3 KB · Views: 0
  • IMG_20190423_202618479.jpg
    IMG_20190423_202618479.jpg
    1.7 KB · Views: 0
  • IMG_20190422_193800534_BURST000_COVER_TOP.jpg
    IMG_20190422_193800534_BURST000_COVER_TOP.jpg
    2.6 KB · Views: 0
I'm trying to imagine what some of the great art masterpieces would have looked like if done to these GB rules, here's your limited palate now crack on :smiling: You're doing a great job with these Neil
 
Hi Neil
Great job. Especially well done with the restricted paints. Good idea to use the pencil - definitely ok as all 10year olds had a pencil kicking around.
Jim
 
Neil.
Well really I think it's quite demanding thought wise to be able to make them look anywhere passable using such a restricted colour pallet. Just shows what can be achieved, and yet we spend £ buying every conceiveable shade of paint .John
 
Thread owner
Just a quick report on the state of play with the boys-
Second flesh coat on, boots and webbing painted with a bit of brown mixed in with the black,in the forlorn hope of being able to shade them later with the mohican brush....
I also gave the uniforms a wash of black because of the difficulty of lining(this was done before the brush surgery), it's helped a bit,and maybe I will be able to highlight with the mohican brush- you never know!
And hair! I can't help thinking that the choice of colours in this set had something to do with their hair- it's really the only reason for the blonde colour if you look at the painting instructions- apart from the few camouflage splodges.
And out came the pencil again(ooh-er missis;)...) to do the buttons and belt buckles- well, why not?
IMG_20190423_202801538.jpg

IMG_20190423_203045502.jpgIMG_20190423_203157735.jpgIMG_20190423_203432496.jpgIMG_20190423_203500357.jpgIMG_20190423_203659587.jpg


I'll say this , they certainly look like a ten-year old has done them!
One of the difficulties I am having with this paint is its fragility - the slightest friction and it comes off the plastic.
I guess that's where the mud will be!
thanks for looking
Neil
 
Thread owner
Well I’m actually getting to the end of this ordeal.

I‘ve finished the equipment and laid it out for kit inspection, just for fun.
IMG_20190427_185534270.jpg

I attempted some detail work on the faces, and some shading of the uniforms with the Mohican brush……
Blimey! I really should have chosen an aeroplane for this GB- I’m struggling with this kind of thing under normal circumstances with good paint and decent brushes, and then I go and hobble myself with this!
Then came the decals…. I’ve only used micro sol and micro set a couple of times, but I’ve been converted by this experience, I can tell you! Being microscopic these decals were very difficult to deal with just a pair of tweezers and a cotton bud. Some of them didn’t stick at all and were claimed by the carpet monster. Some of them, like the officer’s cap badges, are supposed to sit over highly sculpted emblems, which might have worked with micro sol but not with plain old warm water. So if they just stay put long enough for photography I’ll be happy! To be fair, they seem like decent decals otherwise. They must be a feature of the starter set, because I don’t remember them being in the first vintage kit.
face.jpg

That job took me AGES!

Now it's time to fit the equipment, a few touch-ups here and there, a bit of dry-brushing, and it’ll be job done!


PHEW!

Thanks for looking

Neil
 

Attachments

  • IMG_20190428_152024966.jpg
    IMG_20190428_152024966.jpg
    2 KB · Views: 0
Not bad at all bearing in mind what you are having to use. I'm sure it will all come together with the equipment and dry brushing
 
Hi Neil
You're making a far better job of these than the paints and brush shouls allow. As Steve says they will come together nicely. Are you planning on doing a part 2 with these?
Jim
 
Thread owner
thank you gents,that's very kind.
Jim, as for part 2 -no, I don't think so,unless I can find a bargain set.
I'm putting this one down to experience.....
cheers
Neil
 
Thread owner

Attachments

  • IMG_20190428_152031640.jpg
    IMG_20190428_152031640.jpg
    1.9 KB · Views: 0
  • IMG_20190428_151909889.jpg
    IMG_20190428_151909889.jpg
    2 KB · Views: 0
  • IMG_20190428_151903489.jpg
    IMG_20190428_151903489.jpg
    1.8 KB · Views: 0
  • IMG_20190428_151849483.jpg
    IMG_20190428_151849483.jpg
    2.1 KB · Views: 0
  • IMG_20190428_151839209.jpg
    IMG_20190428_151839209.jpg
    2 KB · Views: 0
Thread owner

Attachments

  • IMG_20190428_152321632.jpg
    IMG_20190428_152321632.jpg
    2.4 KB · Views: 0
  • IMG_20190428_152315701.jpg
    IMG_20190428_152315701.jpg
    2.2 KB · Views: 0
  • IMG_20190428_152310067.jpg
    IMG_20190428_152310067.jpg
    2.1 KB · Views: 0
  • IMG_20190428_152303798.jpg
    IMG_20190428_152303798.jpg
    2 KB · Views: 0
  • IMG_20190428_152257798.jpg
    IMG_20190428_152257798.jpg
    2.2 KB · Views: 0
Status
Not open for further replies.
Back
Top