Theme editor

Scale Model Shop

New Bedford Whaler - circa 1835

Status
Not open for further replies.
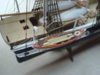
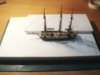
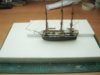
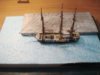
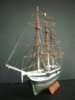
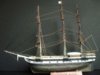
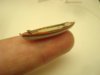
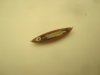
That's really nice Ron, beginning to look the business.


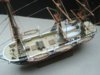
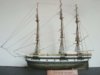
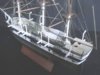
When I was in WH Smith a fortnight ago there was a photo on the cover of a Magazine, not sure if it was Modelling Magazine or Miniature Modelling Magazine showing a ship like your, and with tattered sails. Went in again to Smiths yesterday but it was gone, sorry I didn't get it to show you. Would have looked gret for what you are planning. Derek
 
That was quick!


Looks really good so far and the overscale ratlines are blending in with no problems. Just goes to show that kits do not have to be absolutely 100% accurate in scale to look right - something that's been discussed here many times when talking about panel lines and hard/soft camouflage edges..


What did you use for the rigging?
 
This is looking amazing Ron , all the more because of its diminutive size. Loving the copper bottom effect and the rigging really brings it to life . Cant wait to see the finished article , dont forget to add the scratchbuilt 1/200 scale bucket too!! cheers tony
 
Thread owner
Thanks chaps....


Derek, I appreciate the thought and thanks for trying to get a copy of the mag.


Dave, the standing rigging is the black twine included in the kit - almost miniature polypropylene to look at.


The running rigging is that thin stuff the fishermen tie the bait on with. then painted beige.


Tony, one bucket locked in the memory!


Apart from a bit of tweeking, I've finally finished the rigging. There was very little instructions for the standing rigging and none for the running, so I've used a bit of licence and a wee bit of knowledge from my sailing days and I've done the best I can....


Here is the standing rigging.


View attachment 239166


The running....some baggy, on purpose - honest!


View attachment 239167


A couple of general shots. Minus the remaining ratlines.


View attachment 239168

View attachment 239169


...and the ratlines completed


View attachment 239170


Next up I'll do the ships cutter's davits and start work on fitting out the five cutters themselves. Also, I'll see if any more rigging is required.


Thanks,


Ron
 

Attachments

  • New Bedford Whaler 072.jpg
    New Bedford Whaler 072.jpg
    2 KB · Views: 0
  • New Bedford Whaler 074.jpg
    New Bedford Whaler 074.jpg
    2.2 KB · Views: 0
  • New Bedford Whaler 069.jpg
    New Bedford Whaler 069.jpg
    2.1 KB · Views: 0
  • New Bedford Whaler 070.jpg
    New Bedford Whaler 070.jpg
    2 KB · Views: 0
  • New Bedford Whaler 071.jpg
    New Bedford Whaler 071.jpg
    2 KB · Views: 0
Thread owner
Thanks Derek and Ian. Good to see you're still hanging on in....


Last night I fitted and painted the five sets of boat davits and added the anchor - minus any rope work for them all.


View attachment 239230


View attachment 239232


The anchor.


View attachment 239233


Next I will fit out the five cutters with oars and harpoons plus ropes.


Cheers,


Ron
 

Attachments

  • New Bedford Whaler.jpg
    New Bedford Whaler.jpg
    2.4 KB · Views: 0
  • New Bedford Whaler 080.jpg
    New Bedford Whaler 080.jpg
    2.5 KB · Views: 0
  • New Bedford Whaler 079.jpg
    New Bedford Whaler 079.jpg
    2.4 KB · Views: 0
Hats off to your attention to detail Ron! I'd never have the patience or skill
 
Following this one closely Ron I have 5 boats in my stash to do so will be using some of your techinques on these when I eventually get round to doing them


Colin
 
Thread owner
Thanks Patrick. Patience is being sorely tried and as for skill, there's plenty of that on S.M.


Colin, Don't take too much notice, this is my first attempt at a 'proper' sailing vessel, so I'm learning as I go along......


O.K., I've started fitting out the 5 cutters.


For the oars I used thin electric wire and flattened the ends in a vice, then filed the oar blades to shape.


The harpoon is done in the same way.


The rudder is thin plastic card.


The harpoon rope is sewing cotton wrapped around a cocktail stick, glued, then quickly removed from the stick!


You will notice the paintwork is a bit hit and miss...I figured that after a couple of years at sea, the gear would be a bit worse for wear, to say the least.


Here is one of the wee cutters.


View attachment 239326


View attachment 239327


Cheers all,


Ron
 

Attachments

  • New Bedford Whaler 087.jpg
    New Bedford Whaler 087.jpg
    1.7 KB · Views: 0
  • New Bedford Whaler 088.jpg
    New Bedford Whaler 088.jpg
    1.1 KB · Views: 0
Ha-ha you're just kidding us Ron! That finger is really the size of a tree trunk ;)
 
Wow Ron my eyes hurt just looking at this! Amazing the detail you are pulling off in such a tiny scale.
 
Thread owner
I don't know what has happened to the above, but there should have been more pictures with it!


The previous single picture shows one of the cutters in position with it's ropework for lowering and hauling back up again...


Here are the two starboard cutters - fixed and rigged.


View attachment 239399


The three port ones - only the middle one is permanent.


View attachment 239400


A seagull's view.


View attachment 239401


Nearly there now. Just a few bits and bobs to do. On reflection, I think I might touch up the gear in the cutters. They are possibly a bit too shabby and worn.


Thanks for looking.


Ron
 

Attachments

  • New Bedford Whaler 094.jpg
    New Bedford Whaler 094.jpg
    2.8 KB · Views: 0
  • New Bedford Whaler 093.jpg
    New Bedford Whaler 093.jpg
    2.6 KB · Views: 0
  • New Bedford Whaler 092.jpg
    New Bedford Whaler 092.jpg
    2.5 KB · Views: 0
Cracking work Ron, had to call back and see this. Glad I did, so small, so much detail, soooooooooo good.


Top work.
 
\ said:
Ha-ha you're just kidding us Ron! That finger is really the size of a tree trunk ;)
Have you not met our Ron then Patrick? In reality he's 250ft tall with fingers the size of tree trunks! That's what makes his builds look so marvellous - he just puts his hand down on the lawn of a real building and Justine takes a picture from a helicopter. That's obviously a real rowboat he's picked up from somewhere.
 
Thread owner
Thanks for your great comments Si. Good to see you are able to wander in here and post. I hope this means you are feeling a bit better old mate?


Dave, thanks for your input too. Whilst we were up in the helicopter, we joined the 'Mile High Club' too!!!!!


Right, I need a break from the titchy boat, and as the weather here is awful, I've made a start on the harbour.


Here I have stuck three pieces of scrap polystyrene packing together. Because I need the full hull I had to double thickness the water to accomodate the extra depth. The other piece is obviously the harbour wall.


View attachment 239414


I marked around the hull and then scribed around the lines with a scalpel.


View attachment 239415


I try and get as big pieces out as I can - It makes clearing up so much easier for the wife!


View attachment 239416


The whaler let in and up against the harbour wall.


View attachment 239417


I then simply slurried some cheap acrylic paint all over the base.


View attachment 239418


Next up?.....I really haven't a clue, I never plan, just have a starter idea in my nut and see what comes along. Your guess is a good as mine, but I have had one heck of a pleasant 'Happy Accident! More about that later......


Cheers,


Ron
 

Attachments

  • New Bedford Whaler 100.jpg
    New Bedford Whaler 100.jpg
    2.3 KB · Views: 0
  • New Bedford Whaler 098.jpg
    New Bedford Whaler 098.jpg
    1.8 KB · Views: 0
  • New Bedford Whaler 096.jpg
    New Bedford Whaler 096.jpg
    1.4 KB · Views: 0
  • New Bedford Whaler 095.jpg
    New Bedford Whaler 095.jpg
    2.3 KB · Views: 0
  • New Bedford Whaler 103.jpg
    New Bedford Whaler 103.jpg
    2.2 KB · Views: 0
Status
Not open for further replies.
Back
Top