Theme editor

Scale Model Shop

New Bedford Whaler...circa 1875. *The Harbour*

Status
Not open for further replies.
\ said:
Thanks for your posts Derek and Dave. All good stuff.
I'm sure peeps will have noticed I have glued the back bit back on to accommodate the buildings - will someone please tell me to leave the bl***y thing alone!
Hey Ron! Leave the bl***y thing alone! :D


Happy now?
 
how have I,missed all this Ron,I,m so sorry, :( ;)


lovely to see you back at it,and this will be very interesting to watch,


great work so far,as the polystyrene,just suits the scale so well,without all the work of making rocks,


the jetty and other woodwork looks great as well,real like your colors,


and for the building did you scale that down or just by eye,?


as I would do,:confused:


I do real like the ship,I must do one ,one day always been interested in a wooden ship,


look forward to seeing more and will be on board for all 3 ;)
 
Thread owner
Thanks for the post Monica, it's always good to read your comments on my builds.


I scale up just the same as you - by eye. I always start with a scale figure in a doorway. Scale the doorway and then work across and up, scale 8ft floor to ceiling, 1ft for the floor joists etc. Then another 8ft to the start of the roof. Then I decide what pitch looks right for the roof. I then have a play with the position of windows and other doors. I would think you do much the same.


Cheers lady,


Ron
 
\ said:
Thanks for the post Monica, it's always good to read your comments on my builds.
I scale up just the same as you - by eye. I always start with a scale figure in a doorway. Scale the doorway and then work across and up, scale 8ft floor to ceiling, 1ft for the floor joists etc. Then another 8ft to the start of the roof. Then I decide what pitch looks right for the roof. I then have a play with the position of windows and other doors. I would think you do much the same.


Cheers lady,


Ron
ta Ron,


that is about the same way I do,me and scale rules don,t get on lol, ;)


and it seams to work out ok as well,or go ,off a picture as well,


I do always enjoy your builds,so meany tips and hints,and ,and you do make it all


look so simple,as well,keep up the great work as I lov it, :D
 
Thread owner
Thanks for your posts Monica and Ralph....


Here's the next stage of the harbour build. I've been sat in front of the thing, having a beer waiting for ideas to come along - and blow me down if they did.


I was doing some work on the warehouses, then hit on the idea of a waterside tavern and a fish market. Plus some replacement sails for the whaler.


Still some detail to do on the buildings like barge boards, chimneys etc, but the majority of the work on them is done.


Here are the pictures.


The fish market and one of the warehouses.


View attachment 240456


The pub and the other warehouse.


View attachment 240457


The line up....I set the pub back a bit and brought forward the market to break up the line of buildings.


View attachment 240458


Some replacement sails. After a bit of experimenting, I settled on making them from rolled up toilet paper, painted with acrylics and tied with beige cotton. These will sit on the quayside waiting to be hauled aboard the ship.


View attachment 240459


That's it for now.


Thanks for looking.


Ron
 

Attachments

  • New Bedford Whaler 152.jpg
    New Bedford Whaler 152.jpg
    1.8 KB · Views: 0
  • New Bedford Whaler 154.jpg
    New Bedford Whaler 154.jpg
    1.7 KB · Views: 0
  • New Bedford Whaler 151.jpg
    New Bedford Whaler 151.jpg
    1.7 KB · Views: 0
  • New Bedford Whaler 153.jpg
    New Bedford Whaler 153.jpg
    1.7 KB · Views: 0
great update,the sails look so good ,I use that paper or handwipes from KFC,once dry are good as well,


looks so much better with more builds ,I do real think so,well done,


on them ;)
 
Thread owner
Thanks Ian, I managed to get over my cock up. so not so bad and I'm glad you approve.


I've painted some of the figures using a cocktail stick. This is probably all I'm doing for this. I'll be on it for ever otherwise.....


View attachment 240547


I've also done some more general bits and bobs to fill the spaces - more later.


Cheers,


Ron
 

Attachments

  • New Bedford Whaler 155.jpg
    New Bedford Whaler 155.jpg
    1.4 KB · Views: 0
Thread owner
Thanks Peter San and Ralph for your positive comments.


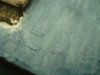
I've finished the quayside, so now I'm concentrating on the water. The previous coats of acrylic served as bit of a sealer for the polystyrene 'water'. Then, after coating the painted polystyrene with diluted PVA, I spread a slurry of polyfilla all over and moulded small waves, made the sea a bit more lively by the stone breakwater and generally messed about with the surface.


A second coat of diluted PVA was applied. Now that's dry, I am building up the colours using cheap acrylics in various shades of blue and green -wet on wet.


Once I'm happy with the sea colours, I will get out the silicone gun and add some detail.


Here are the first stage pictures. The colours are a bit loud, sorry.


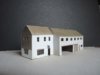
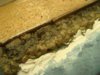
See the quayside ground? Due to the very small scale, I wanted a very fine something to sprinkle on the base.....We have a dog and she is fed that dry mix pellet stuff you get in a big bag. We came to the end of the bag the other day and as I tipped the dross out, I noticed this very fine beige/brown 'dust' at the bottom of the bag....Bingo, this is what you see here...perfect scale!


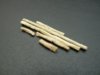
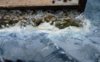
The filla wavelets ready for further treatment and the blues....


View attachment 240606


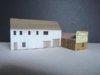
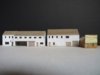
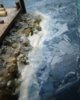
A couple of general views.


View attachment 240607


View attachment 240608


Next up, more work on the sea colours and adding the silicone.


Cheers,


Ron
 

Attachments

  • New Bedford Whaler 158.jpg
    New Bedford Whaler 158.jpg
    2.5 KB · Views: 0
  • New Bedford Whaler 157.jpg
    New Bedford Whaler 157.jpg
    2 KB · Views: 0
  • New Bedford Whaler 156.jpg
    New Bedford Whaler 156.jpg
    3 KB · Views: 0
Looking good Mr Moderator Sir. Those painted figures are first class. Derek
 
Thread owner
Thanks chaps...nearly finished.


'Bout time, I hear the cry!


I've made some small waves and splashes using silicone. I kept adding coats of paint to the sea until I got it something like, then gave the whole thing a coat of varnish to shine it up a bit...With using different shades of blue, a sort of different depth to the sea is achieved.


I wanted the sea smooth in the actual harbour area, so I angled the waves to hit the breakwater and not wash in to where the ship lay, which would have made me have to do ripples and the like........Cunning move what?


Here are a couple of pictures of the finished breakwater.


View attachment 240669


View attachment 240670


Once all this is dry, I can finally plonk the whaler into it's hole and make up some mooring lines and odds and sods - then that's it.


Cheers,


Ron
 

Attachments

  • New Bedford Whaler 160.jpg
    New Bedford Whaler 160.jpg
    2.4 KB · Views: 0
  • New Bedford Whaler 159.jpg
    New Bedford Whaler 159.jpg
    2.9 KB · Views: 0
Status
Not open for further replies.
Back
Top