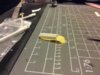
Theme editor

Scale Model Shop

Nimrod MR2 - Airfix 1/72

Status
Not open for further replies.
Thread owner
While things are winding down with the build of XV235 my attention is turning more towards the base. On each of the bay's that Nimrods occupied there was an array of GSE and other bits. I have the Houchin ready for installation but I need more and although the Flightpath diorama set is useful in some ways it is a bit fiddly for my fingers. I need a set of A frame steps, the FP one is made of brass which I don't really get on with so I contemplated making my own from Plastruct U channel before settling on the stairs from their range (cat no.90661), it's N gauge but as it is for a set of steps it looks pretty good to me. These steps are common as muck on any RAF flying station and a stored folded when not in use and that is how I will do mine.

Using the Humbrol cutting mat scale gauge as a guide I cut two lengths of plastic stair to just under six foot, filed angles at each end then glued them together. When dry I'll paint them aluminium but some were painted green or yellow.

Other bits and pieces to be found on the bays were electrical cabinets, spill kits, chocks and dustbins. The dustbins were usually painted red and used to collect venting fuel from the jettison points on the flap trailing edges when the jets were filled to the gunnels - when fuel gets warm it expands of course and needs somewhere to go so a hose fitted to the jettison points drains any excess fuel into the bins. These hoses were euphemistically called donkey's dicks.

I have some dustbins from the Bachmann Scenecraft range which I will paint and add later along with a grit bin from Bachmann that will be the spill kit.

The electrical cabinets are made from Will's line side relay cabinets painted yellow. All of these bits will be added to the base when ready.

I still have those aerial to fit!

View attachment 91767


View attachment 91768


View attachment 91769


Here is a shot of the scale gauge being used to measure the stairs. The electrical cabinets are also shown.

View attachment 91770


The two halves glued together and to be painted when set.

View attachment 204790

View attachment 204791

View attachment 204792

View attachment 204793
 

Attachments

  • image.jpg
    image.jpg
    2.3 KB · Views: 0
  • image.jpg
    image.jpg
    2 KB · Views: 0
  • image.jpg
    image.jpg
    2.9 KB · Views: 0
  • image.jpg
    image.jpg
    2.8 KB · Views: 0
Thread owner

Attachments

  • image.jpg
    image.jpg
    2.4 KB · Views: 0
  • image.jpg
    image.jpg
    3 KB · Views: 0
Thread owner

Attachments

  • image.jpg
    image.jpg
    2.4 KB · Views: 0
  • image.jpg
    image.jpg
    2.6 KB · Views: 0
  • image.jpg
    image.jpg
    1.9 KB · Views: 0
  • image.jpg
    image.jpg
    1.7 KB · Views: 0
Great work Rick, I'm loving this. I would never have thought of putting a relay box etc near the tarmac. Nice touches.
 
Thread owner
I found this photo online. I don't know when it was taken but it is of an MR1 so probably late 70's to early 80's but it clearly shows the electrical cabinets at the side on the parking bay. My efforts are just a representation and not intended to be a like for like copy. The bins aren't painted red in this shot but they were during my time at Kinloss.

View attachment 92107


View attachment 205130
 

Attachments

  • image.jpg
    image.jpg
    1.7 KB · Views: 0
Thread owner
\ said:
Great work Rick, I'm loving this. I would never have thought of putting a relay box etc near the tarmac. Nice touches.
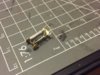
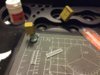
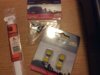
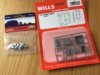
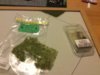
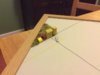
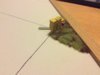
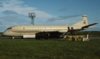
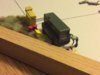
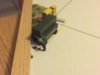
Thanks Joe. This is where personal experience or a site visit comes into its own. I've no idea what these cabinets were for as the jets were powered by a GPU. There was always a prank being played on the new LAC's with them being sent out to switch on the pan heaters or windsock - and no, I wasn't a victim...maybe the prankster.
 
Thread owner
How do you make chocks? Those modern black rubber toblerone shaped lumps with orange rope tied through them? I tried the Flightpath models ones but found they were too finickity so I decided to make my own from 2.0mm/.0080" triangular plastic rod painted black and cut to length. The real ones are roughly eight inches across and 18 inches in length so 2mm is equal to about 6 inches and the plastic rod I have is as close as I can get.

The tricky bit is drilling a hole through for the rope, and that's my next challenge.

View attachment 92108


View attachment 205131
 

Attachments

  • image.jpg
    image.jpg
    2.7 KB · Views: 0
Thread owner
With my weekend away at the NEC torpedoed I've been back at my Nimrod parking bay. I used some orange thread pinched from my daughter's sewing box to replicate the thick nylon rope that you find on the modern rubber chocks used by the RAF, which was a tad fiddly. The A frame steps (type code DNA, according to my RAF GSE expert/domestic engineer) are done and so is the 60 KVA Houchin.

The pictures below demonstrate some poses of the kit I've been playing around with but I haven't glued them down yet as I still need to add a touch of weathering to the concrete, some oils stains and tyre marks maybe. I have also been trying out the positions of the lineys and which ones to use, I love the one with his hands in his pockets - very typical pose.

One of the electrical boxes will receive a number decal to mimic the one in the picture above and the final touch will be a fire extinguisher.

More later.

View attachment 92968

View attachment 92969

View attachment 92970

View attachment 92971

View attachment 92972


View attachment 205991

View attachment 205992

View attachment 205993

View attachment 205994

View attachment 205995
 

Attachments

  • image.jpg
    image.jpg
    2 KB · Views: 0
  • image.jpg
    image.jpg
    2.4 KB · Views: 0
  • image.jpg
    image.jpg
    1.8 KB · Views: 0
  • image.jpg
    image.jpg
    2 KB · Views: 0
  • image.jpg
    image.jpg
    1.3 KB · Views: 0
Looking like a very nice base Rick.

You would get it done quicker if the guy's weren't laying around on the job :)
 
Love the grass. A nice little feature with the ground equipment as well.

By the way good thing CPH was cut as well. Its been piddling down all afternoon.

Ian M
 
Thread owner
One of the last but most important things remaining to add to my Nimrod bay is a fire extinguisher. This type of extinguisher can be found on any parking stand on and RAF base.

This is from the Flightpath kit and it is fair to say that I hate etched brass.

I only ever saw one of these used in anger once during my time in the RAF - and I was onboard the blazing aircraft. Actually it was a wet start and a sheet of flame shot out of the jet pipe and spooked the lines on the long lead. She panicked and the Chief Technician used the lance. By the time me and three other riggers got of the jet the bay was crawling with firemen and a large crowd has assembled in front of the hangars, presumably to watch us all burn!

View attachment 93308


View attachment 93309


View attachment 206331

View attachment 206332
 

Attachments

  • image.jpg
    image.jpg
    2.7 KB · Views: 0
  • image.jpg
    image.jpg
    2.7 KB · Views: 0
Nice fire extinguisher Rick, and a good story too. Seen some huge flames on starts from older generation turboprops (F27), they are quite common but probably enhanced because they are at night. Visible flame during a daylight start is probably not such a good thing.
 
Thread owner
\ said:
Nice fire extinguisher Rick, and a good story too. Seen some huge flames on starts from older generation turboprops (F27), they are quite common but probably enhanced because they are at night. Visible flame during a daylight start is probably not such a good thing.
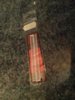
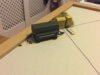
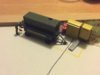
I've seen wet starts on Seaking's too at night and it's impressive. On one occasion there was so much excess fuel not all of it ignited and some was blown out to run down the side of the cab - then it ignited, the RadOps face in the Radshack window was a picture - they still scrambled.

On another occasion the bang was so loud and the flame so bright that ATC called the Fire Service to the SAR dispersal, by the time they arrived the cab was lifting off on a job. The firemen were so disappointed!
 
I know it's a bit off topic now, but I agree, placing decals is arguably my least favorite modelling activity....
 
Thread owner
A bit more work on the fire extinguisher tonight and got it painted. The lance that comes with the etched brass fret is just too flimsy so I used a length of brass rod with the end bent over for the nozzle and the circular disc from the kit superglued together and attached to the frame. It's not shown here but there is also a length of thin lead wire fitted for the hose.

View attachment 93745


I did some more work on the aerials (some fell off), the probe cradle, main gear and leg fairing doors fitted. Disappointingly the leg fairing doors just don't look right, they should slightly overlap the tops of the tyres and there are no connecting rods. I could have used a bit of rod but they are only about 3/8" diameter in real life so a bit finickity to fit To be honest. The gears don't really look right either. The more observant will notice that I've broken the nose gear so there's another bit of tidying up to complete along with a load of paint touch up.

My other tricky task will be the HF aerial from the fin to the roof of the fuselage, the kit doesn't have the masts for this. And not forgetting the massively over scale pitot probes which I'll need to have a think about.

View attachment 93746


View attachment 93747


Edit: I have to find a way of modelling the searchlight. Some Nimrods had them removed and a clear cupola fitted or with a painted cupola with a MAWS sensor that looked like a nipple. I think a silver sequin will do the trick but my search for a suitable diameter one is taking some time.

View attachment 206768

View attachment 206769

View attachment 206770
 

Attachments

  • image.jpg
    image.jpg
    2.2 KB · Views: 0
  • image.jpg
    image.jpg
    2.7 KB · Views: 0
  • image.jpg
    image.jpg
    2.7 KB · Views: 0
Status
Not open for further replies.
Back
Top