
Hi all, after my feeble attempt Normandy GB (which was shocking to say the least) i thought i'd build something a little better than the someone stood in a cemetery. Plus, it's amazing what you can do when the Playstation network is down lol.
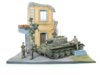
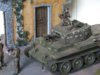
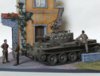
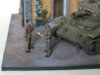
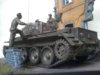
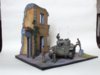
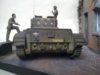
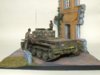
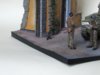
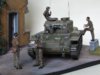
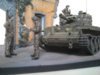
Here we go then, it's the Tamiya 1/35 Centaur Cs.Mk.IV and built staight out of the box. The only thing i did add was some Hobby Boss Cromwell tracks, these are single link tracks. Small but great to work with, it says on the box that 123 for each side but i had to take 6 links out so 117 gave the right amount of sag. With this Centaur being of the Royal Marines it's in Khaki instead of Olive Drab it made a nice change (thinking about it, it's still one colour lol), and sorry Ron i used the airbrush this time. Pre-shading and Khaki/klear on it was time for decals, now the hull was ok it was the turret that was the nightmare. The instructions say put the "degree markings" on before the turret lifting points, i didn't because of pre-shading and dry brushing so i had the cut the decals to fit. I did have a go at the hairspray technique though, hairspray then a light dust of a sandy yellow then played with water and brush to look like dust and dirt thats been walked on.
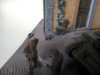
Four figures are from Miniart and needed a lot of work just to look right and the driver is Tamiya own, well, i wasn't going to cut into one of Miniart's figures just to look at his head lol. I just had to put the cat in, he's from Tamiya's German ammo loading crew i have in my stash. The building is from Miniart too (thanks John, it's took me a year to build it), a lot of cutting out to do but well worth the work.
View attachment 28403View attachment 28414View attachment 28408View attachment 28411View attachment 28404View attachment 28405View attachment 28415View attachment 28418View attachment 28417View attachment 28416View attachment 28413View attachment 28412View attachment 28410View attachment 28406View attachment 28409View attachment 28407
Have fun, John
View attachment 34021
View attachment 34022
View attachment 34023
View attachment 34024
View attachment 34025
View attachment 34026
View attachment 34027
View attachment 34028
View attachment 34029
View attachment 34030
View attachment 34031
View attachment 34032
View attachment 34033
View attachment 34034
View attachment 34035
View attachment 34036
View attachment 147047
View attachment 147048
View attachment 147049
View attachment 147050
View attachment 147051
View attachment 147052
View attachment 147053
View attachment 147054
View attachment 147055
View attachment 147056
View attachment 147057
View attachment 147058
View attachment 147059
View attachment 147060
View attachment 147061
View attachment 147062
Here we go then, it's the Tamiya 1/35 Centaur Cs.Mk.IV and built staight out of the box. The only thing i did add was some Hobby Boss Cromwell tracks, these are single link tracks. Small but great to work with, it says on the box that 123 for each side but i had to take 6 links out so 117 gave the right amount of sag. With this Centaur being of the Royal Marines it's in Khaki instead of Olive Drab it made a nice change (thinking about it, it's still one colour lol), and sorry Ron i used the airbrush this time. Pre-shading and Khaki/klear on it was time for decals, now the hull was ok it was the turret that was the nightmare. The instructions say put the "degree markings" on before the turret lifting points, i didn't because of pre-shading and dry brushing so i had the cut the decals to fit. I did have a go at the hairspray technique though, hairspray then a light dust of a sandy yellow then played with water and brush to look like dust and dirt thats been walked on.
Four figures are from Miniart and needed a lot of work just to look right and the driver is Tamiya own, well, i wasn't going to cut into one of Miniart's figures just to look at his head lol. I just had to put the cat in, he's from Tamiya's German ammo loading crew i have in my stash. The building is from Miniart too (thanks John, it's took me a year to build it), a lot of cutting out to do but well worth the work.
View attachment 28403View attachment 28414View attachment 28408View attachment 28411View attachment 28404View attachment 28405View attachment 28415View attachment 28418View attachment 28417View attachment 28416View attachment 28413View attachment 28412View attachment 28410View attachment 28406View attachment 28409View attachment 28407
Have fun, John
View attachment 34021
View attachment 34022
View attachment 34023
View attachment 34024
View attachment 34025
View attachment 34026
View attachment 34027
View attachment 34028
View attachment 34029
View attachment 34030
View attachment 34031
View attachment 34032
View attachment 34033
View attachment 34034
View attachment 34035
View attachment 34036
View attachment 147047
View attachment 147048
View attachment 147049
View attachment 147050
View attachment 147051
View attachment 147052
View attachment 147053
View attachment 147054
View attachment 147055
View attachment 147056
View attachment 147057
View attachment 147058
View attachment 147059
View attachment 147060
View attachment 147061
View attachment 147062
Attachments
-
 DSCF6510.jpg1.9 KB · Views: 0
 -
 DSCF6517.jpg2.8 KB · Views: 0
 -
 DSCF6515.jpg2.7 KB · Views: 0
 -
 DSCF6518.jpg2.4 KB · Views: 0
 -
 2011-05-07 12.09.49.jpg2.7 KB · Views: 0
 -
 DSCF6512.jpg2.4 KB · Views: 0
 -
 2011-05-07 12.10.40.jpg2.5 KB · Views: 0
 -
 DSCF6521.jpg2.3 KB · Views: 0
 -
 DSCF6522.jpg2.4 KB · Views: 0
 -
 2011-05-07 12.07.27.jpg2.5 KB · Views: 0
 -
 DSCF6519.jpg2.4 KB · Views: 0
 -
 DSCF6516.jpg2.3 KB · Views: 0
 -
 DSCF6513.jpg2.2 KB · Views: 0
 -
 DSCF6514.jpg2.6 KB · Views: 0
 -
 2011-05-07 12.08.29.jpg2.1 KB · Views: 0
 -
 2011-05-07 12.06.55.jpg2.7 KB · Views: 0