Theme editor

Scale Model Shop

North African Build

rtfoe

Well-known member
Joined
Apr 29, 2018
Messages
9,251
Reaction score
542
Points
113
Location
Shah Alam, Malaysia
1/3
Thread owner
Hi everyone,

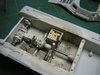
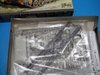
Do any of you ex MM's members remember this dio?....it was slated for the North African GB.

View attachment 315978

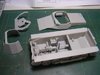
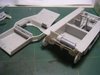
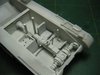
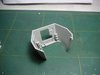
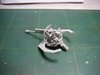
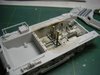
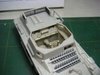
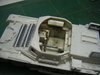
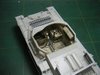
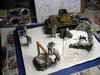
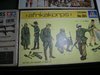
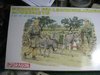
Well, it was abandoned halfway and I thought of reviving it. The initial paring will continue as below...which is the Panzerjager I and not the Semovente and some of the components from the accompanying figure boxes most notably the donkey.

View attachment 315979View attachment 315980View attachment 315981View attachment 315982View attachment 315983

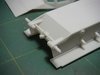
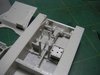
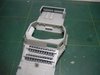
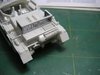
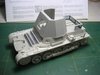
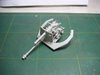
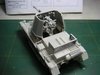
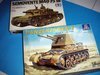
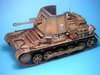
The Panzerjager has been built and competed as an individual display at this years MALCOM and garnered a bronze but I will still take you through its build...

View attachment 315984

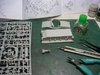
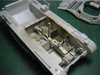
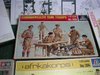
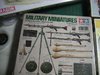
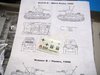
Let's start with its contents...

View attachment 315985View attachment 315986

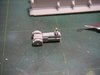
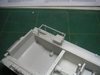
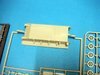
Standard Italeri instructions and sprue tree. The tracks were painted with earth brown base.

View attachment 315989View attachment 315990

In the next post construction will begin.

Cheers,
Richard
 

Attachments

  • 367660.jpg
    367660.jpg
    3.6 KB · Views: 0
  • 359415.jpg
    359415.jpg
    3.6 KB · Views: 0
  • 364402.jpg
    364402.jpg
    3.6 KB · Views: 0
  • 364403.jpg
    364403.jpg
    2.9 KB · Views: 0
  • 364404.jpg
    364404.jpg
    3.2 KB · Views: 0
  • 364405.jpg
    364405.jpg
    2.9 KB · Views: 0
  • 387474.jpg
    387474.jpg
    2.9 KB · Views: 0
  • 359417.jpg
    359417.jpg
    3 KB · Views: 0
  • 359418.jpg
    359418.jpg
    2.7 KB · Views: 0
  • 359637.jpg
    359637.jpg
    2.8 KB · Views: 0
  • 359638.jpg
    359638.jpg
    2.8 KB · Views: 0
Thread owner
Hi again,

I proceeded to assemble the parts for the lower hull starting with the tow hook, rear torsion bar for the idler assemblies then the transmission...

View attachment 316007 View attachment 316008

With the transmission and firewall I fitted the seat, stearing handles, the gun shield supports and ammo storage bin...I sanded away pin marks on the floor.

View attachment 316009 View attachment 316010

Here I have used the vinyl perforated sheet for the exhaust shroud which tended to split. Later I would replace it witha used electric shaver guard. I cleaned up the gun shield and upper hull of any flash.

View attachment 316011 View attachment 316012

So far everything is straight forward.

Cheers,
Richard
 

Attachments

  • 361189.jpg
    361189.jpg
    2.8 KB · Views: 0
  • 361190.jpg
    361190.jpg
    2.8 KB · Views: 0
  • 361210.jpg
    361210.jpg
    2.2 KB · Views: 0
  • 361203.jpg
    361203.jpg
    2 KB · Views: 0
  • 361202.jpg
    361202.jpg
    3.2 KB · Views: 0
  • 361191.jpg
    361191.jpg
    2.6 KB · Views: 0
Thread owner
Hi Richard,
Can't say I remember this one. Why was it slated?

Hi Scottie, in this context slated is meant for it was planned for or scheduled for the GB. In this case it didn't make it and was shelved.

Cheers,
Richard
 
Hi Scottie, in this context slated is meant for it was planned for or scheduled for the GB. In this case it didn't make it and was shelved.

Cheers,
Richard
Ok mate no worries, I thought it had received adverse comments which I would find surprising for any of your builds.
 
Thread owner
Ok mate no worries, I thought it had received adverse comments which I would find surprising for any of your builds.

Thanks for the concern Scottie,

Don't you like the English language...a word can mean differently with just a change of the following two words "for" or "by"

Cheers,
Richard
 
Hi there Richard is nice to see another Afrika project next to mien ! The tank looks awesome! Very much looking forward to see this dio comes alive ! Good luck with the rest! Best regards Danny
 
Hi Richard
Like Scottie I don't remember this and was also wondering why it was slated. Very inventive to use the shaver foil. Look forward to seeing the Dio come together.
Jim
 
Thread owner
Daniel and Jim, good to see you here. It's about time I do something without jungle and leaves. The shaver foil was by accident...just happen to need a replacement and saw that the mesh had a similar dot arrangement as the kit part.

Cheers,
Richard
 
Thread owner
I used an off white acrylic to spray the interior...

View attachment 316139

Then I added the jerrycan bracket, extinguisher, hook and tool box to the fender...

View attachment 316140

The hull too had a storage bracket installed after fitting the given mesh. I also decided on attaching all tools and spare tracks.

View attachment 316141

Both the top and bottom hull were mated. The gap wasn't there when I pressed down and brush on glue along the seam. It is only dry fitted for now. You can see the exhaust shaver foil cover replacement.

View attachment 316142

Test fitted the gun shield...

View attachment 316143View attachment 316144

The gun assembly went without a hitch. I only made sure that seam lines were sanded down.

View attachment 316145View attachment 316146View attachment 316147

Cheers,
Richard
 

Attachments

  • 361283.jpg
    361283.jpg
    2.6 KB · Views: 0
  • 361282.jpg
    361282.jpg
    2.4 KB · Views: 0
  • 361281.jpg
    361281.jpg
    2.3 KB · Views: 0
  • 361279.jpg
    361279.jpg
    2.6 KB · Views: 0
  • 361278.jpg
    361278.jpg
    2.6 KB · Views: 0
  • 361760.jpg
    361760.jpg
    2 KB · Views: 0
  • 361759.jpg
    361759.jpg
    2.1 KB · Views: 0
  • 361758.jpg
    361758.jpg
    2.1 KB · Views: 0
  • 361757.jpg
    361757.jpg
    2.6 KB · Views: 0
Thread owner
Hi, this is my favorite part of painting...messing up and playing dirty. After coating with future I soaked the interior with turpentine and with a brush loaded with a mix of olive drab, brown and black I touched spots and let the paint spread.

View attachment 316424

I then followed up with darker tones of the same color with a stiff old brush and finally fifnishing with very dark grey for paint chips.

View attachment 316425View attachment 316427View attachment 316428View attachment 316429

I carefully picked out the shells with a sharp tipped paint brush with as little brass paint at the tip so it doesn't flow over the sides of the shell casing. Finished with a light pin wash.

View attachment 316431

Cheers,
Richard
 

Attachments

  • 361766.jpg
    361766.jpg
    3.1 KB · Views: 0
  • 361767.jpg
    361767.jpg
    2.9 KB · Views: 0
  • 361769.jpg
    361769.jpg
    2.7 KB · Views: 0
  • 361770.jpg
    361770.jpg
    2.8 KB · Views: 0
  • 361761.jpg
    361761.jpg
    2.7 KB · Views: 0
  • 361771.jpg
    361771.jpg
    3.1 KB · Views: 0
Hi Richard, seems you are on a roll lately ey? I agree with Jim, nice start and the interior looks good!

Cheers
 
Thread owner
Thank you Jim and Wouter...not a roll but old...:smiling6:

Cheers,
Richard
 
And yet again another fantastic WIP.... i can't wait to see more... i'll make in the future a desert Diorama ... so i'm taking notes...
 
I remember it, but thought you had set it aside due to low mojo. Good to see it return. PaulE
 
Thread owner
Wouter :tears-of-joy: ya an old roll...

Greg...just your luck as the dio itself is still a WIP. Not huge but slightly larger than a vignette...a "vigdio" :tears-of-joy:

Dave S...it so happens there's a GB on so reviving and rehashing.

Paul.... this is a left over from a stalled GB from MM when a member who initially started it disappeard and either Tim...God Bless Him or John R took over the duties. By then I had switched to something else.

Cheers,
Richard
 
Back
Top