Theme editor

Scale Model Shop

Original 1960’s Airfix HMS Prince

Bigfoot57

Well-known member
Joined
Jun 24, 2015
Messages
1,179
Reaction score
299
Points
83
Age
68
1/3
Thread owner
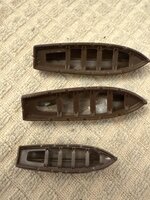
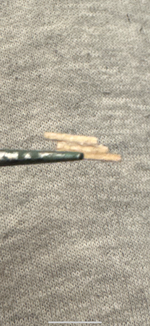
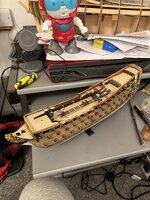
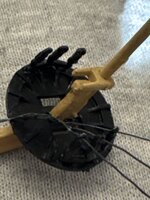
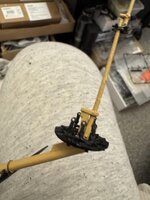
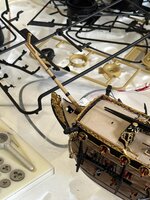
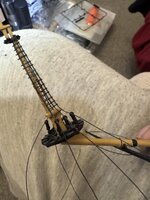
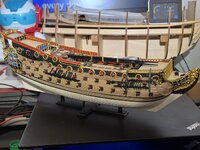
So I brought this off eBay as a partly constructed model as the person had lost interest in it & what they had done was used Airfix enamel paint and glue and looking at the paints are supplied with the model. these also date back to the 1960s Well when I got it. It was not very well made and I’ve had to deconstruct it from scratch soaking in a bowl of water overnight I don’t know if that helped or not
Click image for larger version  Name:	IMG_2909.jpg Views:	0 Size:	263.8 KB ID:	1246674 Click image for larger version  Name:	IMG_2899.jpg Views:	0 Size:	205.6 KB ID:	1246675 Click image for larger version  Name:	IMG_2908.jpg Views:	0 Size:	234.4 KB ID:	1246676 Click image for larger version  Name:	IMG_2924.jpg Views:	0 Size:	409.2 KB ID:	1246677 Click image for larger version  Name:	IMG_2925.jpg Views:	0 Size:	450.8 KB ID:	1246678 
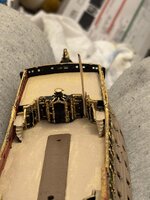
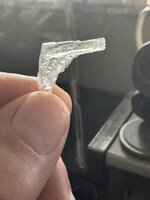
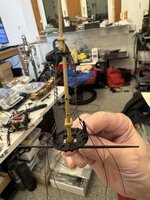
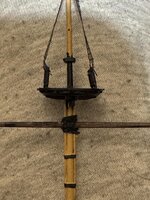
Basically we had a few broken parts which need to be sorted out in the course of building it as you can see, the keel taken a bit of a battering as well, so that’s gonna need sorting so far I’ve given the hull sides a complete repaint they’re now ready for the gilding to be added
been a long time since I constructed a ship of the line so this will be a learning curve for me as well so this is a rare kit. I do not want to screw this one up
 
Last edited:
These Airfix kits of sailing ships are very good for their time. Looks like yours is the 1968 boxing so the moulds were quite new so parts should be better than the much later reissues. It will be an interesting build
 
Thread owner
Click image for larger version  Name:	IMG_2926.jpg Views:	0 Size:	474.2 KB ID:	1247770 Click image for larger version  Name:	IMG_2926.jpg Views:	0 Size:	474.2 KB ID:	1247770 Click image for larger version  Name:	IMG_2926.jpg Views:	0 Size:	474.2 KB ID:	1247770 so when I last posted something I just painted the hull sides and was ready for the detailing before assembling
1st up I painted all the pieces Black silk matt using revelle aqueous acrylic paint
Then using a metallic gold pen from Ghaleri added all the gold and finally painted the windows in blue whether that is correct I couldn’t say as glass usually reflects some of the sky colour when on the outside anyway here’s some pictures
 
Last edited:
Thread owner
Click image for larger version  Name:	IMG_3038.jpg Views:	0 Size:	345.9 KB ID:	1247772 Click image for larger version  Name:	IMG_3035.jpg Views:	0 Size:	305.8 KB ID:	1247773 Click image for larger version  Name:	IMG_3037.jpg Views:	0 Size:	410.8 KB ID:	1247774 Click image for larger version  Name:	IMG_3033.jpg Views:	0 Size:	327.5 KB ID:	1247776 Click image for larger version  Name:	IMG_3033.jpg Views:	0 Size:	327.5 KB ID:	1247776 After that was done it was time to put the thing together. The only problem I had was the transom at the back wouldn’t fit correctly at the bottom so I had to do some slight modifications to the back. It’s now all fitted together along with the deck and the next stage will be to add all the deck detail The elastic bands were used to secure the front and back of the ship as those had a tendency to keep springing off and needed securing whilst the glue set the rear transom was easy. I could just wrap the elastic band around it and on a part of the models sides where there is a step in the deck levels, but the front one there was nothing to hold the band too so I stuck a coffee stirrer through two of the gun ports and did it that way
The final picture shows some 1 mm diameter strips which I’m going to attempt to make a wooden deck with no idea how this is gonna come out but we’ll see you can also see that I cleaned up the paintwork a bit and generally tidied up ready for the next section which will be the deck furniture
 
Last edited:
What a great job you're doing with this. Looks very good. All the gold really sets this model apart.
 
Thread owner
IMG_3090.jpg IMG_3136.jpg IMG_3092.jpg IMG_3148.jpg IMG_3094.jpg IMG_3098.jpg IMG_3103.jpg Right having painted the transom, I then set about cleaning up the paint work and that unicorn which I was not happy with at all after that it was time to do some repair jobs for some reason the person who had this previously had stuck the windless or the capstan onto the rudder and it was missing three of its handles as well why they did that I have no idea anyway using that 1 mm wooden strip I fashioned three new handles for said Capstan painted it then mounted it in its correct position on the deck next were all the companion ways and stairways along the sides of the ship
Next was the cannons the previous owner had stuck them on the wrong way round then i had to fashion some roof covers for the culvers as these were missing completely and I also had to make a replacement gun carriage as that was also missing
I then cleaned up the lifeboats as one of them had a load of glue in the bottom of it and I’ve now painted the gun carriages and the guns ready for mounting on the deck i’ve also made a couple of racks for the lifeboats to stand on as they just can’t be stuck just to the deck I would presume that they have some sort of support that they rest in
 

Attachments

  • IMG_3147.jpg
    IMG_3147.jpg
    313.7 KB · Views: 0
  • 162.5 KB · Views: 0
  • IMG_3072.jpg
    IMG_3072.jpg
    376.6 KB · Views: 0
  • IMG_3137.png
    IMG_3137.png
    2.4 MB · Views: 0
Wow, nostalgia just hit me. I remember getting this kit for Christmas and didn't remember the rest of Christmas day just sat and built it and finished it the next morning. I don't do that anymore.😂
Looking good and what a find.

Cheers,
Wabble
 
Thread owner
Casting Replacement Resin Parts
As there were numerous parts missing from this kit I have now purchased a resin casting kit to make replacement parts using those I do have as a template
This was constructed from something called Bluestuff cause that what it looks like you add boiling water to it and it becomes pliable you can then press things into to make a mould impression leave for an hour remove the item you pressed into it and then you pour in your resin mixture leave it for 24 hours and hopefully you should have resin replacement you can add pigment into the resin mixture if you want it coloured which I didn’t do as I need specific colours and I don’t know how resin would react to arcylic paint so I just went for clear
As you can it looks like it worked so much so I’ve abandon my home made gun carriage and gone for a resin replacement instead the last picture shows a replacement Cathead as this was missing from the kit once painted it should resemble the kit part as normalClick image for larger version  Name:	IMG_3194.jpg Views:	0 Size:	254.2 KB ID:	1248849 Click image for larger version  Name:	IMG_3196.jpg Views:	0 Size:	326.6 KB ID:	1248850 Click image for larger version  Name:	IMG_3195.jpg Views:	0 Size:	190.1 KB ID:	1248851 Click image for larger version  Name:	IMG_3202.jpg Views:	0 Size:	486.7 KB ID:	1248852 Click image for larger version  Name:	IMG_3214.jpg Views:	0 Size:	144.8 KB ID:	1248853 Click image for larger version  Name:	IMG_3194.jpg Views:	0 Size:	254.2 KB ID:	1248849 Click image for larger version  Name:	IMG_3194.jpg Views:	0 Size:	254.2 KB ID:	1248849
 

Attachments

  • IMG_3221.jpg
    IMG_3221.jpg
    148.1 KB · Views: 0
Last edited:
Thread owner
Click image for larger version  Name:	IMG_3255.jpg Views:	1 Size:	223.7 KB ID:	1248880 Click image for larger version  Name:	IMG_3255.jpg Views:	1 Size:	223.7 KB ID:	1248880 so after the last piece of resin pouring I now have all the parts necessary to complete this model. They just need glueing together and painting and then adding to the ship as and when they are required The first picture shows all the parts namely two cat heads one bulkhead stairwell 2 large gun carriages and one small one a replacement lantern as one was totally missing 2 cannons 1 large 1 small and the three parts that make up the admirals entrance which is the front the top and the side the second picture is a close-up of the admirals entrance after it’s been painted
 
Last edited:
Thread owner
IMG_3355.jpg IMG_3356.jpg IMG_3204.jpg IMG_3203.jpg After finishing moulding the missing parts I’ve moved back onto the deck and decided to frame the hatches whether this is correct or not I cannot say but I think it makes the model look better so I’ve done it anyway there are two before shots and two after shots can somebody explain why the photos always appear before the text and they don’t appear in the sequence? I upload them in you should’ve had the two before at the top and the two afters at the bottom not the other way round
 
Last edited:
Thread owner
My latest update from HMS Prince have now added rowing boats along with the oars all the cannons and the Gunport lids the two spare spars and the replacement cat heads which I moulded myself cleaned up the guilding
I’ve done the first round of cleanup on the Gunport lids I also mounted the model on it stand as well so it’s very nearly ready to start the masts and then finally the rigging although I think I may have to get some scale blocks to do the rigging justice and the dead eyes look a bit worse for wear as well but considering this was a total wreck when I brought it off eBay I think it’s coming out quite well
Click image for larger version  Name:	IMG_3453.jpg Views:	0 Size:	379.2 KB ID:	1250521
 

Attachments

  • photo248172.jpg
    photo248172.jpg
    379.2 KB · Views: 0
Last edited:
Thread owner
IMG_3479.jpg IMG_3480.jpg IMG_3485.jpg Next up are IMG_3478.jpg the anchors which again are wrong whoever built these didn’t put them together correctly as you can see there’s a gap at the top and they don’t fit at the bottom where the shank joins the beam so I had to use Tomiya extra thin cement to loosen the old cement pull the shanks out clean them up and replace them into the where they should go in the correct position,
I destroyed one of the rings completely so I’ve made a replacement one out of 1 mm brass wire and painted it. I’ve also threaded through a piece of what should be reasonable scaled anchor rope once looped through the anchors and the anchors are secured in place on the dead eyes I will clean up all the frayed bits of string hanging off of the anchor ropes secure the ends using cotton to simulate thinner ropes
 
Thread owner
IMG_3654.jpg So when I last left you, I’d repaired the anchors as they weren’t stuck correctly since then I’ve done the masts and the rat lines which are still to be finished couldn’t believe how long and how fiddly this so-called simple task was anyway here’s some photos to show where the progress at the moment
starting with the bowsprit mast was painted & the spars were added 1st with Tamiya liquid cement and once this was dried, I actually tied the spars onto the mast using thread then I need the ratlines and finally, foot ropes which were used so that the crew could get out onto the spars to furl & unfurl the sails
this was repeated for all the remaining masts Took approximately two weeks to complete, hence the lack of any postings
You can also see I had to do a repair on one of the spars on the bowsprit hence the piece of wood on the end
other photo show the construction of the binding for the bowsprit which attached to the very forward end of the ship normally, this would form a figure of a loop around the end of the bowsprit I’m loop back around from the Forward end of the ship but because of the way they’ve already started the construction on this the small front deck was already in place and I didn’t want to remove it with a fear of breaking it or other damaging it some other way so what I did was I got two pieces of Dowel with a gap in between to make the binding, which is then looped over the end of the bowsprit and pushed inside the ship to make it look like it had actually been looped around
IMG_3614.jpg IMG_3652.jpg IMG_3563.jpg IMG_3613.jpg IMG_3488.jpg IMG_3575.jpg IMG_3611.jpg IMG_3612.jpg
 

Attachments

  • IMG_3565.jpg
    IMG_3565.jpg
    244.2 KB · Views: 0
  • IMG_3558.jpg
    IMG_3558.jpg
    224 KB · Views: 0
  • IMG_3495.jpg
    IMG_3495.jpg
    347.9 KB · Views: 0
  • IMG_3562.jpg
    IMG_3562.jpg
    281.4 KB · Views: 0
  • IMG_3564.jpg
    IMG_3564.jpg
    288.3 KB · Views: 0
  • IMG_3633.jpg
    IMG_3633.jpg
    340.4 KB · Views: 0
  • IMG_3487.jpg
    IMG_3487.jpg
    369.7 KB · Views: 0
  • IMG_3561.jpg
    IMG_3561.jpg
    445.4 KB · Views: 0
  • IMG_3615.jpg
    IMG_3615.jpg
    353.2 KB · Views: 0
  • IMG_3557.jpg
    IMG_3557.jpg
    482.8 KB · Views: 0
Thread owner
Click image for larger version  Name:	IMG_3735.jpg Views:	0 Size:	333.9 KB ID:	1255304 Click image for larger version  Name:	IMG_3735.jpg Views:	0 Size:	333.9 KB ID:	1255304 Click image for larger version  Name:	IMG_3735.jpg Views:	0 Size:	333.9 KB ID:	1255304 Click image for larger version  Name:	IMG_3735.jpg Views:	0 Size:	333.9 KB ID:	1255304 Click image for larger version  Name:	IMG_3735.jpg Views:	0 Size:	333.9 KB ID:	1255304 Click image for larger version  Name:	IMG_3735.jpg Views:	0 Size:	333.9 KB ID:	1255304 So here’s where I am now with all three masts in place We have a slight issue with the foremast in that it has a slight lean backwards which I will correct with some standing rigging so is what the ship looks like now with all the rat lines now in place to get the tension on each line after tying the knot and applying glue by hung a pair of reversible tweezers from each of the lines whilst the glue was setting this kept them taut apart from the little link lines that run from the top of the spars to the base of the fighting platforms which i’m in the process of constructing this will complete the ratline installation and we can move onto the standing rigging

Click image for larger version  Name:	IMG_3735.jpg Views:	0 Size:	333.9 KB ID:	1255304
 

Attachments

  • IMG_3654.jpg
    IMG_3654.jpg
    617.8 KB · Views: 0
Last edited:
Thread owner
IMG_5042.jpg IMG_5028.jpg IMG_4992.jpg IMG_4990.jpg With the completion of the Porsche, I can now get back to this and I’ve started a Preliminary rigging this will not be a full rig as that would be ridiculous on a scale of this size but it will be sufficient to make it look as though it has got some rigging on it. I’ve already started with the Bowsprit and the Foremast
so as is the normal for me my photographs come out backwards again so starting from the bottom work your way up to the top the first section is my home-made rig for making that piece of rigging that goes between the two static lines this was done by using toothpicks in a cardboard box, bits of thread and superglue after it was attached to the yards and then cut thin slices of toothpick to represent the blocks
The final picture at the top is where I am at present. I’ve just added the three back stays to the Foremast Standing rigging and will continue on from this please note that the blocks I’ve used may be slightly out of scale because they were taken from an old de Prado kit which I think was 1/100th whereas this kit is 1/160th or slightly larger
 
What an incredible transformation from how it started. Real skill and buckets of patience.
 
Back
Top