Theme editor

Scale Model Shop

Painting Motorbike Calipers

Hecky

SMF Supporters
Joined
Mar 6, 2025
Messages
130
Reaction score
103
Points
0
1/3
Thread owner
Hello, I've just had a go at building a 1:12 scale Tamiya bike kit. It's the first time I've made a model for many years and the last time I had a go was just throwing together an Airfix kit when I was young.

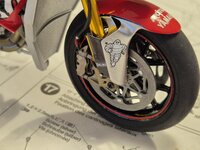
I enjoyed building it and the finished result was ok and I was fairly happy with it but I couldn't figure out how to paint the recessed lettering on the Brembo brake calipers. Is anybody aware of a technique for doing this?

Thanks
 

Attachments

  • 20250306_175810.jpg
    20250306_175810.jpg
    285.4 KB · Views: 0
If they are recessed, and you want the lettering, say Red, then paint the whole thing Red first, then go over the raised areas with whatever other colour you are using, which if you are careful, should leave the red lettering still in place in the recesses.
IYSWIM?
If the lettering is raised, rather than recessed, then you can do the opposite, eg: paint the background colour first, then carefully go over the raised areas to highlight them.
 
Last edited:
Thread owner
Thanks, that makes sense. It's probably a bit late for this build. The lettering is recessed and I painted the whole caliper the main colour first.

I'll put it down to a learning experience for the next one. 20250306_180617.jpg
 
Thread owner
I managed to wipe the paint off the front surface using some isopropyl alcohol and had a go at the method you described. It's not perfect but I think it's good enough to give the right effect. It's really tricky to get right. I think it worked better when the gold colour was slightly thicker. When it was too 20250307_105718.jpg thin then it flowed in over the writing. It's something that will take practice.
 
A better way (in my opinion) is to paint the main colour first with a non-water based paint (eg lacquer). When dry you can infill the recessed letters with a water based paint (I use Vallejo) then when dry gently rub over with a moist cotton bud. It will remove any paint on the raised part but leave it in the recesses.
 
Another way to do this is to add thinned paint into the recessed area and let it settle by gravity. It works well for things like instrument dials so should work here. The part has to be horizontal though, and it needs a gentle touch and a decent brush.
If you use water based acrylic like Vallejo a drop of flow aid in the paint mix will reduce the surface tension of the paint and allow it to run better.
Paint in and wipe off works best with enamels, because when they are touch dry a scrap of kitchen towel dampened with thinners can be used to remove the excess. This is not the easiest of techniques to achieve with acrylic because of the fast drying time, and when acrylics are dry, they are dry….
 
Thread owner
That sounds like a great idea. I'll try that next time. Overall, I'm happy with the way it turned out. It's certainly been a learning experience for the next one.
 
Actually I think Tim's on to something. An oil based paint could be used and would come off very easily with thinners, only issue is the relatively long drying time.
 
Thread owner
Thanks, took me ages. It's my first go, but I have been thinking about it for a long time!
 
Thread owner
I tried again. This time I used a can of acrylic lacquer to cover the Tamiya water based paint and then used very thin Tamiya x-7 and a fine brush to fill the lettering. Once it was nearly dry, I used a bit of kitchen roll dipped in isopropanol (the Tamiya X-20A thinners didn't work) 20250308_122022.jpg to wipe away any excess. It definitely worked better than my last attempt.
 
Back
Top