
You are using an out of date browser. It may not display this or other websites correctly.
You should upgrade or use an alternative browser.
You should upgrade or use an alternative browser.
Peters British ATMP Gekko models 1/35
- Thread starter pjgtech
- Start date
- Joined
- Dec 28, 2023
- Messages
- 2,296
- Location
- Swale Kent UK
- First Name
- Peter
1/3
Just noticed that I think I have one of the tyres on the wrong way round, Doh!
There's always summit int there!!!
Well not changing it now, so it will have to stay like that....")
There's always summit int there!!!
Well not changing it now, so it will have to stay like that....
- Joined
- Dec 28, 2023
- Messages
- 2,296
- Location
- Swale Kent UK
- First Name
- Peter
1/3
Todays update....
First off the wheels have been primed up....
.webp")
Then the driver got his first top coat, but still lots of tidying to do here and adding more detail, etc.
.webp")
Then I added some darker browns to the Buff uniforms on the diorama figures to give the impression of camo, plus touched up a few more little details, these figures are now nearly done, but not quite.
Also started to add the (included with the kit) ropes around the ammo crate....
I think they are a tiny tad over scale, but I'm leaving them as is and will probably weather them up a bit when the crate gets weathered too.
.webp")
The ammo crate is now fully roped up, did not turn out too bad but it was a bit fiddly to get it looking neat....
.webp")
Just a quick photo of the underside, simply because I don't think I've shown one so far. Not much details underneath TBH. I still need to add the small exhaust and its little cover plate.....
.webp")
Finally got around to adding the fuel cans in their frames, again a bit fiddly to get them looking ok, they only each attach to one small part of the upper side frame sections, so not much holding them on, so CA was applied. Here's the drivers side....
.webp")
And here's the passenger side fuel can in its frame....
.webp")
Here is the rear view of the fuel cans in frames attached the upper main vehicle canopy frame, with pallet and large ammo crate.
I have decided to leave the rear access panel in the down/open position so you can see what inside. The kit recommends the spare tyre fits here, but it also comes with a few spare rifle, etc, so they could be placed there too, we'll see...
.webp")
Here is how the pallet and ammo crate look once placed onto the vehicle....
.webp")
And the front view.....
.webp")
Starting to see the finish line now, but still lots of small bits to do, then a gloss coat, then decals and weathering, etc.....
First off the wheels have been primed up....
Then the driver got his first top coat, but still lots of tidying to do here and adding more detail, etc.
Then I added some darker browns to the Buff uniforms on the diorama figures to give the impression of camo, plus touched up a few more little details, these figures are now nearly done, but not quite.
Also started to add the (included with the kit) ropes around the ammo crate....
I think they are a tiny tad over scale, but I'm leaving them as is and will probably weather them up a bit when the crate gets weathered too.
The ammo crate is now fully roped up, did not turn out too bad but it was a bit fiddly to get it looking neat....
Just a quick photo of the underside, simply because I don't think I've shown one so far. Not much details underneath TBH. I still need to add the small exhaust and its little cover plate.....
Finally got around to adding the fuel cans in their frames, again a bit fiddly to get them looking ok, they only each attach to one small part of the upper side frame sections, so not much holding them on, so CA was applied. Here's the drivers side....
And here's the passenger side fuel can in its frame....
Here is the rear view of the fuel cans in frames attached the upper main vehicle canopy frame, with pallet and large ammo crate.
I have decided to leave the rear access panel in the down/open position so you can see what inside. The kit recommends the spare tyre fits here, but it also comes with a few spare rifle, etc, so they could be placed there too, we'll see...
Here is how the pallet and ammo crate look once placed onto the vehicle....
And the front view.....
Starting to see the finish line now, but still lots of small bits to do, then a gloss coat, then decals and weathering, etc.....
- Joined
- Dec 28, 2023
- Messages
- 2,296
- Location
- Swale Kent UK
- First Name
- Peter
1/3
Bloody PE, AaarrrhhhhH!!! 
So the little figures I am doing for the diorama that will feature this x6 wheeler are British SF troop in Afghanistan, includes a radio operator.
He is kneeling down next to the radio, eg: big box with a thin aerial, but the kit also has what appears to be a satellite, radio, aerial thingy, whatchamacallit, doohicky, too, which is made from tiny, and I do mean TINY parts and PE.
The instructions make it all look so easy.... yeah right...
.webp")
Just spent best part of an hour trying to make this bloody thing, it is by far the thing that has had the smallest, most fiddly, awkward flaming parts that I have ever come across. I just used thick CA glue on this as its pretty fast setting, but gives about 30 secs to make any adjustments, so just enough.
Getting the things off the PE sprue without breaking them was the first challenge, but luckily my new Dspiae scalpel is very small and very sharp, so step 1 = complete.
Not losing the little blighters on the desk was next challenge, well there were seven of the tiny little crosses on the sprue and I did manage to lose one to the desk/carpet monster, but the instructions only show six, so maybe they supply a spare?
Next challenge was to actually assemble it....
I eventually got it together in what vaguely looks like it should, not perfect, but I was about to gauge my own eyes out by the end, so its staying as it is now. Trying get everything to line up and to be the correct spacing was so hard to achieve cos its so small and everything is so close to each other part, but, we got there.... Whether it was actually worth the effort or not is another matter, but hey ho. I will not let this bloody PE beat me....

Standard item for comparison pictured....
.webp")
And breathe........ [Sigh]")
Edit, hmmm, looking at the photo, the thin aerial on the radio box is way over scale, so might have to replace that with some thin wire....
So the little figures I am doing for the diorama that will feature this x6 wheeler are British SF troop in Afghanistan, includes a radio operator.
He is kneeling down next to the radio, eg: big box with a thin aerial, but the kit also has what appears to be a satellite, radio, aerial thingy, whatchamacallit, doohicky, too, which is made from tiny, and I do mean TINY parts and PE.
The instructions make it all look so easy.... yeah right...
Just spent best part of an hour trying to make this bloody thing, it is by far the thing that has had the smallest, most fiddly, awkward flaming parts that I have ever come across. I just used thick CA glue on this as its pretty fast setting, but gives about 30 secs to make any adjustments, so just enough.
Getting the things off the PE sprue without breaking them was the first challenge, but luckily my new Dspiae scalpel is very small and very sharp, so step 1 = complete.
Not losing the little blighters on the desk was next challenge, well there were seven of the tiny little crosses on the sprue and I did manage to lose one to the desk/carpet monster, but the instructions only show six, so maybe they supply a spare?
Next challenge was to actually assemble it....
I eventually got it together in what vaguely looks like it should, not perfect, but I was about to gauge my own eyes out by the end, so its staying as it is now. Trying get everything to line up and to be the correct spacing was so hard to achieve cos its so small and everything is so close to each other part, but, we got there.... Whether it was actually worth the effort or not is another matter, but hey ho. I will not let this bloody PE beat me....
Standard item for comparison pictured....
And breathe........ [Sigh]
Edit, hmmm, looking at the photo, the thin aerial on the radio box is way over scale, so might have to replace that with some thin wire....
- Joined
- Dec 28, 2023
- Messages
- 2,296
- Location
- Swale Kent UK
- First Name
- Peter
1/3
Ok, so todays little update....
Added the weathering to the side checker plates using a weathering pencil.
.webp")
In this kit there is an extra (square) checker plate, which fits perfectly the rear bay area. However, it is not mentioned or shown at all in the instructions! So I am assuming that it goes there, above the spare wheel? Its been painted and weathered the same as the side checker plates.
.webp")
When the pallet is loaded onto the rear, it is only just wide enough to span the open area, so again, I assume this removable plate was used to bridge and cover the gap, to stop pallets etc falling down into the rear loading bay, so thats what I'm going to use it for.
.webp")
Pic of the spare wheel in place, it still has to be painted a bit more and then weathered.
.webp")
Heres the rear with the spare wheel and checker plate in place....
.webp")
I have now painted (just used black primer) the fiddly little satellite aerial thingy....
.webp")
I have now removed the over scale plastic aerial from the radio/comms box/unit and replaced with thinner wire which is fixed via drilling small hole and fixing with CA. Its better, but maybe still a tad over scale, but I could not find my even thinner wire, so it'll prolly stay like that....
.webp")
So next major step is to finish the wheels and tryes, painting and weathering then fixing in place.
.webp")
I have already painted one side of the wheel hubs, I will paint the outer wheel hubs next, then apply a black tyre paint to the wheels...
As this will be placed in a sandy (eg: Afghanistan) type terrain diorama, I will be weathering the wheels and tyres (and vehicle) with a dust, dirt, sand wash/pigment, etc to hopefully give it that sort of desert look.
.webp")
And lastly I have added a bit more details to the driver, but he's still not finished yet, and I'm yet to make up my mind what colour I will be painting his goggles, eg: Black, Chrome, or what?
.webp")
Added the weathering to the side checker plates using a weathering pencil.
In this kit there is an extra (square) checker plate, which fits perfectly the rear bay area. However, it is not mentioned or shown at all in the instructions! So I am assuming that it goes there, above the spare wheel? Its been painted and weathered the same as the side checker plates.
When the pallet is loaded onto the rear, it is only just wide enough to span the open area, so again, I assume this removable plate was used to bridge and cover the gap, to stop pallets etc falling down into the rear loading bay, so thats what I'm going to use it for.
Pic of the spare wheel in place, it still has to be painted a bit more and then weathered.
Heres the rear with the spare wheel and checker plate in place....
I have now painted (just used black primer) the fiddly little satellite aerial thingy....
I have now removed the over scale plastic aerial from the radio/comms box/unit and replaced with thinner wire which is fixed via drilling small hole and fixing with CA. Its better, but maybe still a tad over scale, but I could not find my even thinner wire, so it'll prolly stay like that....
So next major step is to finish the wheels and tryes, painting and weathering then fixing in place.
I have already painted one side of the wheel hubs, I will paint the outer wheel hubs next, then apply a black tyre paint to the wheels...
As this will be placed in a sandy (eg: Afghanistan) type terrain diorama, I will be weathering the wheels and tyres (and vehicle) with a dust, dirt, sand wash/pigment, etc to hopefully give it that sort of desert look.
And lastly I have added a bit more details to the driver, but he's still not finished yet, and I'm yet to make up my mind what colour I will be painting his goggles, eg: Black, Chrome, or what?
- Joined
- Apr 27, 2018
- Messages
- 15,028
1/3
I would say that was a good assumption to make about the floor plate. The build is coming on nicely.

- Joined
- Dec 28, 2023
- Messages
- 2,296
- Location
- Swale Kent UK
- First Name
- Peter
1/3
Did a bit more today. Its all starting to come together....
So first off was painting the tyres with a tyre black, (they had already been primed).
.webp")
Next up was final painting of the few accessories, eg: guns and pioneer tools. I will touch up the guns with some dry brushing to hopefully pull out a bit more detail....
.webp")
The driver is pretty much finished and I think I'm gonna place a rifle across his lap...
.webp")
Then it was on to decals, so after a gloss coat on thoses are that will have decals applied, then couple of hours to dry, then some decals went on.
Few dials to the dash and couple of info/warning panels on the other side of the dash.
.webp")
Then some more decals to the ammo crate (eg: lots!)
.webp")
I did leave some decals off some ammo tins, just to make it look a bit more random...
Then just a bit more weathering to the main vehicle chassis, some dry brushing and a rust effect added and weathered up the cab area, seats, etc a bit. Plus some chipping and a few scratches applied with a couple of weathering pencils...
.webp")
.webp")
.webp")
Then it was on to the wheels, as they had now dried from the black tyre paint coat. I wanted to add a sandy effect to the tyres, cos it will eventually be placed in a desert diorama. So I thought I'd test out the effect on the spare tyre, using some Mig Middle East pigment dust and some Mr Hobby Aqueous no' 37, (Wood Brown) to create a sort of thick paste, then removing most of it from the brush and dry brushing it onto the tyre treads. Seemed to work and look ok....
.webp")
So then on to applying the sand effect to the other wheels/tyres.....
.webp")
So thats it for today, almost there, gotta attach the wheels to the vehicle and some final weathering, detailing, etc then we should be ready for the final pics....
So first off was painting the tyres with a tyre black, (they had already been primed).
Next up was final painting of the few accessories, eg: guns and pioneer tools. I will touch up the guns with some dry brushing to hopefully pull out a bit more detail....
The driver is pretty much finished and I think I'm gonna place a rifle across his lap...
Then it was on to decals, so after a gloss coat on thoses are that will have decals applied, then couple of hours to dry, then some decals went on.
Few dials to the dash and couple of info/warning panels on the other side of the dash.
Then some more decals to the ammo crate (eg: lots!)
I did leave some decals off some ammo tins, just to make it look a bit more random...
Then just a bit more weathering to the main vehicle chassis, some dry brushing and a rust effect added and weathered up the cab area, seats, etc a bit. Plus some chipping and a few scratches applied with a couple of weathering pencils...
Then it was on to the wheels, as they had now dried from the black tyre paint coat. I wanted to add a sandy effect to the tyres, cos it will eventually be placed in a desert diorama. So I thought I'd test out the effect on the spare tyre, using some Mig Middle East pigment dust and some Mr Hobby Aqueous no' 37, (Wood Brown) to create a sort of thick paste, then removing most of it from the brush and dry brushing it onto the tyre treads. Seemed to work and look ok....
So then on to applying the sand effect to the other wheels/tyres.....
So thats it for today, almost there, gotta attach the wheels to the vehicle and some final weathering, detailing, etc then we should be ready for the final pics....
- Joined
- Dec 28, 2023
- Messages
- 2,296
- Location
- Swale Kent UK
- First Name
- Peter
1/3
The wheels are on!!!
Dirtied up the underside of the chassis and then add the wheels, seemed to go on ok.
There were some tiny (and I do mean TINY) track rod type arms that were supposed to go on some of the wheels, but as they will not be seen and my chubby little fingers could not cope with such tiny things, I made the executive decision to leave them off.
.webp")
.webp")
So wheels are on and we are tantalisingly close to finishing this one. Still gotta add the side mirrors, few tiny bits to tidy up, finish the driver, etc, but we are nearly there....
.webp")
.webp")
Here's the spare wheel in the rear....
.webp")
And here's the cover checker plate fitted....
.webp")
And the pallet fitted onto the rear plate....
.webp")
And the ammo crate, it still has its gloss coat after the decals were fitted, so the whole thing, vehicle, pallet, ammo carte, etc wil all need a nice matt varnish top coat to finish it all off....
.webp")
So the next set of photos, (hopefully later today or tomorrow) will be the final ones with the whole thing completed.....
.webp")
Dirtied up the underside of the chassis and then add the wheels, seemed to go on ok.
There were some tiny (and I do mean TINY) track rod type arms that were supposed to go on some of the wheels, but as they will not be seen and my chubby little fingers could not cope with such tiny things, I made the executive decision to leave them off.
So wheels are on and we are tantalisingly close to finishing this one. Still gotta add the side mirrors, few tiny bits to tidy up, finish the driver, etc, but we are nearly there....
Here's the spare wheel in the rear....
And here's the cover checker plate fitted....
And the pallet fitted onto the rear plate....
And the ammo crate, it still has its gloss coat after the decals were fitted, so the whole thing, vehicle, pallet, ammo carte, etc wil all need a nice matt varnish top coat to finish it all off....
So the next set of photos, (hopefully later today or tomorrow) will be the final ones with the whole thing completed.....
- Joined
- Apr 27, 2018
- Messages
- 15,028
1/3
Looking good mate.
- Joined
- Dec 28, 2023
- Messages
- 2,296
- Location
- Swale Kent UK
- First Name
- Peter
1/3
I just assumed that the ropes would look like they are tied underneath and through the pallet, rather than tied to the vehicle.All looks very good but I can't tell how the ammo package was secured to the pallet?
Instructions just show how I've done it, the ropes were CA glued all the way round, letting each point dry first, then pulling the rope around to the next point, CA again, and rinse and repeat for each rope, to try to make it look all reasonably tight.
How would you do it?
- Joined
- Dec 28, 2023
- Messages
- 2,296
- Location
- Swale Kent UK
- First Name
- Peter
1/3
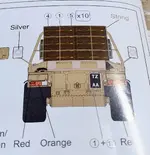
Aha, so the instructions, regarding the roping of the ammo crate on the pallet, was not 100% clear. (Thats my excuse, and I'm sticking to it, Lol)
See pictures from the instructions, the first one just shows the ropes (String) going around the ammo crate, but not the pallet.
.webp")
So, being the numpty that I am, I just assumed that all the ropes only went around the ammo tins, and not the pallet, to secure the tins, but not secure them to the pallet, which thinking about it now, makes no sense, Doh!
The second instruction manual picture does show the ropes going under the pallet, but you do have to look quite close, to spot this. Obviously I did not!
So I have now redone the ropes. But, I had already cut the ropes and only had a tiny bit left as spare, so could not completely redo the ropes in question, and I have no other matching thread or string.
So, using what little I had left I just CA'd them onto the original as carefully as I could and continued them under and through the pallet, so the pile of ammo crates are now attached to the pallet.....[phew]
Looks a bit of a bodge TBH, but as above, its prolly the best I could do in the circumstances.
Lesson learnt, read the instructions carefully!
.webp")
See pictures from the instructions, the first one just shows the ropes (String) going around the ammo crate, but not the pallet.
So, being the numpty that I am, I just assumed that all the ropes only went around the ammo tins, and not the pallet, to secure the tins, but not secure them to the pallet, which thinking about it now, makes no sense, Doh!
The second instruction manual picture does show the ropes going under the pallet, but you do have to look quite close, to spot this. Obviously I did not!
So I have now redone the ropes. But, I had already cut the ropes and only had a tiny bit left as spare, so could not completely redo the ropes in question, and I have no other matching thread or string.
So, using what little I had left I just CA'd them onto the original as carefully as I could and continued them under and through the pallet, so the pile of ammo crates are now attached to the pallet.....[phew]
Looks a bit of a bodge TBH, but as above, its prolly the best I could do in the circumstances.
Lesson learnt, read the instructions carefully!
Attachments
.webp")
.webp")
- Joined
- Dec 28, 2023
- Messages
- 2,296
- Location
- Swale Kent UK
- First Name
- Peter
1/3
Just a small update on this....
I had previously stated that there was no reference to the rear loading area square checker plate in the instructions, and I just assumed it would slot onto the top of the rear loading area.
I had tried to slot it into the floor of the rear loading bay but it would not fit, hence my assumption it went on top.
Well, today I was sorting through the box, ready to bin it as the model is now done, and in the bottom of the box, face down, with its plain empty white side facing up, was another sheet which I had previously not noticed.
I have a gander and its an addendum sheet for, yep, you guessed it, the rear checker plate section.
It does indeed go on the floor of the rear loading area, not the top! How you ask, when I had previously already tried it there? Well it is in fact actually not quite square, its ever so slightly rectangular, and I had obviously not had it the correct way round to make it fit. So, I tried again, rotating it and yes, it now fits onto the rear loading area floor, nice and snug.
So..... revised completion pics with therear checker plate now in its correct place.....
.webp")
.webp")
I had previously stated that there was no reference to the rear loading area square checker plate in the instructions, and I just assumed it would slot onto the top of the rear loading area.
I had tried to slot it into the floor of the rear loading bay but it would not fit, hence my assumption it went on top.
Well, today I was sorting through the box, ready to bin it as the model is now done, and in the bottom of the box, face down, with its plain empty white side facing up, was another sheet which I had previously not noticed.
I have a gander and its an addendum sheet for, yep, you guessed it, the rear checker plate section.
It does indeed go on the floor of the rear loading area, not the top! How you ask, when I had previously already tried it there? Well it is in fact actually not quite square, its ever so slightly rectangular, and I had obviously not had it the correct way round to make it fit. So, I tried again, rotating it and yes, it now fits onto the rear loading area floor, nice and snug.
So..... revised completion pics with therear checker plate now in its correct place.....
Legal Notice
scalemodelling.co.uk is a privately operated online discussion forum. All content posted by members reflects their own views and opinions and does not necessarily represent those of the forum owners or administrators. While reasonable efforts are made to moderate content, no responsibility is accepted for user-generated material. By using this site, you agree to comply with UK law and the forum rules.