
You are using an out of date browser. It may not display this or other websites correctly.
You should upgrade or use an alternative browser.
You should upgrade or use an alternative browser.
Pete's Eurocopter
- Thread starter stillp
- Start date
- Status
- Not open for further replies.
Thanks Joe. To be honest they didn't need much polishing, it was more a case of cleaning off the residue of the clear. Came of with little more than a wipe then a quick buff with a clean cloth.
Pete
Pete
Had a long day in London doing some of the worky thing (I'm retired, but still do a bit occasionally) so didn't feel like doing much, but those tricky decals for the roof switch panel have had a coat of Galeria matt.
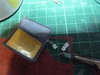
Remember I was asking if anybody could understand the instructions saying to place some decals inside, some outside? Here they are (well, the inside ones):
View attachment 296366
Small aren't they!
And here they are in place:
View attachment 296367
They can dry overnight and tomorrow I might fit these doors. I'm tempted to pose them open, but the masking will be easier with them closed.
Pete
Attachments

Hadn't realised it had been so long since I posted - I've been a bit distracted by helping an old schoolmate with some genealogy. Some progress on the Eurocopter, although not all as I'd like.
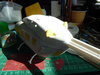
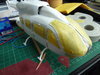
You won't be surprised to hear that the windscreen didn't fit! It needed squeezing in at the lower rear corners, and pressing down at the top. All curved surfaces so nothing for clamps to grip. Tried to reshape it a little after soaking in hot water, which helped a little. After a lot of attempts I managed to get it somewhere close with tape and rubber bands:
View attachment 297425
After taking the tape off I found that the windscreen was sitting a bit proud of the fuselage, so after fitting all the doors first to keep the sanding dust out I sanded it down to be nearer to a flush fit, then micromeshed and polished it back to a reasonable semblance of clarity. I'm still not satisfied with the fit, but to be honest I'm getting demotivated by this kit - it has some lovely detail, but the fit of some of the major parts is terrible. I'm not going to take that windscreen out again, so it'll have to do.
Maybe it'll look better with a coat of paint, and I think it's at the stage where if I add any more of the small parts, they'll get broken off anyway, so it's time for a coat of gloss white!
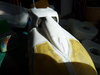
On with the masking:
View attachment 297426
Underneath:
View attachment 297427
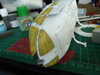
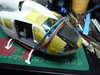
The intakes have been plugged with foam:
View attachment 297428
And the exhausts (well, the holes where they fit) protected with some ear plugs:
View attachment 297429
I've brushed some white primer around the windscreen masking, so the next task is a coat or three of Tamiya gloss white. Wish me luck!
Pete
You won't be surprised to hear that the windscreen didn't fit! It needed squeezing in at the lower rear corners, and pressing down at the top. All curved surfaces so nothing for clamps to grip. Tried to reshape it a little after soaking in hot water, which helped a little. After a lot of attempts I managed to get it somewhere close with tape and rubber bands:
View attachment 297425
After taking the tape off I found that the windscreen was sitting a bit proud of the fuselage, so after fitting all the doors first to keep the sanding dust out I sanded it down to be nearer to a flush fit, then micromeshed and polished it back to a reasonable semblance of clarity. I'm still not satisfied with the fit, but to be honest I'm getting demotivated by this kit - it has some lovely detail, but the fit of some of the major parts is terrible. I'm not going to take that windscreen out again, so it'll have to do.
Maybe it'll look better with a coat of paint, and I think it's at the stage where if I add any more of the small parts, they'll get broken off anyway, so it's time for a coat of gloss white!
On with the masking:
View attachment 297426
Underneath:
View attachment 297427
The intakes have been plugged with foam:
View attachment 297428
And the exhausts (well, the holes where they fit) protected with some ear plugs:
View attachment 297429
I've brushed some white primer around the windscreen masking, so the next task is a coat or three of Tamiya gloss white. Wish me luck!
Pete
Attachments

Well, I needn't have bothered with sanding and polishing the windscreen - the glue (Contacta Clear) seems to have relaxed a bit, and the corners of the 'screen are sticking out again.
I've just wacked a bit of filler around the edges and painted over it. At least it's all the same colour now. I just want to get it finished and move on to something less frustrating.
Pete
I've just wacked a bit of filler around the edges and painted over it. At least it's all the same colour now. I just want to get it finished and move on to something less frustrating.
Pete
Hi Peter
Just had a good read through from the start. This has fought you all the way so hardly surprising that you just want it done with. Having said that you have done a fine job. Real shame about the screen as up until then you have overcome the other issues. Must be an old kit judging by the flash - the moulds have clearly seen better days. I look forward to the final reveal.
Jim
Peter,
Just sat and had a read through with a cuppa. Looks like it didn’t have the best fit of parts but as Jim says, regardless of that you’ve made a good job of it.
Hope there are no more surprises and you get it finished .
Si
Just sat and had a read through with a cuppa. Looks like it didn’t have the best fit of parts but as Jim says, regardless of that you’ve made a good job of it.
Hope there are no more surprises and you get it finished .
Si
Thanks chaps. It's a real shame about the fit issues, as there's some lovely detail on the mouldings. I can understand a bit of warping over time, but some parts being the wrong size by 2 - 3 mm does make you wonder about their quality control.
Still, I only paid £20 for this and a 1/35 Academy Pave Hawk.
Pete
Still, I only paid £20 for this and a 1/35 Academy Pave Hawk.
Pete
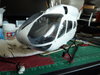
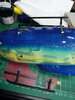
Well, the paint hasn't turned out too bad.
View attachment 300968
Needs some touching up where the undercarriage has been brush-painted black, some of which ran under the masking.
The windows will be OK after a bit of work with a cocktail stick. You can see some of the mess caused by the problems with the windscreen in the pic below. I'm not going to try to clean that up, it looks OK from a few yards away, if you squint a bit.
View attachment 300969
View attachment 300970
There are lots of small detail parts to be added, including those two aerials(?) you can see in the pic above, but I think I need to add the decals first, or I'll be knocking off the details when decalling.
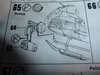
The instructions still have me guessing how some parts are supposed to fit - I'm thinking that the person who wrote them hadn't seen the kit! For example, there are two identical flat triangular that fit on the lower legs of the undercarriage. The instructions show these as parts 81(LH side) and 96 (RH). However the two are identical, both numbered 81 on the sprue. Just below the pic showing you to fit parts 81 and 96, there's a pic showing how to fit the tail rotor... which is part 96!
Oh well, onwards and upwards!
Pete
View attachment 300968
Needs some touching up where the undercarriage has been brush-painted black, some of which ran under the masking.
The windows will be OK after a bit of work with a cocktail stick. You can see some of the mess caused by the problems with the windscreen in the pic below. I'm not going to try to clean that up, it looks OK from a few yards away, if you squint a bit.
View attachment 300969
View attachment 300970
There are lots of small detail parts to be added, including those two aerials(?) you can see in the pic above, but I think I need to add the decals first, or I'll be knocking off the details when decalling.
The instructions still have me guessing how some parts are supposed to fit - I'm thinking that the person who wrote them hadn't seen the kit! For example, there are two identical flat triangular that fit on the lower legs of the undercarriage. The instructions show these as parts 81(LH side) and 96 (RH). However the two are identical, both numbered 81 on the sprue. Just below the pic showing you to fit parts 81 and 96, there's a pic showing how to fit the tail rotor... which is part 96!
Oh well, onwards and upwards!
Pete
Attachments
Hi Joe, thanks, I was thinking no-one was watching!
I probably should have left the masking on, the top and bottom need to be painted blue. I've been working on some of the little bits that need adding onto the outside, but they're not going to be added until the painting's finished and the decals are on, or they'll keep getting broken off. The instructions continue to confuse...
I'll do an update later.
Pete
G
Guest
Guest
You’re a better man than me Pete!
I’ve just caught up with this, and I would have abandoned it long ago.
Looking good from all the hard work.
Jim
I’ve just caught up with this, and I would have abandoned it long ago.
Looking good from all the hard work.
Jim
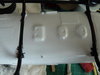
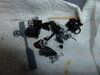
Well, I haven't been able to do much today, real life is getting in the way again. I've been preparing and painting some of the external details:
View attachment 301751
This little fella looks like he belongs in Star Wars:
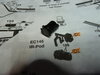
View attachment 301752but I think he's actually an IR camera. The instructions would have it fitted to a rail on the right-hand side of the undercarriage, but there's nowhere for it to fit! I'll have to scratch something. Meanwhile, there's a part (actually an assembly of 11 parts) that looks like a searchlight, but Revell call it an IR pod:
View attachment 301753
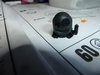
There is a mounting point for that one:
View attachment 301754
Hopefully I'll get a chance to do some more tomorrow but my wife has to go for a bone density scan in the morning.
Pete
View attachment 301751
This little fella looks like he belongs in Star Wars:
View attachment 301752but I think he's actually an IR camera. The instructions would have it fitted to a rail on the right-hand side of the undercarriage, but there's nowhere for it to fit! I'll have to scratch something. Meanwhile, there's a part (actually an assembly of 11 parts) that looks like a searchlight, but Revell call it an IR pod:
View attachment 301753
There is a mounting point for that one:
View attachment 301754
Hopefully I'll get a chance to do some more tomorrow but my wife has to go for a bone density scan in the morning.
Pete
Attachments
It's my first GB Jim, I can't give up!You’re a better man than me Pete!
I’ve just caught up with this, and I would have abandoned it long ago.
Looking good from all the hard work.
Jim
Pete
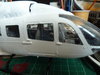
Oh bother! (Slightly stronger language was actually used)
View attachment 302970
Dropped while removing the masking, and snapped the undercarriage off on one side. That'll need pinning.
Some overspray and paint creep too, but that's relatively easy to sort.
Pete
View attachment 302970
Dropped while removing the masking, and snapped the undercarriage off on one side. That'll need pinning.
Some overspray and paint creep too, but that's relatively easy to sort.
Pete
Attachments
- Status
- Not open for further replies.
Legal Notice
scalemodelling.co.uk is a privately operated online discussion forum. All content posted by members reflects their own views and opinions and does not necessarily represent those of the forum owners or administrators. While reasonable efforts are made to moderate content, no responsibility is accepted for user-generated material. By using this site, you agree to comply with UK law and the forum rules.