Theme editor

Scale Model Shop

Pushing Back .......

Thread owner
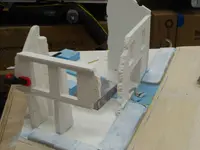
Alrighty ..... its time to commit glue to foam .... and plaster .....

P1010630.webp

first the glue .....

P1010632.webp

then the plaster ....

P1010633.webp

I'll clean up the overspill as I go ....

P1010634.webp

Straight enough ..... with bombs going off left right and centre ...... nothings straight .... :D

P1010635.webp

even the curves look straight ... maybe not .....

P1010636.webp

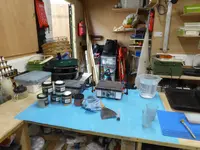
one last shot for now ...... must get going ..... targets to meet.

cheers

toto
 
Thread owner
OK ...... still on the march here ......

P1010637.webp

straight enough .....

P1010638.webp

and where I have just left off .....

P1010639.webp

one more main stretch to go ......

anyone spot the deliberate mistake ...... I was going to give all the balsa and foam a coat of brown primer ...... dohhhhhh.

never mind ..... it was not essential .... just a would like to ....

time to eat and then try and get the remaining kerbs finished off for today ..... a time sapping process ...... but not as bad as the cobbles ...... Ohhhhhhh them cobbles ...... :D

back soon ( ish )

toto
 
I will look back in next year when you have the cobbles laid. i will say it is quite relaxing laying the cobbles I have done it on a couple of builds this was after I cast them all as well lol.
 
Thread owner
Hi Scottie,

you understand my pain then ..... :D

I have maybe between one and two thousand cast so far but will probably need more. My moulds are at the ready. I'll [lay around at the junction to see where the best point is for maintaining straight in all directions ...... could be fun but worth spending the time over at this stage.

I've plenty plain grey but will need to cast more of other colours to complete the " specials " that run parallel with the kerb line at the sides of the roads where the drains will go.

I have just more or less finished the kerb lines as we speak with only the wider radius kerbs to glue in place at the T junction ..... thats for tomorrow ..... I feel knackered now.

so some closing images for now .....

P1010640.webp

As I said ... these curves are not glued in place yet. A bit filing etc to get them bob on.

P1010641.webp

I think they look ok.

P1010642.webp

Happy ( ish ) with that.

P1010643.webp

and that ....

P1010644.webp

The long shot .....

P1010645.webp

and ..... the last shot ..... for now at least ..... until tomorrow.

Time to go until later as I have an invoice to prep and send ..... at least that is the only work related thing I'll be doing until I return to Dounreay a week on Monday ..... On holiday for a week ...... yippeeeeeee.

cheers for now

toto
 
Thread owner
Hi John,

It is a very slight camber but it is amazing how noticeable it is once you start to lay the cobbles.

Loads ofsetting out to do tomorrow. I will take some time out tomorrow to turn my attention to the special cobbles. These get away from a plain grey finish and define gutters and the like. I am reliably told they were udes in certain countries.

I have man hole and cover moulds and I am sure that I got some small drain / siver moulds although I cant be 100% on that one.

I should get on to cobble laying at some point tomorrow. I'll check and see how many " specials " I have cast and work out how many more will need to be done. I have plenty cobble moulds so I can cast in large amounts ..... as long as my sanity lasts out. :D

Now .... off to hunt for sign posts and other odds and ends.

Cheers for now and hope you are finding it interesting.

Toto
 
Thread owner
Hi flyjoe,

Glad you find it interesting. I hope I can match the expectation going forward. Enjoying the journey regardless.

Cheers

Toto
 
Thread owner
So ....where are we today.

I think I'll fill in the little junction corner gaps give the footpaths a little coat of diluted PVA and plaster to give better adhesion for when the paviours get laid and also coat the balsa wood road subsurface with the diluted PVA as well.

That could take a little while to dry so whilst I am awaiting it all drying, I can go ahead and glue the various building sections together. I will be using alaphatic glue for that. It has better " grab" capabilities than normal PVA and is rumoured to be stronger as well.

Once the PVA on the road subsurface is dry, time to mark out some reference lines for the cobble stones.

Lets see how far I get. I still have to cast some more " specials " for the cobbles as well as manhole covers and frames.

More as it happens.

Cheers for now

Toto
 
Your crater could be at the intersection to deny the road to vehicles causing them to take more interesting routes. Beautiful work so far.
 
Thread owner
Hi,

I had been thinking of that. I also thought about one of the buildings but to be honest i ws rather lookjng forward to modelling them out as ruins showing the insides bombed out bur recogniseable for what they had been.

I think your idea wins the day.

I dont know about beautiful work ..... maybe more just plain old reasonable idea with a good dose of begginers luck .... :D many thanks though as it gives heart.

Cheers

Toto
 
Thread owner
So ...... back in the shed. The domestics are done for today ..... many brownie points earned.

started coating the foam in thin plaster wash ...

P1010649.webp

and filled in the small fillet area's at the junction woth plaster once it had started to go off.

P1010650.webp

then

P1010654.webp

marked out roughly where the bomb creator would be sited and you will notice the blue pen marks along the gutter area's ..... these are 10mm out from the kerb which allows for two rows of cobble stones length wise to be laid.

P1010655.webp

and one more showing the junctionagain with markings for the coblestones. The two rows of cobblestones will follow the radius of the junctions corners ..... I think.

I will wait the plaster to dry ( wont take long ) then go in with a sanding block and smooth some edges off before coating the rest of the road surface with diluted PVA. Just to seal the balsa wood and and act as a binder coat between the cobbles and the balsa.

more as it happens.

cheers

toto
 
Thread owner
Balsa now been coated in PVA dilution ....

P1010658.webp

you can maybe just see the difference in colour ....

cheers

toto
 
Thread owner
OK ......

I've been waiting patiently for the balsa to dry out. In hindsight I could ( read that as should ) have cut the blast creator before applying PVA as the balsa wood will now be harder but never mind ..... no big deal. But .... give a man time and this is what happens .....

My mind got to wandering .... and I remembered about this ........

P1010659.webp

a bit of another plaster cast kit that I messed up previously ..... and I thought ..... I could extend the existing building by using this. talk about recycling .... :D

I have not made up my mind yet as there are a couple of issues .

P1010660.webp

it would have to be compressed a bit to make it work.

P1010662.webp

it could also go like this .....

P1010664.webp

from the other side .....

P1010663.webp

This shot shows the obvious issue. The kit was a residential kit which you can just make out by the chimney breast and whats left of the fire place. you would not have had that in an industrial warehouse or stores building. The jury is out on this one but I'll have to make my mind up fast.

cheers for now.

toto
 

Attachments

  • P1010661.webp
    P1010661.webp
    316.5 KB · Views: 0
Thread owner
Could fit here though ......

P1010665.webp

it was actually a bombed out shop ....

P1010666.webp

and there is the fireplace and chimney ....

P1010667.webp

and from another angle .....


P1010668.webp

hey presto ..... with the shop front .....

I'd need to shimmie it into position as it would probably just do the job and no more in that location ..... size wise.

what do you think ....... in ..... or ..... out ?

all comments welcome as usual.

cheers

toto.
 
Thread owner
Now ..... whilst the jury is out on the 3rd building ...... and ..... the PVA is drying on the roads Sub formation ........ its back to casting moulds of cobbles " specials " as I call them as they stray from the standard grey.

P1010669.webp

bench cleared and repurposed for " wet works".

moulds ..... got ,..... scales ...... got ...... vibrating table ...... got .... plaster and pigment set to the side ... and water will be available ..... after tea .... :D

P1010670.webp

clamps, cloths and plastic sheets for sitting wet mould on .....

P1010671.webp

an assortment of pre-cast cobbles but more colour variation required ......

thats me ..... until after tea

cheers for now

toto
 
Back
Top