Theme editor

Scale Model Shop

Return to a stalled build

Status
Not open for further replies.
Thread owner
1/32 Lancaster Bomber Update 20

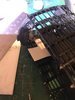
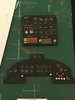
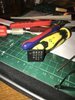
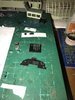
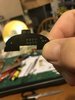
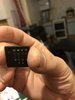
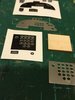
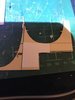
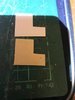
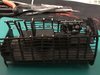
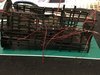
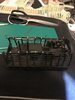
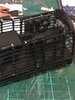
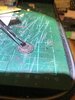
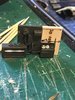
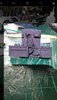
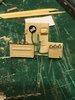
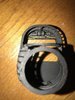
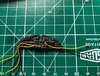
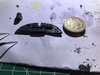
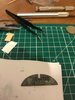
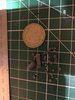
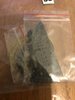
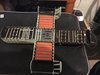
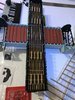
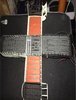
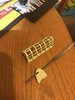
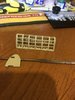
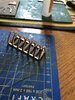
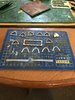
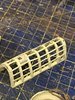
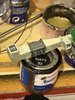
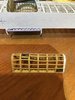
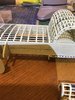
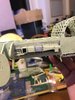
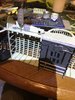
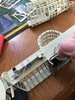
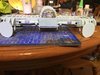
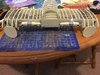
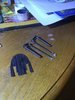
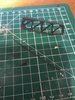
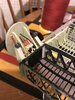
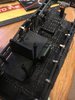
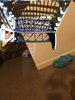
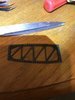
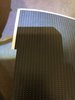
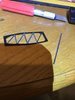
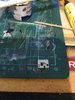
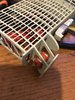
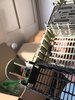
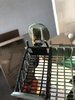
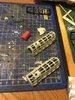
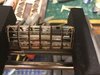
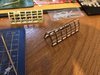
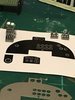
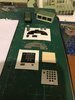
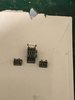
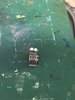
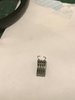
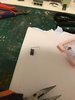
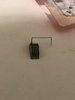
This is a milestone for me it was at this point previously where I made a complete and utter cockup and gave up the 1st time around this time I have passed this stage so here are the photos showing the engine throttle assembly I did modify the main console using a pair of staples to construct the two outer throttles in a more releastic way and a couple of bits of plastic tubing this all needs painting after it had throughly dried and set the glue

Regards

Colin
 

Attachments

  • ACD3481E-3486-4093-AFC7-66ADA80DF98E.jpeg
    ACD3481E-3486-4093-AFC7-66ADA80DF98E.jpeg
    3.4 KB · Views: 0
  • 2983E68C-5BEE-45B7-B332-B1D93CFF3514.jpeg
    2983E68C-5BEE-45B7-B332-B1D93CFF3514.jpeg
    3.7 KB · Views: 0
  • 7512666E-FEBD-404D-8633-09F8DA835471.jpeg
    7512666E-FEBD-404D-8633-09F8DA835471.jpeg
    3.7 KB · Views: 0
  • 77E048D3-3087-4079-9FAC-06D3C1176190.jpeg
    77E048D3-3087-4079-9FAC-06D3C1176190.jpeg
    2.2 KB · Views: 0
  • 5B6D8A22-1DC2-461A-9B33-88597F866F5C.jpeg
    5B6D8A22-1DC2-461A-9B33-88597F866F5C.jpeg
    2.9 KB · Views: 0
  • C67AEF41-B6D2-4794-815A-BC58B5022255.jpeg
    C67AEF41-B6D2-4794-815A-BC58B5022255.jpeg
    1.9 KB · Views: 0
  • 6BE5BD29-98D3-4880-B56A-46A7F0F5787C.jpeg
    6BE5BD29-98D3-4880-B56A-46A7F0F5787C.jpeg
    3.1 KB · Views: 0
  • 6DA6D0B4-C2AA-442E-813D-0EF68080989E.jpeg
    6DA6D0B4-C2AA-442E-813D-0EF68080989E.jpeg
    1.9 KB · Views: 0
Thread owner
Lancaster 1/32 Build Update 21

Hello peeps sorry for lack of postings been doing a lot of fiddley stuff with nothing much to show anyway here’s where I am at present
Fitted cockpit instrument panel and engineers panel scratch built a left hand side panel where I believe 2 vhf raidios sat on the floor on the left hand side of the pilot these in turn were connected to this left hand panel and from research these varied in size shape and fittings so there is no right one to be made so I just averaged out the designs and came up with is for mine it may be rightish or completely wrong but it looks reasonable
Next I decided to add a wiring loom made from 4 strands of signal cable twisted together and tied in several places to resemble the actual cable next it will be painted grey this should enhance the look of it considerably so that’s it so far more updates to follow

Regards

Colin
 

Attachments

  • A0099959-9839-4DDD-AF5F-8187B52EEA5D.jpeg
    A0099959-9839-4DDD-AF5F-8187B52EEA5D.jpeg
    3.4 KB · Views: 0
  • F73162F5-1368-43CF-AD25-1C9F0C709E43.png
    F73162F5-1368-43CF-AD25-1C9F0C709E43.png
    13.6 KB · Views: 0
  • F2E1A7BA-9337-4B09-A004-34AB1AFF9C09.jpeg
    F2E1A7BA-9337-4B09-A004-34AB1AFF9C09.jpeg
    2.8 KB · Views: 0
  • C6002AE6-ABE2-488C-B94B-A70701415A48.jpeg
    C6002AE6-ABE2-488C-B94B-A70701415A48.jpeg
    4.1 KB · Views: 0
  • DC5A2938-D666-43BD-BBA6-952095ACED7D.jpeg
    DC5A2938-D666-43BD-BBA6-952095ACED7D.jpeg
    3.8 KB · Views: 0
  • 1A13D98B-3A9E-4333-9826-F8E9684ADCE6.jpeg
    1A13D98B-3A9E-4333-9826-F8E9684ADCE6.jpeg
    3.6 KB · Views: 0
  • 6054970D-6F8C-4047-823E-DB66E48A9198.jpeg
    6054970D-6F8C-4047-823E-DB66E48A9198.jpeg
    3.4 KB · Views: 0
  • F296C9CC-2539-4FFA-9DEA-CEA697C11EE1.jpeg
    F296C9CC-2539-4FFA-9DEA-CEA697C11EE1.jpeg
    3.4 KB · Views: 0
  • BDBA98B1-BA60-49A1-836C-A225060AA738.jpeg
    BDBA98B1-BA60-49A1-836C-A225060AA738.jpeg
    3 KB · Views: 0
  • 54165EFA-7CC6-4CDB-9567-67A4A98093E2.jpeg
    54165EFA-7CC6-4CDB-9567-67A4A98093E2.jpeg
    3 KB · Views: 0
  • 5AC21A54-2FD2-401B-A505-86DE60E25270.jpeg
    5AC21A54-2FD2-401B-A505-86DE60E25270.jpeg
    3.6 KB · Views: 0
  • 053EDA42-BE79-4BC4-AEE7-BAA07CD79B4F.jpeg
    053EDA42-BE79-4BC4-AEE7-BAA07CD79B4F.jpeg
    3.6 KB · Views: 0
  • 42ED6A42-3BA7-4803-8489-BD81BEA028E8.jpeg
    42ED6A42-3BA7-4803-8489-BD81BEA028E8.jpeg
    3.4 KB · Views: 0
  • 6C5BE288-2221-4C7D-ABFF-B6B19DD55AA2.jpeg
    6C5BE288-2221-4C7D-ABFF-B6B19DD55AA2.jpeg
    3.7 KB · Views: 0
  • A940D7D2-86ED-448F-8530-6C543359926D.jpeg
    A940D7D2-86ED-448F-8530-6C543359926D.jpeg
    3.6 KB · Views: 0
  • 7FAF5D72-C37C-42EC-A6E8-1F4BF0588EFA.jpeg
    7FAF5D72-C37C-42EC-A6E8-1F4BF0588EFA.jpeg
    4.3 KB · Views: 0
  • D4AFB22A-EC9E-46C3-B28D-347908FCCA1D.jpeg
    D4AFB22A-EC9E-46C3-B28D-347908FCCA1D.jpeg
    3 KB · Views: 0
  • C2725BB0-C752-454C-ACE9-C166D9430A12.jpeg
    C2725BB0-C752-454C-ACE9-C166D9430A12.jpeg
    3.8 KB · Views: 0
  • D7B468A9-DBA1-420A-AC32-CB1D019E15CB.jpeg
    D7B468A9-DBA1-420A-AC32-CB1D019E15CB.jpeg
    3.6 KB · Views: 0
Thread owner
Lancaster 1/32 Build Update 22

Still more detail being added very little structural building taking place added new inside skins on starboard side and the instrument panel in the front section of the nose tonight the bomb bay gets some attention

Regards

Colin
 

Attachments

  • F1AB53DA-3E17-42B7-BCF4-E822778A50F9.jpeg
    F1AB53DA-3E17-42B7-BCF4-E822778A50F9.jpeg
    3.5 KB · Views: 0
  • 1007DF09-CD41-43E8-97C4-88948F7C78BE.jpeg
    1007DF09-CD41-43E8-97C4-88948F7C78BE.jpeg
    3.8 KB · Views: 0
  • 7F965F15-22C9-4887-8C7A-B004FD669DD2.jpeg
    7F965F15-22C9-4887-8C7A-B004FD669DD2.jpeg
    3.3 KB · Views: 0
  • 47B96902-35C7-4646-B891-58548905677C.jpeg
    47B96902-35C7-4646-B891-58548905677C.jpeg
    3.6 KB · Views: 0
  • A2001B6F-AF22-4775-BF2F-C14806A2A62B.jpeg
    A2001B6F-AF22-4775-BF2F-C14806A2A62B.jpeg
    3.6 KB · Views: 0
  • CB7DCCEC-F610-493E-9346-1C9EBBB35B1E.jpeg
    CB7DCCEC-F610-493E-9346-1C9EBBB35B1E.jpeg
    3.9 KB · Views: 0
  • BECF2A3C-6234-463D-8E6A-33B6AABE5FE2.jpeg
    BECF2A3C-6234-463D-8E6A-33B6AABE5FE2.jpeg
    2.8 KB · Views: 0
Hi Colin
What a huge undertaking. Hats off to you. The man hours needed don't bear thinking about. I have seen these part-works advertised and saw a ship done on You-Tube. Fine progress so far and you will end up with a superb model of this iconic aircraft.
Jim
 
Thread owner
Lancaster Bomber MK1 1/32 Update no 23
Well I finally finished modifying the bomb bay to the best of my ability and interpretation of reference material so much for nights work it took a week never mind I have attached before and after photo’s the show the difference and it’s still in its raw state unpainted which will be the next job when it’s all set and solid

Regards
Colin
 

Attachments

  • 220B619D-7BD4-4C86-A481-FF431CDBAAA3.jpeg
    220B619D-7BD4-4C86-A481-FF431CDBAAA3.jpeg
    3.5 KB · Views: 0
  • 2A872B6D-12F8-459F-8DB5-217DE51FD371.jpeg
    2A872B6D-12F8-459F-8DB5-217DE51FD371.jpeg
    4.2 KB · Views: 0
Thread owner
Lancaster 1/32 Update No 24

Bomb bay now fully painted and apart from the trailing wires which still need to be trimmed and put into the final fixings it’s now ready for the bomb load note the 3 sections are just pushed together not glued so you can see the whole bay
Apologies for the squashed photo appearance don’t know why it’s done that the fuselage should appear longer and more drawn out than the picture dipicts

Regards

Colin
 

Attachments

  • 632C2BD4-D2BE-48E6-AA12-621B1C4A3A8C.jpeg
    632C2BD4-D2BE-48E6-AA12-621B1C4A3A8C.jpeg
    2.8 KB · Views: 0
Thread owner
Lancaster 1/32 Update No 25
Well after a 8 week layoff due to building a formula 1 car model for the GB its now back to the Lancaster this time the first piece of the leading edge of the main wing

Regards

Colin
 

Attachments

  • 5A351BB0-3A12-4E93-8A14-8E223221629A.jpeg
    5A351BB0-3A12-4E93-8A14-8E223221629A.jpeg
    3.4 KB · Views: 0
  • 1DC1997D-4705-42E7-B0CF-DE12294ECE6A.jpeg
    1DC1997D-4705-42E7-B0CF-DE12294ECE6A.jpeg
    3.4 KB · Views: 0
  • 39538D47-F559-4B31-B0CA-5F4F591EA017.jpeg
    39538D47-F559-4B31-B0CA-5F4F591EA017.jpeg
    4.1 KB · Views: 0
  • 62A79FCC-332A-4B8B-B98B-6F27F6066BF3.jpeg
    62A79FCC-332A-4B8B-B98B-6F27F6066BF3.jpeg
    3.8 KB · Views: 0
A real labour of love Colin, going to be a huge masterpiece when its finished.
 
Thread owner
Well I hope so Mick will be doing some more on it tonight something to do with some sort of ducting in the leading edge of the starboard main wing

Regards

Colin
 
Thread owner
Lancaster 1/32 Update No 26
Greetings latest update more work on the rh or starboard leading edge this time some sort of radiator ducting
1st the assembly of the radiator then marking and drilling mounting holes in the leading edge then painting the radiator and fittings which is where I am now waiting for it to dry before applying 2nd coat

Regards

Colin
 

Attachments

  • 3A12FDA8-44B3-4FD4-AD76-BB78089D566D.jpeg
    3A12FDA8-44B3-4FD4-AD76-BB78089D566D.jpeg
    4.8 KB · Views: 0
  • 97505FAC-E36D-4976-A6E3-C1BE3CB52B8B.jpeg
    97505FAC-E36D-4976-A6E3-C1BE3CB52B8B.jpeg
    4.4 KB · Views: 0
  • 59633720-256A-4189-8ABD-1F0D64EE3400.jpeg
    59633720-256A-4189-8ABD-1F0D64EE3400.jpeg
    3.3 KB · Views: 0
  • 6CAC7FB2-321A-4CD0-BE0C-42241CE28AC6.jpeg
    6CAC7FB2-321A-4CD0-BE0C-42241CE28AC6.jpeg
    2.9 KB · Views: 0
  • 5A8A36F0-08EE-41DA-B1A0-230049C545E8.jpeg
    5A8A36F0-08EE-41DA-B1A0-230049C545E8.jpeg
    3.8 KB · Views: 0
Thread owner
Lancaster 1/32 Update No 27
Ok here we go again this time finishing off the ducting on the starboard leading edge
Once again this was a right pia trying to glue thin wire onto the leading edge and keeping the wire straight which failed miserably I might even strip it all off and redo it using my own idea which would be streched sprue using the candle method to heat it up and the pull each end at the same time producing a fine wire like apperance fillament anyway here are the pictures

Regards

Colin
 

Attachments

  • 00D08F3E-3641-4CB1-B7FE-E72C0C90191E.jpeg
    00D08F3E-3641-4CB1-B7FE-E72C0C90191E.jpeg
    4.1 KB · Views: 0
  • C79A480A-E7B8-4353-89F4-22246E8A0895.jpeg
    C79A480A-E7B8-4353-89F4-22246E8A0895.jpeg
    4.2 KB · Views: 0
  • 895E6B1D-6568-4C4A-8BBA-EDCEAAD96B95.jpeg
    895E6B1D-6568-4C4A-8BBA-EDCEAAD96B95.jpeg
    4.1 KB · Views: 0
Wow Colin, this looks like one labor of love with every part detailed.

I've just seen Hong Kong Models new intro of their 1/32 Lancaster at the recent MALCOM show and its a beauty. Only the clear fuselage and interior were displayed and according to Neil it's still WIP and will be out soon. He was thinking of stress panels for the skin but decided not to as it was a mammoth task. We couldn't find any ejector marks on the clear fuselage. I'll see if a friend has a picture of it.

Building your own from scratch makes the project more personal. :thumb2:

Cheers,
Richard
 
Thread owner
Lancaster 1/32 Update No 28
Pressed on with the wiring of the 2nd duct this time on the port wing this now completes this stage
I tried to keep the wires as straight as possible but it had its own ideas so as most of it will not be visible when the leading edge of the wing is added I decided to leave as is

Regards

Colin
 

Attachments

  • 2C80F9B1-CCEC-4F04-9782-8CCFD4037680.jpeg
    2C80F9B1-CCEC-4F04-9782-8CCFD4037680.jpeg
    3.7 KB · Views: 0
  • 79FAA10D-E751-40DD-8F50-3331112EB68A.jpeg
    79FAA10D-E751-40DD-8F50-3331112EB68A.jpeg
    3.7 KB · Views: 0
  • F0A49A55-2BB9-4BC6-9679-B57CEE87CF39.jpeg
    F0A49A55-2BB9-4BC6-9679-B57CEE87CF39.jpeg
    4.2 KB · Views: 0
Thread owner
Lancaster 1/32 Update No29

Hello again been a couple of months since last update so here’s whats progressed this time
1st was the construction of second leading edge cover followed by adding detail to the wheel well and engine attachment for starboard wing
I also had concerns of the riveting tool so i have tried something different namely a paper template of rivets drawn in word then printed out onto paper as rows
I also fashioned my own wing spar for the wheel bay as it seemed there was a shortage of these in the kit
The rivet paper templates were then glued to the spar and any white patches that appeared were painted over to improve the look
While i was at it i redid the cockpit floor as well when all are fully set will varnish to seal the paper
This system did not work well on the green so I have left that with the riveting tool impressions
Next a couple of wheel bay bulkheads were given the rivet treatment and finally 2 pieces of the main undercarriage oleons were bolted together
That’s it for this update will produce another in about a weeks time hopefully depending on how busy I am

Regards

Colin
 

Attachments

  • 19B12157-FEA0-4AC4-95DE-AB105277710C.jpeg
    19B12157-FEA0-4AC4-95DE-AB105277710C.jpeg
    3.5 KB · Views: 0
  • DA89A022-6689-4088-881E-54E16DE25613.jpeg
    DA89A022-6689-4088-881E-54E16DE25613.jpeg
    4.1 KB · Views: 0
  • 98F6103B-5CBE-4465-A98E-688F424171CC.jpeg
    98F6103B-5CBE-4465-A98E-688F424171CC.jpeg
    3.9 KB · Views: 0
  • 77845C64-0AB1-4DCF-8702-82EE7D44EFBB.jpeg
    77845C64-0AB1-4DCF-8702-82EE7D44EFBB.jpeg
    4.5 KB · Views: 0
  • AD6C9102-F53F-4A6D-8181-502990BEF586.jpeg
    AD6C9102-F53F-4A6D-8181-502990BEF586.jpeg
    3.8 KB · Views: 0
  • C5E73D6D-69D1-44A9-B8F3-7881D1CA64E2.jpeg
    C5E73D6D-69D1-44A9-B8F3-7881D1CA64E2.jpeg
    3.5 KB · Views: 0
  • D1D42E40-0E5F-4959-B002-FD7C30695EFE.jpeg
    D1D42E40-0E5F-4959-B002-FD7C30695EFE.jpeg
    3 KB · Views: 0
  • 1872A560-5488-48A1-BCAC-E24240925D9F.jpeg
    1872A560-5488-48A1-BCAC-E24240925D9F.jpeg
    2.5 KB · Views: 0
  • 06CE624F-FFDA-4E51-B09D-606E1A91638B.jpeg
    06CE624F-FFDA-4E51-B09D-606E1A91638B.jpeg
    3.2 KB · Views: 0
  • F875402C-FA15-4802-9CF6-41C6AA38855D.jpeg
    F875402C-FA15-4802-9CF6-41C6AA38855D.jpeg
    3.6 KB · Views: 0
  • 8CE89081-7A88-41F2-8076-F3E19BC01B30.jpeg
    8CE89081-7A88-41F2-8076-F3E19BC01B30.jpeg
    4.2 KB · Views: 0
  • DA344A8E-5C87-4B53-A589-8CDE4C4B1515.jpeg
    DA344A8E-5C87-4B53-A589-8CDE4C4B1515.jpeg
    4.1 KB · Views: 0
  • 47A02017-2CB9-4A36-AE83-39A8762FF294.jpeg
    47A02017-2CB9-4A36-AE83-39A8762FF294.jpeg
    3.7 KB · Views: 0
  • 9A2C8B21-5DC0-4DA7-B33A-4C5EA25B3BAF.jpeg
    9A2C8B21-5DC0-4DA7-B33A-4C5EA25B3BAF.jpeg
    4.4 KB · Views: 0
  • D787F621-0E5D-4D94-BF9D-332A3C163537.jpeg
    D787F621-0E5D-4D94-BF9D-332A3C163537.jpeg
    3.9 KB · Views: 0
  • DD681DD8-60D3-486A-A172-555C71AC6AB2.jpeg
    DD681DD8-60D3-486A-A172-555C71AC6AB2.jpeg
    3.7 KB · Views: 0
Hi Colin
You're dedication to this does you proud. Progress looks good and the rivet idea is a clever solution.
Jim
 
Thread owner
Steve
I had 3 month sabbaitical whilst I built a 1/8 scale Formula 1 car for Pollux’s GB that’s now finished so it’s back to the old faithfull long way to go though so stay tuned

Regards

Colin
 
Status
Not open for further replies.
Back
Top