Theme editor

Scale Model Shop

Return to modelling - 1:144 Revell Castle Class Corvette HMCS snowberry

Status
Not open for further replies.

Ancientmariner

New member
Joined
Feb 11, 2018
Messages
867
Reaction score
20
Points
0
1/3
Thread owner
Hi all,

After reading a few posts on here and frankly marvelling at what most of you are producing I thought I'd start a thread for this kit I have purchased after not building a model since I was about 15.

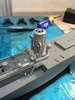
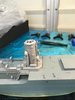
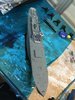
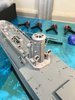
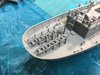
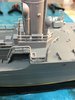
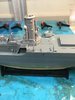
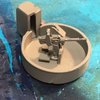
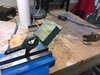
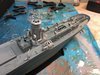
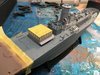
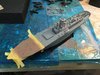
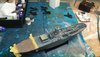
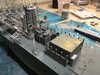
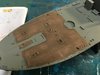
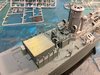
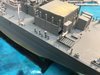
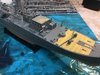
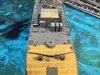
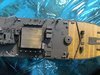
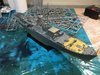
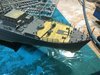
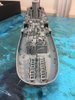
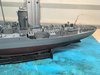
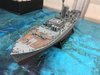
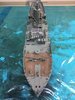
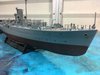
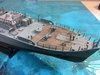
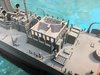
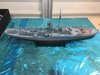
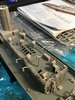
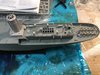
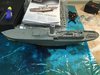
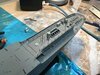
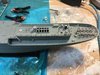
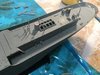
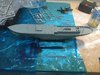
I am about 1/5th of the way into the build and have posted a few photos below as I progress.
Not ever having been particularly good at modelling I am bodging it together as I go along, with the intention of building the hull and fitting most exposed fittings, spraying and then putting on the extra bits which I will spray separately.

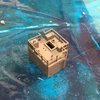
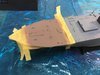
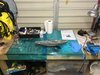
I found the kit which is a level 5 and has about 500 pieces is from the outset fiddly. Tamiya tweezers were a must from the start and great care has to be taken when removing pieces from the sprues as in most cases the parts don't sit flat against the bench and are easy to break even when cutting off with a scalpel. I tried using the Tamiya clippers I have and the clearance between the sprue and part isn't enough in most cases to prevent damage to the part.

Generally all the parts I've done so far seem to fit well and require little prepping before fitting.

Mainly so far fiddly would sum up this kit. I'm taking my time but think it's a bit beyond me as a beginner. I am going to continue now I've started though and see how it ends up.

Any tips or trick anyone has to help me improve would be greatfully received.

Happy modelling!

JamesView attachment 294487View attachment 294488View attachment 294489View attachment 294490View attachment 294491View attachment 294492View attachment 294493View attachment 294494View attachment 294495View attachment 294496View attachment 294497
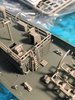
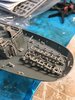
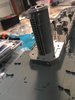
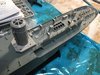
 

Attachments

  • IMG_5758.JPG
    IMG_5758.JPG
    3.8 KB · Views: 0
  • IMG_5757.JPG
    IMG_5757.JPG
    3.9 KB · Views: 0
  • IMG_5756.JPG
    IMG_5756.JPG
    3.8 KB · Views: 0
  • IMG_5755.JPG
    IMG_5755.JPG
    3 KB · Views: 0
  • IMG_5754.JPG
    IMG_5754.JPG
    3.7 KB · Views: 0
  • IMG_5753.JPG
    IMG_5753.JPG
    3.3 KB · Views: 0
  • IMG_5752.JPG
    IMG_5752.JPG
    3.4 KB · Views: 0
  • IMG_5748.JPG
    IMG_5748.JPG
    3.7 KB · Views: 0
  • IMG_5747.JPG
    IMG_5747.JPG
    3.4 KB · Views: 0
  • IMG_5744.JPG
    IMG_5744.JPG
    3.4 KB · Views: 0
  • IMG_5743.JPG
    IMG_5743.JPG
    3.2 KB · Views: 0
Welcome to the forum James.
I have noticed that you will have fun painting as I always paint as I build but I do have the same kit on the go .
I look forward to seeing end result.
 
James, you might find it useful to cut off a chunk of the sprue with the part attached, and then cut the sprue off the part, rather than trying to remove a part from the sprue without damaging it.

Pete
 
It does seem to be a big kit for a beginner. But, it looks like you're doing a great job, take your time. If you haven't discovered it yet, youtube is full of all sort of tutorials, I find youtube very useful.
 
Thread owner
Managed to get out to the shed for 30 mins this morning and glue a few more bits around the funnel.

Thanks for the tip Pete, have already used it even though some parts are so close together on the sprues it's almost impossible and I'm still having to slowly use the scalpel

Have spent the morning on YouTube actually Colin, expert modellers making it look so easy even I could do it.....till I try that is

View attachment 294585View attachment 294586View attachment 294587View attachment 294588
 

Attachments

  • IMG_5765.JPG
    IMG_5765.JPG
    3.5 KB · Views: 0
  • IMG_5766.JPG
    IMG_5766.JPG
    2.8 KB · Views: 0
  • IMG_5768.JPG
    IMG_5768.JPG
    3.5 KB · Views: 0
  • IMG_5767.JPG
    IMG_5767.JPG
    3.3 KB · Views: 0
Thread owner
Continued the build today. Parts around midships fitted today though rails etc here do not fit very well and needed a bit of messing to fit in. Also there are other fittings round here such as deck boxes which don't fit very well.

Apart from that I have started building sections and spraying them with Tamiya acrylic mixed with thinner 2:1 ration which seems to cover well and looks ok. Also sprayed a small section of the stern just to see how it comes out. View attachment 294687View attachment 294688View attachment 294689View attachment 294690View attachment 294691
 

Attachments

  • IMG_5868.JPG
    IMG_5868.JPG
    3.3 KB · Views: 0
  • IMG_5824.JPG
    IMG_5824.JPG
    3 KB · Views: 0
  • IMG_5796.JPG
    IMG_5796.JPG
    2.9 KB · Views: 0
  • IMG_5795.JPG
    IMG_5795.JPG
    4 KB · Views: 0
  • IMG_5794.JPG
    IMG_5794.JPG
    3.8 KB · Views: 0
Thread owner
Progress has been made this weekend, as I built the room which goes below the wheel house. This was constructed first, the inside sprayed light grey and left to dry. Once dry I masked the windows and cut out so each on is individually masked before sticking them in with PVA. As I had constructed this space already I had to cut the side windows into sections to fit.
Once done I masked the top off and sprayed battleship grey.

I also started construction of the lifeboats and life rafts today, adding the supports down aft for the life rafts to sit on.

Lastly I masked the forward end and have sprayed the wooden area of deck and now will dry brush it once dry and then apply a earthing wash to give some texture and depth.

View attachment 294851View attachment 294852View attachment 294853View attachment 294854
 

Attachments

  • IMG_5915.JPG
    IMG_5915.JPG
    3.5 KB · Views: 0
  • IMG_5913.JPG
    IMG_5913.JPG
    3.6 KB · Views: 0
  • IMG_5914.JPG
    IMG_5914.JPG
    3.6 KB · Views: 0
  • IMG_5912.JPG
    IMG_5912.JPG
    3.3 KB · Views: 0
  • IMG_5911.JPG
    IMG_5911.JPG
    3 KB · Views: 0
  • IMG_5909.JPG
    IMG_5909.JPG
    2.9 KB · Views: 0
Hi James I think it's looking great, the main thing is as long as your happy and enjoying your modelling, well done.

Steve.
 
Thread owner
Continued today dry brushing the wooden focsle deck and trying to give it some texture. Just waiting for it to dry and seems to look ok. Will probably apply a wash over it to highlight the gaps between the planks.
Also finished the life rafts today and have included a before and after picture. Most colours I am doing from my experience of ships and also from my grandfathers memory of when he was on the Corvettes.

Sprayed all the remaining parts grey today as well, something that in hindsight would have been better to do at the start!

View attachment 294906View attachment 294907View attachment 294908
 

Attachments

  • IMG_5939.JPG
    IMG_5939.JPG
    2.8 KB · Views: 0
  • F5CEE2C0-7C87-479C-9B01-07BE99862E9A.jpg
    F5CEE2C0-7C87-479C-9B01-07BE99862E9A.jpg
    3 KB · Views: 0
  • IMG_5932.JPG
    IMG_5932.JPG
    3.1 KB · Views: 0
Thread owner
A few more hours put in today, achieved what seems like not a lot. Progress is slow as I am trying to build all the deck mail components to a level where I can spray a fulll grey coat to avoid marking with glue.
I then plan to build the wheel house deck and forward gun assemble separately and spray them before sticking in place.

I have applied a black wash to the forward wooden deck, glued the deck house, alleyway and forward accommodation in place along with the sides.
I made a small mistake here and found once I had done it that the sides of the accommodation are the wrong way around as I didn't notice a tag on the one for affixing a ladder which I shall now probably leave out.

Stuck presently at that stage where you feel you are making no progress while resisting the urge to rush!

View attachment 294946View attachment 294947View attachment 294948View attachment 294949
 

Attachments

  • IMG_5947.JPG
    IMG_5947.JPG
    3.5 KB · Views: 0
  • IMG_5946.JPG
    IMG_5946.JPG
    3.6 KB · Views: 0
  • IMG_5944.JPG
    IMG_5944.JPG
    2.6 KB · Views: 0
  • IMG_5943.JPG
    IMG_5943.JPG
    3.6 KB · Views: 0
Thread owner
Well another day and another 50 miniature parts fixed in place. These are mainly mushroom vents, vent pipes, bitts and cleats forward of the accommodation/bridge.

Though fiddly all pretty straight forward.

I think one more gluing session before I am ready to start spraying the entire vessel after which I shall seemvle bridge area etc and forward gun and affix the required bits.

Had to stop today as progress was good but not rushing has had a very positive effect on my results so far.

James

View attachment 295014View attachment 295015View attachment 295016View attachment 295017
 

Attachments

  • IMG_5957.JPG
    IMG_5957.JPG
    3.3 KB · Views: 0
  • IMG_5956.JPG
    IMG_5956.JPG
    3.5 KB · Views: 0
  • IMG_5958.JPG
    IMG_5958.JPG
    3.5 KB · Views: 0
  • IMG_5959.JPG
    IMG_5959.JPG
    3.5 KB · Views: 0
Thread owner
Finally sprayed the gray top coat and removed the masking from the wooden foclse deck, bridge windows and hull.
Reasonably happy with the results , still have to affix ladder for the mast, depth charge racks on the pool, the forward windlass and ten the nav deck etc which I shall
Construct separately.

Will probably leave it here as I have to return to work next week so shall continue in a few months.

James View attachment 295050View attachment 295051View attachment 295052View attachment 295053View attachment 295054View attachment 295055View attachment 295056View attachment 295057View attachment 295058
 

Attachments

  • IMG_5976.JPG
    IMG_5976.JPG
    3.1 KB · Views: 0
  • IMG_5975.JPG
    IMG_5975.JPG
    3 KB · Views: 0
  • IMG_5974.JPG
    IMG_5974.JPG
    2.8 KB · Views: 0
  • IMG_5973.JPG
    IMG_5973.JPG
    3.1 KB · Views: 0
  • IMG_5972.JPG
    IMG_5972.JPG
    3.2 KB · Views: 0
  • IMG_5971.JPG
    IMG_5971.JPG
    2.7 KB · Views: 0
  • IMG_5970.JPG
    IMG_5970.JPG
    3.3 KB · Views: 0
  • IMG_5968.JPG
    IMG_5968.JPG
    3.4 KB · Views: 0
  • IMG_5967.JPG
    IMG_5967.JPG
    3.1 KB · Views: 0
Hi James I'm a little late with this one, but welcome to the forum. Your doing a fantastic job of this so far.
 
Thread owner
Thanks for all your positive comments. I am going for a clean basic look with this one, might add a little rust streaking and also some basic highlighting.
 
Thread owner
Good evening chaps!

Well with some luck I shall be returning in the next two weeks or so to continue this build.

A quick question, has anyone got any recommendations for the hand rail wires and rigging wires? The supplied black cotton looks crude and I don't think will look right. I have looked at fuse wire but am pondering what thickness to use any advice/suggestions?

James
 
Status
Not open for further replies.
Back
Top