
You are using an out of date browser. It may not display this or other websites correctly.
You should upgrade or use an alternative browser.
You should upgrade or use an alternative browser.
Revell 1/32 Bf109 G-6 Early/Late
- Thread starter Vaughan
- Start date
- Status
- Not open for further replies.
Thanks for the comps guys. Might be a while before my next update as I managed to fall down stairs on Sunday bruised ribs an a swollen left arm now in a sling. Luckily no brakes after a visit to A&E but it has put me out of action .
.
.
G
Guest
Guest
Sorry to hear that Vaughan, let's hope you make a swift recovery!
Cheers
Patrick
Cheers
Patrick
G
Guest
Guest
That is just bad luck Vaughan.
But being a young man recovery is quickly ensured !
Laurie
Very nice progress on the model. Though I am not a 1.32 man the detail on a 1/32 is very interesting.
But being a young man recovery is quickly ensured !
Laurie
Very nice progress on the model. Though I am not a 1.32 man the detail on a 1/32 is very interesting.
Well as promised here at last is some progress although not too much.
The fuselage is now together and the side cowlings added. As I'm going with the late version I've added the high tail option. A little sanding was required as there is no natural panel line where the top section is added.
The top section of the cowling is at present not glued as the exhaust stacks are not in place, I was hoping to work round this one and added them further down the line but they have to be inserted from the inside so will require masking at some point.
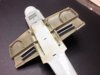
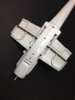
Not sticking to the instructions I've made a start on the nose cone and prop. Revell in their wisdom have split the nose cone where there is no seam and as a result once the props are fitted it will be nearly impossible to remove the join so some modification is required so the props can be added later.
View attachment 83685
View attachment 83686
View attachment 83687
View attachment 83688
View attachment 83689
View attachment 196708
View attachment 196709
View attachment 196710
View attachment 196711
View attachment 196712
The fuselage is now together and the side cowlings added. As I'm going with the late version I've added the high tail option. A little sanding was required as there is no natural panel line where the top section is added.
The top section of the cowling is at present not glued as the exhaust stacks are not in place, I was hoping to work round this one and added them further down the line but they have to be inserted from the inside so will require masking at some point.
Not sticking to the instructions I've made a start on the nose cone and prop. Revell in their wisdom have split the nose cone where there is no seam and as a result once the props are fitted it will be nearly impossible to remove the join so some modification is required so the props can be added later.
View attachment 83685
View attachment 83686
View attachment 83687
View attachment 83688
View attachment 83689
View attachment 196708
View attachment 196709
View attachment 196710
View attachment 196711
View attachment 196712
Attachments
Good to see you back at it and some nice progress.
The kit's join halfway up the spinner just beggars belief. Why would they do that? There was a join at the back of the spinner where it attached to the spinner back plate on the real thing which they could have replicated!
For those who don't know what I mean a picture speaks a thousand words. Here's a Bf 109 (actually a G-10, but this bit is the same) which has lost it's spinner, showing where it would have attached to the back plate.
Cheers
Steve
As I suspected Steve. I've just had a second look at the instructions my nose cone differs from the drawings there appears to be a cut out so one part would mate with the back plate with another section creating a seam half way up. Why oh why did Revell do this? they're a German company after all. Anyway I will plod on.
G
Guest
Guest
Sorry to hear about your accident. You have a simple but extremely effective cockpit right there. Great paint job. I like the dials and the seatbelts as well. The build is progressing nicely.\ said:Thanks guysReelo, thanks for the links I had checked out the reviews when I first bought the kit so have made some adjustments to the fuselage as I've opted to do the early version top oil filler cover filled as was only used on the G10 variant.
The cockpit is now all buttoned up and I have added the spar to achieve the correct dihedral.
View attachment 82623
View attachment 82624
View attachment 82625
View attachment 82626
John
Hi Vaughan
Good progress on the Gustav
Re the spinner break down: if you don't fancy fixing the join Henri Dahne does a superb after market item on a par with the Stuka prop and spinner I used in my last build. I've already bought this item for my Revell 109 G and can report (again) that it's very, very good.
I'm eagerly looking forward to seeing this model finished Vaughan. I think it will be another special build.
Cheers
P
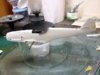
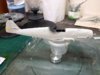
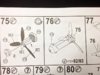
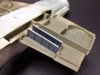
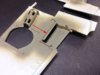
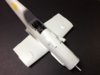
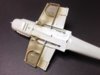
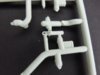
A small update here. I've just completed the three sections that make up the wings and I must say that I'm somewhat disappointed with the results. Revell by cutting corners in providing a kit that will cover different variants. The result is that you have three sections for the wings which gives you three chances of miss alining the components. Where the two top sections meet you end up with a panel line that is so wide that you then have add filler, leading edge seams don't line up and the wing roots need attention. Anyway here are the results so far. On a second note two parts that are greyed out on the instruction sheet and supposedly are not for use should be fitted as they are the backs of the oil baths(see red arrows)they are on spru B-84A and spru A-26
View attachment 83966
View attachment 83967
View attachment 83968
View attachment 83969
View attachment 83970
View attachment 83971
View attachment 83972
View attachment 83973
View attachment 83974
View attachment 83975
View attachment 196989
View attachment 196990
View attachment 196991
View attachment 196992
View attachment 196993
View attachment 196994
View attachment 196995
View attachment 196996
View attachment 196997
View attachment 196998
. Revell by cutting corners in providing a kit that will cover different variants. The result is that you have three sections for the wings which gives you three chances of miss alining the components. Where the two top sections meet you end up with a panel line that is so wide that you then have add filler, leading edge seams don't line up and the wing roots need attention. Anyway here are the results so far. On a second note two parts that are greyed out on the instruction sheet and supposedly are not for use should be fitted as they are the backs of the oil baths(see red arrows)they are on spru B-84A and spru A-26View attachment 83966
View attachment 83967
View attachment 83968
View attachment 83969
View attachment 83970
View attachment 83971
View attachment 83972
View attachment 83973
View attachment 83974
View attachment 83975
View attachment 196989
View attachment 196990
View attachment 196991
View attachment 196992
View attachment 196993
View attachment 196994
View attachment 196995
View attachment 196996
View attachment 196997
View attachment 196998
Attachments
-
 141706_2178.jpg2.7 KB · Views: 0
 -
 141806_2197.jpg1.5 KB · Views: 0
 -
 141806_2200.jpg1.7 KB · Views: 0
 -
 141706_2177.jpg2.5 KB · Views: 0
 -
 141706_2175 copy.jpg2.5 KB · Views: 0
 -
 141706_2172 copy.jpg2.2 KB · Views: 0
 -
 141606_2183.jpg2.1 KB · Views: 0
 -
 141606_2184.jpg2 KB · Views: 0
 -
 141706_2169.jpg2.2 KB · Views: 0
 -
 141706_2171 copy.jpg2.1 KB · Views: 0
Hi Vaughan
The wing configuration does seem a bit complex but I know that you'll master the problems with the fit.
It looks real quality so far (no less then I'd expect from you) and I can't wait to see the scheme you go for. Many thanks for the heads up on the build quirks it is really useful.
Looking forward to the next instalment
Paul

")
Thanks for the vote of confidence guys.
I think maybe this thread is going to turn into a bit of a rant. I'm still working on the wings and nose cone but hopefully they will turn out ok. (Paul thanks for the info on a replacement spinner but at the moment I'm a bit short of cash so will persist on trying to make good with the one I've got).
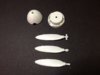
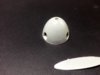
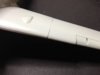
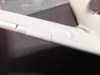
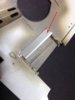
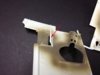
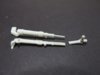
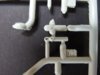
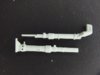
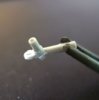
As a distraction I thought I would have a look at the main under cart, maybe I shouldn't have. Basically they are made up of three parts for some reason it is split vertically with the wheel axil needing to be attached separately. Just take a look at the spru shots there is so much flash that the part is hardly visible. What are Revell playing at the detail is good but there seems to be some fundamental things going wrong. I've made an attempt at cleaning up the axil but some work is still needed. Rant over I will try to make the best job of it I can.
View attachment 84027
View attachment 84028
View attachment 84029
View attachment 84030
View attachment 84031
View attachment 84032
Thanks for the vote of confidence guys.
View attachment 197050
View attachment 197051
View attachment 197052
View attachment 197053
View attachment 197054
View attachment 197055
I think maybe this thread is going to turn into a bit of a rant. I'm still working on the wings and nose cone but hopefully they will turn out ok. (Paul thanks for the info on a replacement spinner but at the moment I'm a bit short of cash so will persist on trying to make good with the one I've got).
As a distraction I thought I would have a look at the main under cart, maybe I shouldn't have. Basically they are made up of three parts for some reason it is split vertically with the wheel axil needing to be attached separately. Just take a look at the spru shots there is so much flash that the part is hardly visible. What are Revell playing at the detail is good but there seems to be some fundamental things going wrong. I've made an attempt at cleaning up the axil but some work is still needed. Rant over I will try to make the best job of it I can.
View attachment 84027
View attachment 84028
View attachment 84029
View attachment 84030
View attachment 84031
View attachment 84032
Thanks for the vote of confidence guys.
View attachment 197050
View attachment 197051
View attachment 197052
View attachment 197053
View attachment 197054
View attachment 197055
Attachments

It doesn't look to be the best engineered kit, even given that there are economic reasons for the wing arrangement. I doesn't look to be the most cleanly molded either. These things are sent to try us, and it seems like that's exactly what they are doing to you!
Good luck, I'm sure you will master it eventually. The progress certainly looks good.
I made some adverse comments about the engineering and molding of the Revell 1/32 Ju 88 kit somewhere and got castigated for it on the grounds that it was good value for money for such a big kit in a large scale. This seemed a bit unreasonable to me, but there you go. It might be good value for money but it requires some experience to put together without making a dog's ear of it and some parts were so malformed I virtually had to scratch build them. This Bf 109 kit seems similar in many respects.
Cheers
Steve
- Status
- Not open for further replies.
Legal Notice
scalemodelling.co.uk is a privately operated online discussion forum. All content posted by members reflects their own views and opinions and does not necessarily represent those of the forum owners or administrators. While reasonable efforts are made to moderate content, no responsibility is accepted for user-generated material. By using this site, you agree to comply with UK law and the forum rules.