Theme editor

Scale Model Shop

Revell 1/32 Typhoon 1B with car door canopy (Build)

Status
Not open for further replies.

rtfoe

Active member
Joined
Apr 29, 2018
Messages
9,251
Reaction score
542
Points
113
Location
Shah Alam, Malaysia
1/3
Thread owner
Hi Everyone,

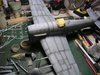
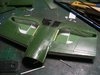
Here's Henry Talalla's Typhoon or near enough as he may have been shot down in a later bubble four bladed version of the rocket firing Typhoon. It is in his squadron markings, 182Sqd. The car door version was being switched just before D-Day with the upgraded bubbled canopy version and since only the CO has a constant aircraft of his own, the others would fly in anything operational and assigned to them on that day. I'm pretty sure Henry would have flown the car door version or the B1 when joining his squadron.

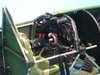
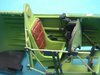
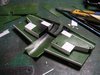
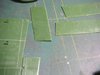
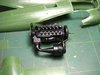
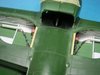
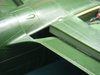
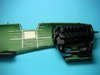
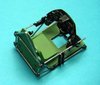
The kit is a Revell 1/32 scale with raised panel lines and covered with rivets. These all had to be sanded down and panel lines re-scribed. Early on I had decided I would not show the engine but one was provided that can be super detailed if one so chooses. Also I wanted to correct the wheel wells.

View attachment 315927

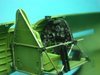
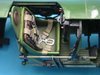
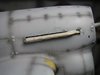
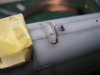
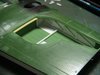
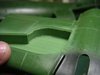
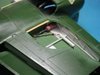
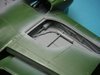
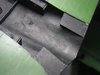
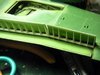
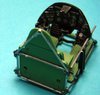
I just painted the engine black and hoped it wasn't visible in any openings. The kit wheel well sides were molded flush with the contours of the door flap. But in reality it was boxed shaped on the inside.

View attachment 315928

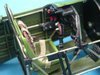
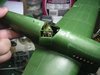
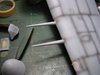
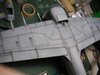
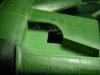
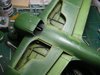
I cut away one side and proceeded to cut the other along the edge of the well.

View attachment 315929

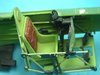
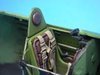
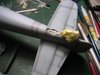
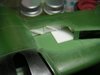
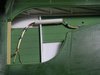
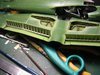
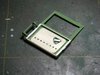
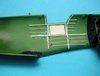
Meanwhile I thought the flaps ought to shown open as well...living dangerously was I...so cut away I did.

View attachment 315930

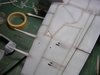
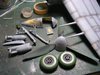
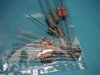
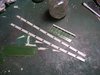
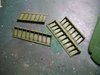
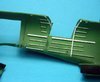
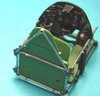
Whatever was cut was replaced with plastic card...

View attachment 315931

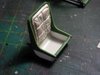
Everything was mirrored for the other side....

View attachment 315932

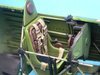
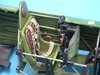
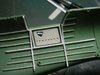
The rivet impressions hide the rscribed panel lines. The kit was peppered with it...very measled like.

View attachment 315933

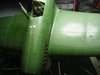
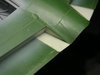
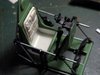
From the inside it looked like this. The boxed frames held everything in place inside the well. This also shows how thick and robust the Typhoon wings were.

View attachment 315934

More later...

Cheers,
Richard
 

Attachments

  • 8.jpg
    8.jpg
    3.2 KB · Views: 0
  • 7.jpg
    7.jpg
    2.7 KB · Views: 0
  • 6.jpg
    6.jpg
    3 KB · Views: 0
  • 5.jpg
    5.jpg
    2.2 KB · Views: 0
  • 4.jpg
    4.jpg
    2 KB · Views: 0
  • 3.jpg
    3.jpg
    2.2 KB · Views: 0
  • 2.jpg
    2.jpg
    2.3 KB · Views: 0
  • 1.jpg
    1.jpg
    2.7 KB · Views: 0
Thread owner
Here's more of the wheel well construction. I needed to replicate piping and servo units in the well and I found resistors that looked like them.

View attachment 316039View attachment 316040

With as much reference that I could find I made the well look as busy as it could be.

View attachment 316041View attachment 316043View attachment 316044

With some paint and weathering it looked a bit better but if I had known then that I do now is that wheel wells on Typhoons were silver in colour. Well I could remask and do it all over again but it's too much trouble...perhaps one day. So far no one has looked under.

View attachment 316045

Lots of puttying to the joints coming up.

Cheers,
Richard
 

Attachments

  • 11.jpg
    11.jpg
    2.7 KB · Views: 0
  • 10.jpg
    10.jpg
    2.8 KB · Views: 0
  • 9.jpg
    9.jpg
    2.3 KB · Views: 0
  • 8a.jpg
    8a.jpg
    2.5 KB · Views: 0
  • 12.jpg
    12.jpg
    2.6 KB · Views: 0
  • 15a.jpg
    15a.jpg
    3.2 KB · Views: 0
Hi Richard
Another rather poor kit getting the RF treatment. The wheel wells look great. Just sanding and rescribing a couple of panel lines is time consuming but tackling all of them - that's dedication.
Jim
 
Nice tip with the resistors. I hope the electrics in your house still work.:smiling5: Stunning work as always:thumb2:
 
Thread owner
Thanks Jim and Steve for commenting. Well the kit was sitting around on the shelf and I had spare time plus it was theraputic. Even with three faced wire ring it's been tripping quite often during thunderstorms and I had nothing to do with it...I'm scared stiff at touching any wires in the house.

The Typhoon had very large barn door flaps which I wanted to show dropped. Unfortunately they were molded shut so I cut it and created the individual frame with pre drilled card and rod styrene. Here are the flaps...

View attachment 316390

Obviously when anything is cut away gaps need to be filled or blocked...

View attachment 316395
View attachment 316396

And sanded...

View attachment 316397
View attachment 316391

Test fitted...

View attachment 316392

Painted and weathered....

View attachment 316393

I painted the reverse side black as the cockpit came in a turbular frame that you could see right through to the bottom.

View attachment 316394

Cheers,
Richard
 

Attachments

  • 16.jpg
    16.jpg
    2.8 KB · Views: 0
  • 15.jpg
    15.jpg
    2.1 KB · Views: 0
  • 14.jpg
    14.jpg
    2 KB · Views: 0
  • 13.jpg
    13.jpg
    2.6 KB · Views: 0
  • 20.jpg
    20.jpg
    2.4 KB · Views: 0
  • 19.jpg
    19.jpg
    2.7 KB · Views: 0
  • 18.jpg
    18.jpg
    3.7 KB · Views: 0
  • 17a.jpg
    17a.jpg
    3.1 KB · Views: 0
Thread owner
Hi Ya'll,
Now we're moving onto the fuselage. The side walls were practically devoid of any ribbing frames so I made some up with plastic strips. I based the measurement of the sections on the rivet detail on the outer fuselage.
View attachment 316702

The firewall was attached to the engine so that had to be installed. As mentioned, the engine would be a nice piece to detail but I wasn't intending to so its just painted in black.

View attachment 316703View attachment 316704

I created more detail to the left door panel

View attachment 316705

The right fuselage ribbing and frame was duplicated...the difference was that the door is in the opened position.

View attachment 316706

Attention was paid to the door panelling. The two raised injector pin marks were being removed with a sharp blade...one has already been sliced off.

View attachment 316707

If you wanna see more check out the next posting.

Cheers,
Richard
 

Attachments

  • 26.jpg
    26.jpg
    2.4 KB · Views: 0
  • 25.jpg
    25.jpg
    2.5 KB · Views: 0
  • 24.jpg
    24.jpg
    2.8 KB · Views: 0
  • 23.jpg
    23.jpg
    2.5 KB · Views: 0
  • 22.jpg
    22.jpg
    2.2 KB · Views: 0
  • 21.jpg
    21.jpg
    2.2 KB · Views: 0
Thread owner
Here's more to the interior but real bad pictures. The camera keeps focusing the foreground.

The kit comes with a flat instrument panel to stick a large piece of decal. I photocopied the decal and using that as a template, I cut out panels and drilled bezels for the instruments. I did the usual sandwiching of decal and panels to the kit instrument panel. The side consoles were also enhanced with knobs and a raised compass. I painted the facings carefully in black and dropped Future into the drilled out bezels to create glass covers for the instruments.

View attachment 317145View attachment 317146View attachment 317147

The kit seat was flat at the bottom so I cut that out and created a bucket. This is where the parachute normally fits and the pilot sits on it. I also kneaded up a back cussion.

View attachment 317150

The seat was attached to the back armour plate and the floor had enough room for the bucket extension. Fixed on the gun sight, joystick and pedals. I didn't have enough reference to tell if the seats were made from the same material as the Spitfire seats so I left it in interior green.

View attachment 317148

All the parts are left unglued for easy painting and re-attaching.

Cheers,
Richard
 

Attachments

  • 31.jpg
    31.jpg
    2.4 KB · Views: 0
  • 30.jpg
    30.jpg
    2.8 KB · Views: 0
  • 29.jpg
    29.jpg
    2.9 KB · Views: 0
  • 28.jpg
    28.jpg
    3.5 KB · Views: 0
  • 27.jpg
    27.jpg
    3.3 KB · Views: 0
Great to see all of the new details you're adding to this model Richard ;).
Those resistors look nice too in the well...
Cheers, Steven
 
Hi that's a masteclass in scratch building Richard, very crip and clean :thumb2::thumb2::thumb2:.
Old Puffer Pete.
 
Thread owner
Thank you Steven and Pete. Apparently sources say that the kit is pretty accurate in surface detail for an old model. All it needed were the few extras to ham it up.

Cheers,
Richard
 
Thread owner
Get ready for more pictures of the cockpit after some painting. A few more bits and bobs like circuit boxes and knobs were added.

View attachment 317505

The leather back cushion recieved a coat of red brown. Dark washes and lighter shades of brown were later painted on.

View attachment 317506View attachment 317507View attachment 317508

My usual seat belts out of masking tape were attached with some CA glue and the whole assembly weathered with washes and painted highlights.

View attachment 317509

Dials and switches were picked out with white and red...finally the dash board can be seen clearly.

View attachment 317510View attachment 317511View attachment 317512View attachment 317513

Bit by bit the dark wash and highlights with drybrushing brought the canopy to life.

View attachment 317514

There is still the seam line I missed on the gun sight. The camera can always pick up these details on close up. Filler can be seen just ahead of the cockpit to fill a dimple.

View attachment 317515

Soon I'll close the fuselage.

Cheers,
Richard
 

Attachments

  • 37.jpg
    37.jpg
    3.4 KB · Views: 0
  • 36.jpg
    36.jpg
    3.4 KB · Views: 0
  • 35.jpg
    35.jpg
    2.9 KB · Views: 0
  • 34.jpg
    34.jpg
    3.1 KB · Views: 0
  • 33.jpg
    33.jpg
    3.1 KB · Views: 0
  • 32.jpg
    32.jpg
    3.1 KB · Views: 0
  • 38.jpg
    38.jpg
    3.6 KB · Views: 0
  • 39.jpg
    39.jpg
    3.4 KB · Views: 0
  • 40.jpg
    40.jpg
    3.3 KB · Views: 0
  • 42.jpg
    42.jpg
    3.2 KB · Views: 0
  • 41.jpg
    41.jpg
    2.7 KB · Views: 0
Thread owner
After all innards were completed, the basic closing of the main parts that make up the aircrafts body, wings and tail is done. You can see visible the scribbed panel lines on the aircrafts surface. The kit fit was pretty good for an old mold. There were gaps for the engine panel that was given to expose the enging if one wanted to.

View attachment 318691

The wing roots fit so well that minimal filler was needed only for dimples at attachment points seen here just forward of the cockpit.

View attachment 318692

Thanks for looking in.

Cheers,
Richard
 

Attachments

  • 44.jpg
    44.jpg
    2.2 KB · Views: 0
  • 43.jpg
    43.jpg
    2.9 KB · Views: 0
Hi Richard,
Missed this up to know but the magic is already showing great work so far.
 
Bit late to this build myself but a fantastic read none the less. Loving your scratch building
 
Thread owner
Hey thanks guys, no worries as posts get shifted down the pecking order quite quickly here and can be missed.

The Typhoon is one of the least featured planes but is getting some coverage lately at D-Day reunions. Little known fact that they slowed down German reaction for counter attacks hitting ground targets trying to reach the beach that many thought was Hitlers reluctance to deploy his forces. No doubt the main heavy armour was kept to the North there were elements of Rommels make shift defence armour that were decimated everytime they came out of cover by aerial bomb or rocket attacks by fighter bombers like the Typhoon. Only well concealed anti-tank guns or small tank company's travelling by night hindered the Allied advance. Any large German columns in daylight on roads were sitting ducks for allied fighter bombers.

Cheers,
Richard
 
Richard.
I don't know what league of modellers your in but one day I'd like to be in it ! Dedication coupled with madness produces work like yours, that office is brilliant, along with the undercarriage.
No doubt you have seen the footage on U tube of Typhoons causing havoc in France , certainly lived up to their name .
John.
 
Thread owner
Thanks Ross and John, the large space in the Typhoon cockpit allowed for some extra work so I went for it... had a few swigs from the whiskey bottle first to calm the nerves...I think that did the trick John. :tongue-out3: There are no terror leagues of modelers, just loonie ones. :tears-of-joy::tears-of-joy:

It was a coincedence when I was researching for the Typhoon that I found out about the Talalla brothers. One of them actually flew one of my favorite planes. Also an article in a magazine featured a build of a 1/48 scaled Typhoon in the same squadron markings as Henry Talalla was from which was another coincedance. I had only pieced together the engine and left the kit in the stash for years so the timing was right.

Cheers,
Richard
 
Thread owner
Ok...I broke out the airbrush and did a pre-flight check... "Flaps, check...magnetos, check...oil gauges and switches on, check...brakes on, check...contact...BANG!! SPLUTTER!!...VROOOOM!!"

With all checked out smoothly grey primer was sprayed on...then the pre-shading with diluted Nato Black commenced... at 1/32 it was easy keeping the lines consistant and straight.

View attachment 318951

Everything that needed coating and pre-shading was covered...

View attachment 318952

I forgot that I had added a modification like some sort of a strengthening structure just ahead of the navigational light benind the cockpit...

View attachment 318953

I blu tac'd all the flap and covers before attacking the underside...

View attachment 318954

Stain streaks were added with the airbrush at this stage, hopefully they would appear more subtle under the base coat of paint.

View attachment 318955View attachment 318956View attachment 318957

Under primer you can see the newly added screw heads from plastic rod slices and notched in the center. The molding was so soft that these had to be replaced.

View attachment 318958

That's it...next the anti Focke Wulf stripes...

Cheers,
Richard
 

Attachments

  • 52.jpg
    52.jpg
    2.1 KB · Views: 0
  • 51.jpg
    51.jpg
    2.6 KB · Views: 0
  • 50.jpg
    50.jpg
    3 KB · Views: 0
  • 49.jpg
    49.jpg
    2.6 KB · Views: 0
  • 48.jpg
    48.jpg
    2.9 KB · Views: 0
  • 47.jpg
    47.jpg
    2 KB · Views: 0
  • 46.jpg
    46.jpg
    3.4 KB · Views: 0
  • 45.jpg
    45.jpg
    3.6 KB · Views: 0
Richard.
This video on U tube has a very interesting section on the white markings, apparently quite a few Typhoons were shot down by friendly fire, being mistaken for German 109's, resulted in the planes having white lines on them prior to the landings.


John.
 
Status
Not open for further replies.
Back
Top