
You are using an out of date browser. It may not display this or other websites correctly.
You should upgrade or use an alternative browser.
You should upgrade or use an alternative browser.
Revell 1/72 Gato Class Submarine Build.
- Thread starter ojays
- Start date
- Status
- Not open for further replies.
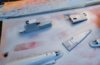
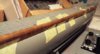
Such a lovely day today, took the bits outside to blow a little paint on.
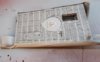
A coat of primer filler to show up any imperfections ( of which there are many) so I know where any filler needs to be applied.
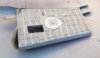
Must admit fairly satisfied with the PE decking, just needs a little fettling.
View attachment 100629
View attachment 100630
View attachment 100631
View attachment 100632
View attachment 100633
View attachment 100634
Gregg
View attachment 213652
View attachment 213653
View attachment 213654
View attachment 213655
View attachment 213656
View attachment 213657
A coat of primer filler to show up any imperfections ( of which there are many) so I know where any filler needs to be applied.
Must admit fairly satisfied with the PE decking, just needs a little fettling.
View attachment 100629
View attachment 100630
View attachment 100631
View attachment 100632
View attachment 100633
View attachment 100634
Gregg
View attachment 213652
View attachment 213653
View attachment 213654
View attachment 213655
View attachment 213656
View attachment 213657
Attachments
The deck does look good, Gregg.
Yes, indeed it was a lovely day today!
Yes, indeed it was a lovely day today!
Knocking on with this now.
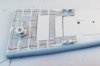
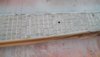
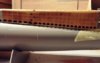
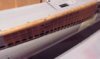
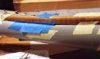
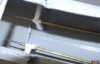
Got started on the area I have been putting off for a while, the 'Eduard' PE hull side plates.
First time I have tackled any PE this big, took 4hrs just to fold the starboard plates. & get them to lay without forcing.(double curvature)
Temporarily held on with masking tape until I can get some Cyano Gell (do you sell it John)
Some areas need to be trimmed to go around fixtures & holes for other parts.
Starting on the other side tonight.
View attachment 101431
View attachment 101432
View attachment 101433
View attachment 101434
View attachment 101435
View attachment 101436
View attachment 214454
View attachment 214455
View attachment 214456
View attachment 214457
View attachment 214458
View attachment 214459
Attachments
Cyano Gell glue turned up today, so hoping to make the PE side-plates secure this weekend.
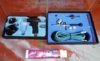
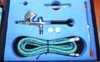
Also couldn't resist getting a couple of cheap airbrushes off the net, £5.50 & £8.20 (postage included) to mess about with.
Although I have a Badger & a Miji used in my past profession, I still use hairy sticks on my models.
I will give these a try to see how they fair against my old ones.
View attachment 102813
View attachment 102814
View attachment 102815
View attachment 102816
Gregg
View attachment 215836
View attachment 215837
View attachment 215838
View attachment 215839
Attachments


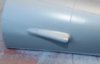
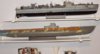
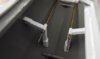
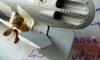
Not a great lot to mention, just positioning the prop shafts and working on making the stern dive planes operational.
'A' frames now positioned and secured, waiting for the glue to set.
View attachment 106024
View attachment 106025
View attachment 106026
View attachment 106027
View attachment 106028
View attachment 106029
View attachment 219047
View attachment 219048
View attachment 219049
View attachment 219050
View attachment 219051
View attachment 219052
Attachments


I thought once of doing a sub model after watching days boot ( yep I thought and I'm glad I kept it there) wow that's huge I mean huge for a kit. What you done to date is out of this world ( you seem to be putting so much detail into this it's going to be awesome when finished, just thinking with all that photo etch it's not going to be light either?
Fantastic Greg
Regards
Robert
Fantastic Greg
Regards
Robert
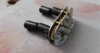
looking interesting ,what are the gears for ? sorry silly to ask,
looking good so far,and liking it,")
see the pic of the AB,can i have some info on that one,
as if im thinking right your using it for under coat to cover more at once than a smaller AB,
and if possible a link to were from ta,appreciate any help.")
View attachment 106045
View attachment 219068
looking good so far,and liking it,
see the pic of the AB,can i have some info on that one,
as if im thinking right your using it for under coat to cover more at once than a smaller AB,
and if possible a link to were from ta,appreciate any help.
View attachment 106045
View attachment 219068
Attachments

Nice work Gregg, looks superb so far. You're correct in making the diving planes larger, the Gato just dips and rises all the time if left with standard. I have heard that the Gato is a bit of a pig compared to the 1/72 U-boat when converting to RC, something to do with ballasting, of course I may have got this wrong.
Si
Si
Thanks for all the comments guys & gals.
Monica: forget that airbrush, first time I pulled the trigger, the needle and adjuster shot out the back of the body
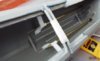
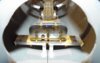
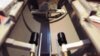
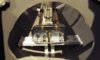
Not a silly question Moni, basically:
The gearbox is a two into one reduction drive. Basically one electric motor, will drive two propellers. However the gearbox will slow motor the revolutions down to a usable range.
Si : Your right, after speaking to others who have converted the Gato, it is difficult to ballast as it has such a large internal area that requires either flooding (my choice) or weighing down with ballast.
Gregg
Monica: forget that airbrush, first time I pulled the trigger, the needle and adjuster shot out the back of the body
Not a silly question Moni, basically:
The gearbox is a two into one reduction drive. Basically one electric motor, will drive two propellers. However the gearbox will slow motor the revolutions down to a usable range.
Si : Your right, after speaking to others who have converted the Gato, it is difficult to ballast as it has such a large internal area that requires either flooding (my choice) or weighing down with ballast.
Gregg
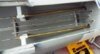
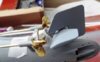
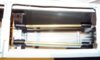
Managed a little work over the last few weeks.
Trial fitting of control runs to rear dive planes and rudder.
Made a start on the forward planes.
View attachment 109501
View attachment 109502
View attachment 109503
View attachment 109504
View attachment 109505
View attachment 109506
View attachment 109507
View attachment 109508
View attachment 222524
View attachment 222525
View attachment 222526
View attachment 222527
View attachment 222528
View attachment 222529
View attachment 222530
View attachment 222531
Attachments

G
Guest
Guest
Nice, this looks like a really interesting and enjoyable build. Good work so far
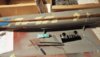
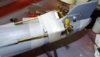
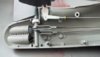
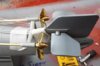
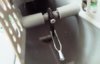
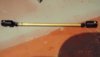
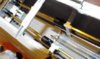
Some of my latest progress, setting up the drive train.
Secondary drive shafts, connecting the gearbox to the main prop shafts.
View attachment 110446
View attachment 110447
View attachment 110448
View attachment 110449
View attachment 110450
View attachment 110451
View attachment 223469
View attachment 223470
View attachment 223471
View attachment 223472
View attachment 223473
View attachment 223474
Attachments

G
Guest
Guest
cracking work mate, I built one of these a few years ago and gave it to a friend. Nice detailing work.
- Status
- Not open for further replies.
Legal Notice
scalemodelling.co.uk is a privately operated online discussion forum. All content posted by members reflects their own views and opinions and does not necessarily represent those of the forum owners or administrators. While reasonable efforts are made to moderate content, no responsibility is accepted for user-generated material. By using this site, you agree to comply with UK law and the forum rules.
Currently on our website
Threads
37,405
Messages
707,857
Members
2,652
Latest member
Waffenträger Auf E-100