Theme editor

Scale Model Shop

Revell 1/72 Macchi C.200 Saetta

Status
Not open for further replies.

flyjoe180

Active member
SMF Supporters
Joined
Jan 18, 2012
Messages
13,317
Reaction score
1,119
Points
113
Location
Earth
1/3
Thread owner
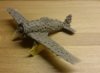
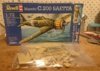
This is the old (ancient) Revell kit of this iconic Italian aircraft. It was the first model I ever built, with Dad in the early 1980s. I remember painting it (it was the overall green version which still crops up from time to time). This version has the great looking Italian 'mottle' scheme. The kit has not changed in all those years, and it certainly shows it's age with flash and crude components.


The box and parts, nicely sealed:


View attachment 256106


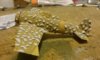
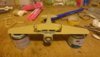
No point in hanging around. Putty and sandpaper heaven. If you're into that sort of thing...


View attachment 256107


View attachment 256108


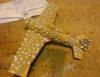
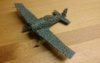
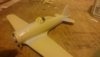
I added plastic card to the floor of the cockpit/roof of the landing gear bays so you can't see straight through later on.


View attachment 256109


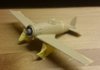
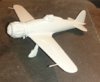
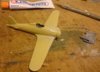
I stuck my awesome Italian pilot onto his sofa of a cockpit seat, and primed the Saetta. The cowl is stuck on with bluetac so I can remove it afterwards for it's yellow and bronze paint.


View attachment 256110


As my build rate has suffered (standstill) for some time, my objective is to finish this soon (yeah right).
 

Attachments

  • DSC_0267.JPG
    DSC_0267.JPG
    2.9 KB · Views: 0
  • DSC_0283.JPG
    DSC_0283.JPG
    2.5 KB · Views: 0
  • DSC_0279.JPG
    DSC_0279.JPG
    2.3 KB · Views: 0
  • DSC_0278.JPG
    DSC_0278.JPG
    1.7 KB · Views: 0
  • DSC_0273.JPG
    DSC_0273.JPG
    2.3 KB · Views: 0
that certainly goes together very quickly! This kit reminds me of those short run kits which are horrendous to put together.


Good to see you have the main parts together despite it's quality
 
Thread owner
that certainly goes together very quickly! This kit reminds me of those short run kits which are horrendous to put together.


Good to see you have the main parts together despite it's quality

Again, it's an old kit so you go with what you have, but it falls together really. The difficult part was the landing gear, and masking the tiny canopy.
 
Well you've not been on for a while Joe, but your making up for lost time. 
 
That looks nice Joe, the colour scheme should be a challenge in 1/72 ;)
 
Great start joe , its good to get back to basics now and then , and they dont come much more basic than this veteran moulding!! Cant wait to see the paint go on , cheers tony
 
Not familiar with this aircraft.  Is it me or does it look like it was designed to have a different engine to the one it ended up with?
 
Thread owner
Not familiar with this aircraft.  Is it me or does it look like it was designed to have a different engine to the one it ended up with?

Macchi was forced to use a radial engine in the Saetta; Italian development of liquid-cooled engines was not up to speed at the time of the aircraft's introduction. It was pretty much obsolete at the start of the Second World War. The C.202 Folgore was a development of the C.200, strapping a Daimler Benz 601 engine to the airframe and altering the fuelage accordingly. The Folgore turned out to be one of the best fighters of the war.


Having said that the Saetta did serve in all the major Italian campaigns, and on the Eastern Front had a kill to loss ratio of 88 to 1!
 
Thread owner
Pressing on. The engine cowl, propeller and engine are ready for installation later:


View attachment 256268


The yellow/brown colour was sprayed on after the white fuselage band was masked off. The colour is a bit washed out in this photo, I've been using my cellphone camera.


View attachment 256269


Once that was dry, I added random blobs of tac. Once ready, i will spray the next colour, a dark brown, and repeat the exercise once more for the final green colour. It's got Macchi pox!


View attachment 256270


View attachment 256271
 

Attachments

  • DSC_0333.JPG
    DSC_0333.JPG
    2.3 KB · Views: 0
  • DSC_0332.JPG
    DSC_0332.JPG
    2.6 KB · Views: 0
  • DSC_0325.JPG
    DSC_0325.JPG
    1.9 KB · Views: 0
  • DSC_0313.JPG
    DSC_0313.JPG
    1.3 KB · Views: 0
That's coming along very nicely Joe, looking forward to the big reveal
 
Thread owner
Thanks Patrick. Me too!


Masked with blobs of tac for the green, and the final top colour sprayed on. This particular pot of paint is over 20 years old now and sprays very nicely and evenly! Humbrol went through a patch of bad paint products, the very old tins and the brand new tins have been superb.


View attachment 256433


View attachment 256434


Waiting for it to dry overnight and then I will reveal the camouflage scheme. Probably going to need touch ups on the underside I suspect.
 

Attachments

  • DSC_0336.JPG
    DSC_0336.JPG
    1.9 KB · Views: 0
  • DSC_0337.JPG
    DSC_0337.JPG
    1.8 KB · Views: 0
looking forward to the big reveal joe!
 
It looks a little unwell Joe, it's covered in spots.


great work though.
 
Ah yes - the warts. I remember them well! Looking good, Joe - looking forward to seeing the finished job.
 
That's a great idea for the camo scheme. I'd never have thought of doing it that way. Looking forward to the blobs coming off.
 
Revell did several of the well known WW2 fighters in that series during the mid/late 1960s - Zero, Hurricane, Spitfire, Me109 et al. I still have a P 47 somewhere. Although they may not have been the best detailed,  they were good enough at the time, and went together well.


I remember reading somewhere that they were nearly all a bit undersize, working out at about 1/75
 
Status
Not open for further replies.
Back
Top