Hi all
So back in November 2019 when I got these, Jakko said he was interested to know how I got on with them. So better late than never I thought it was about time I posted a ‘review’.
I’ve not done any major reviews before and I’m far from a modelling or paint expert, so if I’ve missed anything then please forgive me and ask me to comment on what I’ve missed.
I’ll included some pictures below of the paint and effects I’ve achieved with the paints – for better or worse. These will be in a second post as I’ve hit the site's post character limit (it’s 10,000 by the way).
All the best.
Andrew
-------------------------------------------------
So why this set?
I came across this set on the channel of Michael Kovac aka ‘Uncle’ Night Shift. https://www.youtube.com/c/NightShiftScaleModels/featured
For those of you who’ve not heard of him he’s a Slovakian modeller. His channel has only been going for about three years (130k subscribers) but earlier this year it got to the point where he could go full time on it. Whilst he may not be the ‘best’ modeller in the world (if there is such a person), I like him for a number of reasons:
In the demo of this set (see below) he made two claims:
I try not to get sucked in by every recommendation I see but the results were very good and Martin bought them with his own money, and so wasn’t promoting the set. So took a punt and splashed out some of my hard-earned cash on it.
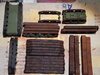
What you get
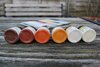
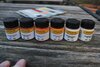
So, for your money you six 22ml pots of water based acrylic paints, in plastic pots with screw top lids (size wise think Tamiya XF paints pots and you won’t be very far off).
The colours you get are:
Whilst these are supposedly ‘Rust and dust’ colours, they will obviously do the job if you need the colour for something else.
Consistency.
Definitely thinner than Vallejo Model Colour and thicker than Model Air. To my eye they look pretty close to my one pot of Tamiya XF paint.
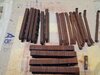
Coverage.
One of the things Martin commented on right at the start of his review is just how surprisingly pigment heavy this paint is and I have to agree with him
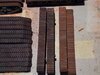
I’ve only used with a hairy stick and not through an AB. Coverage of the neat paint in three darker colours was good although three lighter ones less so, although perhaps understandable (see below DIY swatches). As you’ll see below on the tracks and other examples, I’ve mainly used it as washes rather than neat, so I’ve not given it extensive trials in its normal un-thinned state. Because the paint is so pigment heavy it takes a lot of water/thinner to get them to wash consistency.
Techniques Martin Kovac and I have used
So, I need to confess that at this point I’ve only used the ‘rust’ colours, so I’ll have no complaints if you cry ‘review fraud’ at this point!
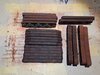
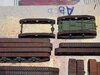
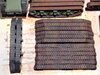
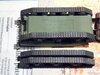
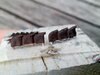
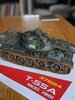
Martin demonstrated a technique using a thin wash either by painting/slopping it on and also speckling the tracks using a toothpick and paintbrush. He started with the lightest coat first and then getting darker – using all four paints. Apparently, this is light to dark technique is one recommended by Mike Rinaldi.
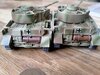
I’ve tried a number of variations of the technique on tracks, sometimes over flat black surfaces, sometimes over metallic surfaces and some over metallic surface covered in my home brew very dark brown wash that creates a dull metal effect before the rust is applied (as demonstrated on my BoB build).
I tried varying the order, what paints I used – sometimes only two or three – and even applying my wash over the top (see examples below).
Availability & price
When I was looking to het this set availability was VERY problematic. In the end I had to order specifically and waited around six weeks for delivery, not sure why. I do though see that it now looks like it’s more readily available.
Price wise it you’re looking at around £18-20 incl. P&P in the UK. That works out at about £3.20 per pot.
Verdict
At this point I should say I’ve not used Life Colour before and so have no axe to grind on that front.
I can’t say if It is quite simply the best ‘rust’ set I’ve ever seen, as it’s the only one I’ve ever used. No doubt though there are others out there that claim to be the best ‘rust and dust’ set ever but I’ll let you be the judges.
What I can say is that the technique demonstrated by Martin Kovac is very simple and produces great results – great for modelling novices.
Also, when you consider the set has four colours, combine that with the range of base coats you could theoretically use, the varying order you could apply the paint in and then think about the different application methods, whilst you might not have an infinite number of options – you won’t short of them either.
So, will it last for ever as Martin Kovac said?
Firstly, I seem to recall seeing some people have issues with Life Color paints drying out. I’ve only had mine for 15 months but so far, they appear to be lasting okay.
Ultimately it of course depends upon how much use them but the fact the suggested technique is to use them as a wash they should last a long time.
As I said above, it takes a surprising amount of water/thinner to get them to wash consistency and so I often have some of the mixture left in the pallet. So as not to waste it, I just simply pour it back into the pot and so far, have suffered no ill effect. So that combined with the fact I normally do 1/72, mine should be lasting a while!
Should you buy it?
If you’re an experienced modeller with all the tools and paints already, and have a good sound technique that works, I don’t honestly think you will gain much – but I may be wrong of course.
If you’re modelling novice, are looking to find the right effect or are struggling with rust paints, then I would recommend giving this set a go.
Over to you
Since I started putting this review together, it has transpired that our very own Tim Marlow uses them and likes them too. Given his experience and great skills, I’ve asked him to add his own thoughts below. Thanks again Tim.
Similarly, if you’ve used the set and have any other comments or recommendations, then please feel free to explain them below and post a few example shots.
If you have any other rust techniques then I don’t mind a short description of it below but please don’t post any pictures. Sorry but I want this thread to be about this particular set.
Pictures to follow shortly….
So back in November 2019 when I got these, Jakko said he was interested to know how I got on with them. So better late than never I thought it was about time I posted a ‘review’.
I’ve not done any major reviews before and I’m far from a modelling or paint expert, so if I’ve missed anything then please forgive me and ask me to comment on what I’ve missed.
I’ll included some pictures below of the paint and effects I’ve achieved with the paints – for better or worse. These will be in a second post as I’ve hit the site's post character limit (it’s 10,000 by the way).
All the best.
Andrew
-------------------------------------------------
So why this set?
I came across this set on the channel of Michael Kovac aka ‘Uncle’ Night Shift. https://www.youtube.com/c/NightShiftScaleModels/featured
For those of you who’ve not heard of him he’s a Slovakian modeller. His channel has only been going for about three years (130k subscribers) but earlier this year it got to the point where he could go full time on it. Whilst he may not be the ‘best’ modeller in the world (if there is such a person), I like him for a number of reasons:
- Even if he isn’t the ‘best’ he is very talented.
- He’s more than willing to admit he doesn’t know it all, that he is still learning and points out where he’s made mistakes.
- He doesn’t push any particular brand and uses what he thinks does the best job – plus he’s willing to take risks and experiment.
- He’s not afraid to say he if he doesn’t get on with a particular product a manufacturer has sent him to test – but he always does it nicely.
- He is open about a couple of companies that sponsor him but it sounds like he started using their products before getting sponsored by them.
- Perhaps best of all, he has a VERY self-deprecating sense of humour and some personality unlike some I’ve seen/heard.
In the demo of this set (see below) he made two claims:
- It is quite simply the best ‘rust’ set he’d ever seen
- It will last forever.
I try not to get sucked in by every recommendation I see but the results were very good and Martin bought them with his own money, and so wasn’t promoting the set. So took a punt and splashed out some of my hard-earned cash on it.
What you get
So, for your money you six 22ml pots of water based acrylic paints, in plastic pots with screw top lids (size wise think Tamiya XF paints pots and you won’t be very far off).
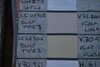
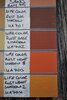
The colours you get are:
- UA 701 Rust Dark Shadow. This is a mid-brown. The closet matches I have are Vallejo Model 984 Flat Brown or Tamiya Nato XF 68 Nato Brown but to my eye UA701 looks ever so slightly darker with a touch less red in it.
- UA 702 Rust Base Color. This is reddish brown. The closest match I have is Humbrol Enamel H113 Rust but UA702 looks very slightly ‘brighter’ and is a touch redder.
- UA 703 Rust Light Shadow 1. I can best describe this as a terracotta colour. The closest match I have is Vallejo Model Air V71.129 Light Rust although UA703 is again looks very slightly ‘brighter’ and with a touch more orange to it.
- UA 704 Rust Light shadow 2. I can best describe this as a very dark yellow or even a very muted and light orange. The ‘closest’ match I personally have is Revell’s enamel R88 Ochre Brown but UA704 definitely has more yellow/orange to it and again looks a bit brighter.
- UA 705 Dust Type 1. This is an off white with a very slight red hint to it (at least to my eyes). Unfortunately, I have nothing even close to it to give you a comparison with other than to say it is definitely not a ‘pure’ white.
- UA 706 Dust Type 2.. Again, this is an off white with a very slight yellow hint to it (at least to my eyes). Again, I have nothing even close to it to compare with – sorry!
Whilst these are supposedly ‘Rust and dust’ colours, they will obviously do the job if you need the colour for something else.
Consistency.
Definitely thinner than Vallejo Model Colour and thicker than Model Air. To my eye they look pretty close to my one pot of Tamiya XF paint.
Coverage.
One of the things Martin commented on right at the start of his review is just how surprisingly pigment heavy this paint is and I have to agree with him
I’ve only used with a hairy stick and not through an AB. Coverage of the neat paint in three darker colours was good although three lighter ones less so, although perhaps understandable (see below DIY swatches). As you’ll see below on the tracks and other examples, I’ve mainly used it as washes rather than neat, so I’ve not given it extensive trials in its normal un-thinned state. Because the paint is so pigment heavy it takes a lot of water/thinner to get them to wash consistency.
Techniques Martin Kovac and I have used
So, I need to confess that at this point I’ve only used the ‘rust’ colours, so I’ll have no complaints if you cry ‘review fraud’ at this point!
Martin demonstrated a technique using a thin wash either by painting/slopping it on and also speckling the tracks using a toothpick and paintbrush. He started with the lightest coat first and then getting darker – using all four paints. Apparently, this is light to dark technique is one recommended by Mike Rinaldi.
I’ve tried a number of variations of the technique on tracks, sometimes over flat black surfaces, sometimes over metallic surfaces and some over metallic surface covered in my home brew very dark brown wash that creates a dull metal effect before the rust is applied (as demonstrated on my BoB build).
I tried varying the order, what paints I used – sometimes only two or three – and even applying my wash over the top (see examples below).
Availability & price
When I was looking to het this set availability was VERY problematic. In the end I had to order specifically and waited around six weeks for delivery, not sure why. I do though see that it now looks like it’s more readily available.
Price wise it you’re looking at around £18-20 incl. P&P in the UK. That works out at about £3.20 per pot.
Verdict
At this point I should say I’ve not used Life Colour before and so have no axe to grind on that front.
I can’t say if It is quite simply the best ‘rust’ set I’ve ever seen, as it’s the only one I’ve ever used. No doubt though there are others out there that claim to be the best ‘rust and dust’ set ever but I’ll let you be the judges.
What I can say is that the technique demonstrated by Martin Kovac is very simple and produces great results – great for modelling novices.
Also, when you consider the set has four colours, combine that with the range of base coats you could theoretically use, the varying order you could apply the paint in and then think about the different application methods, whilst you might not have an infinite number of options – you won’t short of them either.
So, will it last for ever as Martin Kovac said?
Firstly, I seem to recall seeing some people have issues with Life Color paints drying out. I’ve only had mine for 15 months but so far, they appear to be lasting okay.
Ultimately it of course depends upon how much use them but the fact the suggested technique is to use them as a wash they should last a long time.
As I said above, it takes a surprising amount of water/thinner to get them to wash consistency and so I often have some of the mixture left in the pallet. So as not to waste it, I just simply pour it back into the pot and so far, have suffered no ill effect. So that combined with the fact I normally do 1/72, mine should be lasting a while!
Should you buy it?
If you’re an experienced modeller with all the tools and paints already, and have a good sound technique that works, I don’t honestly think you will gain much – but I may be wrong of course.
If you’re modelling novice, are looking to find the right effect or are struggling with rust paints, then I would recommend giving this set a go.
Over to you
Since I started putting this review together, it has transpired that our very own Tim Marlow uses them and likes them too. Given his experience and great skills, I’ve asked him to add his own thoughts below. Thanks again Tim.
Similarly, if you’ve used the set and have any other comments or recommendations, then please feel free to explain them below and post a few example shots.
If you have any other rust techniques then I don’t mind a short description of it below but please don’t post any pictures. Sorry but I want this thread to be about this particular set.
Pictures to follow shortly….