
You are using an out of date browser. It may not display this or other websites correctly.
You should upgrade or use an alternative browser.
You should upgrade or use an alternative browser.
Rick's 1/48 Hasegawa Phantom FGR2, 1435 Flt Stanley Airport
- Thread starter rickoshea52
- Start date
- Status
- Not open for further replies.
I have applied the Matt varnish now and noticed the RWR fairings on the tip of the fin hadn't been painted so out with some cut down post it notes for masking and a lick of black paint solved that problem.
View attachment 282646
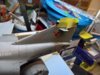
I assembled the intake FOD blanks too, these only took a few minutes to do and will be painted on the fret before fitting. The kit comes with some copper wire to make the grab handles, there are also some flat etched brass handles on the fret is you want a different style. Using a sizing/bending guide wire handles were a cinch to make and are super glued in place.
View attachment 282647
View attachment 282648
View attachment 282646
I assembled the intake FOD blanks too, these only took a few minutes to do and will be painted on the fret before fitting. The kit comes with some copper wire to make the grab handles, there are also some flat etched brass handles on the fret is you want a different style. Using a sizing/bending guide wire handles were a cinch to make and are super glued in place.
View attachment 282647
View attachment 282648
Attachments
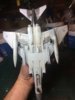
I'm getting close to the end of this now with some small aerials, seats and canopies to go and of course the weapons load and intake blanks remaining.
View attachment 282884 View attachment 282885 View attachment 282886 View attachment 282887
View attachment 282884 View attachment 282885 View attachment 282886 View attachment 282887
Attachments
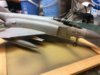
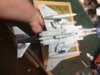
I'm getting there, in between knocking off elevons and trying to get jet pipes to stay in position as glue dries. Off scene are the missiles to fit to this beast, they are drying too. Despite the advice of Dave W and some other Phantom aficionados I will fit the centreline gun to this one, I found lots of photos that show these fitted to FI Pahntoms, it is ready to fit after the sidewinders are added.
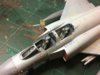
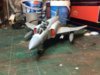
One or two touch ups are needed, the cockpit surround and canopy edging need a lick of black paint and I noticed tonight that the top edge of the LH intake panel is missing some paint!
I have found lots of photos on the web that show the underside of these being really filthy and a part of me says add more grime but I don't want to push my luck as there are so many bits to knock off now....mmmmm.
View attachment 283555 View attachment 283556 View attachment 283557 View attachment 283558
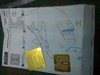
This kite will need a parking stand when it is finished so I am knocking one up from a cheap photo frame from Wilko's and concrete rendering sheet from Will's plastic sheeting. When glued to the photo frame backing I scratched some cracks using a blunt box knife blade, it has been painted in VMA 045 Concrete Grey. Later it will have some of the panels masked and painted in lighter and darker shades to break up the base colour followed by a wash and a yellow taxi line.
I know there are cheaper ways to make a base or ready to use downloadable paper/card but I prefer to have something more unique, appropriate to the subject but also the 3D effect compared to printed sheet.
View attachment 283559
One or two touch ups are needed, the cockpit surround and canopy edging need a lick of black paint and I noticed tonight that the top edge of the LH intake panel is missing some paint!
I have found lots of photos on the web that show the underside of these being really filthy and a part of me says add more grime but I don't want to push my luck as there are so many bits to knock off now....mmmmm.
View attachment 283555 View attachment 283556 View attachment 283557 View attachment 283558
This kite will need a parking stand when it is finished so I am knocking one up from a cheap photo frame from Wilko's and concrete rendering sheet from Will's plastic sheeting. When glued to the photo frame backing I scratched some cracks using a blunt box knife blade, it has been painted in VMA 045 Concrete Grey. Later it will have some of the panels masked and painted in lighter and darker shades to break up the base colour followed by a wash and a yellow taxi line.
I know there are cheaper ways to make a base or ready to use downloadable paper/card but I prefer to have something more unique, appropriate to the subject but also the 3D effect compared to printed sheet.
View attachment 283559
Attachments
I knocked my elevons off a few times too. I think your weathering looks good Rick. If it were me I'd leave it as is for the sake of your sanity. Your apron is looking good.I have found lots of photos on the web that show the underside of these being really filthy and a part of me says add more grime but I don't want to push my luck as there are so many bits to knock off now....mmmmm.
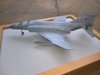
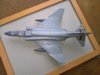
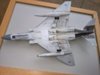
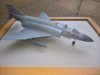
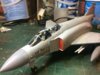
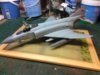
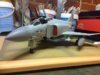
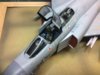
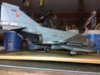
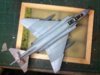
This is done....except for the missiles, but it's my GB and this jet waiting for the Armourers to finish their tea break first. Apologies for the pictures but I just wanted to show the completed aircraft (weapons to follow), I am working on a baseboard for this which I will use for the completed thread photos.
View attachment 283697 View attachment 283698 View attachment 283699 View attachment 283700 View attachment 283701 View attachment 283702 View attachment 283703 View attachment 283704
View attachment 283697 View attachment 283698 View attachment 283699 View attachment 283700 View attachment 283701 View attachment 283702 View attachment 283703 View attachment 283704
Attachments
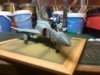
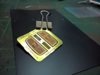
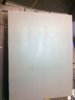
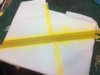
After masking and picking out some panels in varying shades I masked again for the yellow/black taxi line, this is the yellow applied and after a second coat I will add a thin line of masking tape along the centreline then finish with black.
View attachment 283706
View attachment 283706
Attachments
G
Guest
Guest
Really nice build, Rick.
Looks a smooth work")
Looks a smooth work
- Status
- Not open for further replies.
Legal Notice
scalemodelling.co.uk is a privately operated online discussion forum. All content posted by members reflects their own views and opinions and does not necessarily represent those of the forum owners or administrators. While reasonable efforts are made to moderate content, no responsibility is accepted for user-generated material. By using this site, you agree to comply with UK law and the forum rules.