Theme editor

Scale Model Shop

Rick's Westland Sea King HAR3 (x2) 1/144 by Sweet Decal

Status
Not open for further replies.

rickoshea52

Well-known member
Joined
Dec 20, 2011
Messages
4,103
Reaction score
70
Points
48
1/3
Thread owner
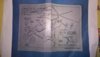
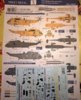
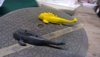
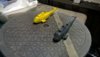
Here's a little pair of Sea Kings that I got while in Japan this summer. I used to work on D Flight 202 Sqn at RAF Lossiemouth and by coincidence the paint schemes offered by this kit include two of the cabs (IIRC) that were on the flight during my time there. As well as the classic yellow SAR cab we also had one painted in the grey Falklands Islands scheme, the latter had RWR heads on the nose and under the tail pylon.


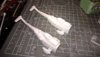
The kit describes these as HAR3 A's but the cabs were in fact HAR3's - the only obvious external difference is the HF aerial mast layout so these could be modelled as either Mark. It's a simple kit but there were no instructions so I had to find some on the Internet. Another deficiency of the kit is the lack of EAPS/SNIPS intake filter, there are two cockpit options one of which has the older FOD deflector - this version won't be modelled so a scratch built filter will be required.


I plan to display them on a base modelled on the SAR dispersal at Lossiemouth.


View attachment 123466


View attachment 123461

View attachment 123462


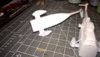
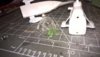
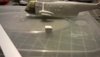
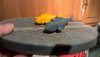
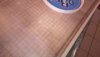
The two halves of the fuselage go together nicely and the sponsons fit into a slot with the stay a separate item.


View attachment 123463

View attachment 123464


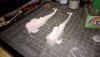
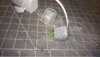
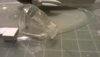
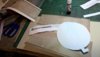
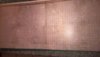
The underside had some detail sanded off that wasn't appropriate for this Mark.


View attachment 123465


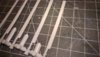
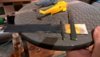
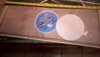
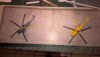
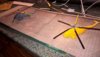
The main rotor blades offered have grooves along the entire length, the upper sides were sanded smooth, I left the underside as they won't be seen.

View attachment 236352

View attachment 236353

View attachment 236354

View attachment 236355

View attachment 236356

View attachment 236357
 

Attachments

  • image.jpg
    image.jpg
    1.9 KB · Views: 0
  • image.jpg
    image.jpg
    2.2 KB · Views: 0
  • image.jpg
    image.jpg
    2.4 KB · Views: 0
  • image.jpg
    image.jpg
    2.4 KB · Views: 0
  • image.jpg
    image.jpg
    2.4 KB · Views: 0
  • image.jpg
    image.jpg
    3.6 KB · Views: 0
Thread owner
The cockpit glazing has had a coat of translucent green over the eyebrow panels and light grey on the others, there is no cockpit detail. One of the glazing pieces had had a hole drilled for the RWR head with a scrap of plastic through it for illustration


View attachment 123467

View attachment 123469


The horizontal stabiliser needed trimmed as per the decal sheet instructions!


View attachment 123470

View attachment 123471


View attachment 236358

View attachment 236360

View attachment 236361

View attachment 236362
 

Attachments

  • image.jpg
    image.jpg
    2.3 KB · Views: 0
  • image.jpg
    image.jpg
    2 KB · Views: 0
  • image.jpg
    image.jpg
    2.2 KB · Views: 0
  • image.jpg
    image.jpg
    2.3 KB · Views: 0
Thread owner
This kit only gives you the option of having the FOD deflector intake guard or no guard at all so I have cut and filed a block of 3.2mm plastic rod to represent the EAPS/SNIPS intake filter box that are/were fitted to all Sea Kings sometime in the early 90's (I think). These will need painting before fitting because of the vortex screens, could be tricky.


And the canopies have been masked and glued to the fuselage too.


View attachment 238958

View attachment 238959

View attachment 238960
 

Attachments

  • image.jpeg
    image.jpeg
    1.8 KB · Views: 0
  • image.jpeg
    image.jpeg
    1.7 KB · Views: 0
  • image.jpeg
    image.jpeg
    1.6 KB · Views: 0
I'm going to have to watch this Rick........... at 1/144 scale, I'd have thrown it at the wall well before I got to that stage.:rolleyes:
 
Thread owner
\ said:
I'm going to have to watch this Rick........... at 1/144 scale, I'd have thrown it at the wall well before I got to that stage.:rolleyes:
Well the intake filter was straight forward, the RWR fairing for the nose and under the tail boom for the grey cab will be a challenge.
 
Nice work rick , the sweet kits are great arent they. Another little chopper (!) thats a great kit is the revell 1/144 puma in any of its boxings , were there any of those there while you were ?
 
Thread owner
\ said:
Nice work rick , the sweet kits are great arent they. Another little chopper (!) thats a great kit is the revell 1/144 puma in any of its boxings , were there any of those there while you were ?
I don't recall seeing any Revell aircraft kits in any of the model shops I visited in Japan Tony but I remember your Tigermeet build from a year or two ago. This is a nice little kit but a bit rudimentary, the fuselage windows are decals and the bubble windows will need some imagination to replicate. I'm just happy that the kit features a pair of cabs and the paint schemes that were applied to the pair on D flight when was posted there. Making a dispersal base for them is planned.
 
Thread owner
Both cabs were primed tonight but I haven't taken pictures, my next post should feature a DSG and a bright yellow cab.
 
Thread owner
Something was bugging me with the grey cab after I painted it DSG, it is too dark. The real cab was quite faded so a lightened shade was applied and it looks better, the same cant be said for the yellow cab. The clear part that is the cockpit isn't taking the yellow paint too well.


The rotor blades have been painted on the under side and two have been painted yellow on the upper surface (not pictured).


View attachment 239446

View attachment 239447

View attachment 239448
 

Attachments

  • WP_20151128_21_23_56_Pro.jpg
    WP_20151128_21_23_56_Pro.jpg
    2.1 KB · Views: 0
  • WP_20151128_21_24_33_Pro.jpg
    WP_20151128_21_24_33_Pro.jpg
    2.4 KB · Views: 0
  • WP_20151128_21_24_05_Pro.jpg
    WP_20151128_21_24_05_Pro.jpg
    2 KB · Views: 0
Thread owner
One of these cabs has been gloss varnished and ready for decals, the yellow one is causing me trouble though with coverage. Anyway, I put the main rotors together and ran the blades through my thumbs to create the droop effect and noticed that I have painted the black/grey blades upside down...did I mention I worked on these for three years? Ooops!


I also made a start on a little base for them using Scalescenes sheets cut and glued to a piece of mounting card. The yellow circle on the dispersal was created using a Woodland Scenics paint pen and the lid of a large yoghurt pot as a template which just happens to be a little bigger than the rotor disc. Before I did all this I created a sillouette of the helicopters to help me with the spacing and size calculations of the dispersal. Next I will add some grass around three of the edges and weight it down to straighten it out.


View attachment 242467

View attachment 242468

View attachment 242471

View attachment 242473

View attachment 242475

View attachment 242476
 

Attachments

  • image.jpeg
    image.jpeg
    2.1 KB · Views: 0
  • image.jpeg
    image.jpeg
    1.7 KB · Views: 0
  • image.jpeg
    image.jpeg
    2 KB · Views: 0
  • image.jpeg
    image.jpeg
    1.4 KB · Views: 0
  • image.jpeg
    image.jpeg
    2 KB · Views: 0
  • image.jpeg
    image.jpeg
    2.3 KB · Views: 0
Looking very good Rick....... I have a question ? I really have no idea, and there is probably a simple answer. Why is one rotor blade yellow ?????
 
Thread owner
\ said:
Looking very good Rick....... I have a question ? I really have no idea, and there is probably a simple answer. Why is one rotor blade yellow ?????
For visibility when the rotors are turning. If viewed from above the rotor disc, the single yellow blade can clearly be seen with the naked eye, I've seen it on a Wessex HC2.
 
Coming along well.


Nice idea for the base.


I used the same company's sheets on my railway layout
 
\ said:
For visibility when the rotors are turning. If viewed from above the rotor disc, the single yellow blade can clearly be seen with the naked eye, I've seen it on a Wessex HC2.
Thank Rick.... I did figure it'd be easy.
 
Status
Not open for further replies.
Back
Top