Theme editor

Scale Model Shop

SE5a CONSTRUCTION BEGINNING TO . . .

Status
Not open for further replies.
Thread owner
Barry to the rescue


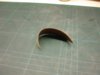
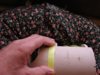
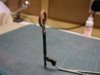
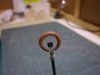
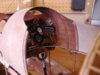
Before I tried the ammonia on the real decking I experimented with the piece I’d cut out for the cockpit opening, not that I didn’t trust you Barry!!


View attachment 262609


As I needed to tighten the curve that’s what I tried, as you can see it did indeed hold its new shape and this was a rush job, not left over night.


What is not evident from the photo is just how pliable the wood became using ammonia instead of water and I only brushed it on, I didn’t leave it soaking as I would have done with water.


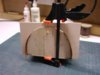
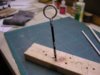
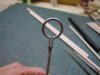
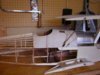
Having satisfied myself that this was the way to go I tried it on the decking but this time I will leave it over night to thoroughly dry.


View attachment 262610


I really like this “reverse” jig idea, I’m sure this method will get a lot of use in the future.
 

Attachments

  • decking 7.jpg
    decking 7.jpg
    1.7 KB · Views: 0
  • decking 8.jpg
    decking 8.jpg
    2.5 KB · Views: 0
Well there you go Grahame ! it certainly makes a big difference and allows the ply to go supple,the ammonia does not degrade the ply just in case you were thinking it could have detrimental effects,the adhesive bond re-cures in a few hours.

Clever trick.
 
Thread owner
Now that the decking is the correct shape it’s time to try and fit it. In order to work around the cabane struts and bracing wires the holes have had to be made quite large, these will be filled after the decking is permanently fitted, but it’s still a bit awkward.


View attachment 262611


On full size they remove the cabane struts and bracing wires, fit and cover the decking then re-fit them, unfortunately at this size we don’t have the luxury of being able to climb inside to tighten up the nuts!


The instrument panel is a good fit and looks quite “busy” when it’s buried in the fuselage; this is when the shadows and highlights really bring it alive.


View attachment 262612


It’ll look a bit busier with the clock,altimeter and throttle, which are fitted on the cockpit coaming, and the switch box fitted to the side decking, not forgetting the control column.
 

Attachments

  • decking 10.jpg
    decking 10.jpg
    2.9 KB · Views: 0
  • decking 9.jpg
    decking 9.jpg
    2.6 KB · Views: 0
will you be doing the rudder pedals as well?

looks busy enough at the moment!!! lovely work as usual mate.
 
Thread owner
I’ll wait and see how much is visible before I decide whether or not to include rudder pedals etc.; weight always has to be a consideration. It’s a bit of a “chicken & egg” situation as the decking has to be in position to check what’s visible but the detailing has to be added before the decking, although the pedals may be able to be fitted from below.
 
Graheme, superb as always. The cockpit is a thing of beauty and all the more satisfying for having made it from appropriate materials and from your own ideas.

Barry, it sounds like the ammonia is softening the glue within the ply laminations, allowing it to become supple but it returns to its rigid state when the ammonia completely evaporates. Neat idea and very usefull in many aircraft and boat applications.
 
Thread owner
Cutting the inspection hatch and the opening for the Vickers involves marking and cutting straight lines on a curved surface. A good help for this is to use the plastic “banding” that is used to hold cardboard cartons together, these hold their straight edge but easily follow the curve.


View attachment 262613


Another useful item, to hold things steady at an angle, is a “bean bag”; the better half made me a couple, hence the tasteful floral pattern!


View attachment 262614
 

Attachments

  • decking 12.jpg
    decking 12.jpg
    3.1 KB · Views: 0
  • decking 11.jpg
    decking 11.jpg
    2.7 KB · Views: 0
I really like the attention to detail in this build. It really makes you appreciate the actual construction of the aircraft, you get a feeling of knowing the aircraft as if you could hop in and already be familiar with the controls.

Really nicely observed and executed work.
 
Grahame I have been following your build for a while and now i just have to post and tell you that Its bloody superb I just love the cockpit and the way the whole thing is taking shape ! Its like building a full size one from scratch !!Keep it up mate its enthralling!!! Thanks
 
Thread owner
The control column, or joystick if you prefer, is always a prominent part of any cockpit; luckily it’s one part of the SE5a that’s really basic.


The top is a curtain ring, the column itself aluminium tube and the rest various pieces of plastic tube.


View attachment 262615


With 3 more lengths of snake outer and a lick of paint it’s almost finished.


View attachment 262616


When the paints dry I’ll bind the top ring with button thread then add the 2 triggers, made from litho plate and that’ll be it; simple!
 

Attachments

  • control column 2.jpg
    control column 2.jpg
    2.8 KB · Views: 0
  • control column 1.jpg
    control column 1.jpg
    2.6 KB · Views: 0
Thread owner
For some unknown reason the aileron cables are connected to the control column under the pilots seat, this seems strange as in the wing they run very close to the front spar, but as they will not be seen it makes the pivot a lot easier to make.


View attachment 262629


In the first photo you can see the different components used to make it; white plastic tube, black Plasticard for the flange and collar, toothpick for the grease nipple and a couple of slivers of hex. rod for the nuts. After painting it looks very “ex-works”, but a bit of dry brushing with silver Solalac will soon change that.


I’d originally made the triggers from litho plate but decided they were just too fragile and would soon fatigue with the engine vibration, so these are made from and old “bean tin”.


View attachment 262630


In the background is my “working sketch” for the top of the control column. We’ll have to wait and see how similar the finished item is to the design.
 

Attachments

  • control column 4.jpg
    control column 4.jpg
    2.3 KB · Views: 0
  • control column 3.jpg
    control column 3.jpg
    2.1 KB · Views: 0
Thread owner
As Barry said the binding has really improved the look of the control column; first chord all over (button thread), then leather for the top half (Solatex).


View attachment 262646


After the addition of the triggers with their cables the control column and the pivot can be assembled; with a little weathering, which isn’t obvious from the photo, it looks ready for the cockpit.


View attachment 262647
 

Attachments

  • control column 6.jpg
    control column 6.jpg
    2.2 KB · Views: 0
  • control column 7.jpg
    control column 7.jpg
    2 KB · Views: 0
looks great!! that binding look so realistic it hard to think it was made from thread. superb job!
 
Thread owner
The decision that the instrument panel is finished has to be taken at some point and that time has come, so it’s glued in position and the decking added; it’s too late now so I’ll not look at any more photos of instrument panels.


There’s a large cut out for the Vickers.


View attachment 262648


The view through the inspection panel will determine how much more cockpit detail is needed.


View attachment 262649


It’s only small but it certainly gives a good view of the Vickers so that’ll need to be quite detailed.


Some of the instruments etc. are actually attached to the decking which makes life a bit awkward to say the least. The left hand side is fairly uncluttered; before I fitted the right hand rear section of decking I glued the radiator flap control lever to the left hand decking.


View attachment 262650


The right hand side is a lot more complicated; so far I’ve fitted the magneto switches, the main electrical switch box and an aluminium bracket (no idea what it’s for), still to go before I can finish the decking are the hand cranked magneto and the flare box.


View attachment 262651
 

Attachments

  • cockpit 7.jpg
    cockpit 7.jpg
    2.6 KB · Views: 0
  • decking 13.jpg
    decking 13.jpg
    2.8 KB · Views: 0
  • decking 14.jpg
    decking 14.jpg
    2.8 KB · Views: 0
  • cockpit 8.jpg
    cockpit 8.jpg
    2.8 KB · Views: 0
Beautiful Grahame it looks really businesslike,how do you manage to keep your workshop so clean and tidy ? there is not a speck of balsa dust anywhere !
 
One question has sprung to mind whilst watching this incredible build thread.

With so much detail, love, and time spent on this project; Won't it be a bit gut wrenching when you have to dope it up and cover the majority of that exquisite detail?
 
Status
Not open for further replies.
Back
Top