Theme editor

Scale Model Shop

Si B's-Meng Jagdpanther Ausf. G1

Status
Not open for further replies.
Thread owner
Hi Si
Poor you. Fancy having to work at that bench. Warm sunshine, a beautiful view, a cold one at the ready - life can be a toil!! :tongue-out3:

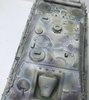
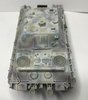
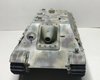
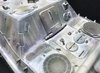
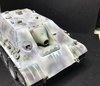
That looks a great kit in all respects. Meng do have a good reputation. Really neat construction so bring on the paint.
Jim

Well it’s a tough job Jim, but someone has to do it:smiling5:
It was in the high twenties/ thirty’s most days and the pool was anywhere between 24-28! I did spend half a day strimming the lower field for Dad so it wasn’t all fun. Dad did cook me a proper paella for my efforts though, with longestines as big as your had.....my food heaven:smiling4:
 
Thread owner
Thanks very much for looking in so far. So as you’ve figured out, the build was done and dusted a while ago. The painting is happening as we speak.
Here’s how she looked with a camo scheme
View attachment 326837

I used the recently released AK real colour paints and thinned with Mr levelling thinner hoping to avoid a rough finish but was still grainy! I’m starting to think it’s my technique rather then the paints?

Anyways a few coats of varnish helped to smooth it out a bit. Then I used Ak worn effects and a coat of Tamiya mixed with X20A and brushed like crazy.


Now I’m aiming toward a vehicle thats been white washed but most of it’s come away....and it’s going to be dirty too.
I found using Tamiya mixed with water gave a better worn result, but didn’t try until I got to the wheels!

View attachment 326838View attachment 326840
View attachment 326839View attachment 326841
View attachment 326842

I’m still new to this winter white wash but think it’s going ok. I’m gradually building up the effect with some thinned enamel now. It’s a bit trial and error so let’s see how it goes!

All comments welcome
Cheers
 

Attachments

  • 38736818-99BB-4FE8-A234-90C7703E9975.jpeg
    38736818-99BB-4FE8-A234-90C7703E9975.jpeg
    2.6 KB · Views: 0
  • 505B0EE1-1273-4640-A493-F46DD13AB951.jpeg
    505B0EE1-1273-4640-A493-F46DD13AB951.jpeg
    3.6 KB · Views: 0
  • ACA13926-B807-41FC-8092-54891439F3F8.jpeg
    ACA13926-B807-41FC-8092-54891439F3F8.jpeg
    3.3 KB · Views: 0
  • 20C73F3F-43ED-47C7-B35A-FB26F19BEBCD.jpeg
    20C73F3F-43ED-47C7-B35A-FB26F19BEBCD.jpeg
    2.3 KB · Views: 0
  • 8182AF55-5123-4730-B973-12AFB166AED1.jpeg
    8182AF55-5123-4730-B973-12AFB166AED1.jpeg
    2.8 KB · Views: 0
  • 90C291F1-3DF9-4C8E-B14D-134A40037089.jpeg
    90C291F1-3DF9-4C8E-B14D-134A40037089.jpeg
    2.2 KB · Views: 0
Really nice effect so far, I've tried a couple washed out winter camo schemes. Ended up over spraying then brushing back in to get the desired effect.
Cheers Rick H.
 
Thread owner
Al, Rick...
Thanks very much guys :thumb2:
It’s a long way off still but I think I’m off to a reasonable start, I’ll try not to balls it up:smiling5:

This is the kind of look I’m after..
View attachment 326859
Picture for discussion purposes only
 

Attachments

  • A1453D2D-22BD-4C13-B782-1C1011DC9CAD.jpeg
    A1453D2D-22BD-4C13-B782-1C1011DC9CAD.jpeg
    2.3 KB · Views: 0
Now I’m aiming toward a vehicle thats been white washed but most of it’s come away....
I think it needs more white, including (more or less) solid areas of it. As it looks now, IMHO the appearance is of faded paint rather than worn-away whitewash over camouflage.
 
Hi Si
Looks good. I take Jakko's point about strengthening some areas of white. Michael Rinaldi strengthens areas with white oil paint straight from the tube. A tiny dot placed onto the area and then brushed out. He makes it look easy and very effective.
Jim
 
Thread owner
I think it needs more white, including (more or less) solid areas of it. As it looks now, IMHO the appearance is of faded paint rather than worn-away whitewash over camouflage.

Jakko,
Thanks for your input mate:thumb2:.....Not wanting to make you look daft, but if you read what I’ve written at the bottom of post#22 you’ll see that it says “I’m gradually building up the effect with some thinned enamel now” (building up the white areas effectively). Exactly what you’ve suggested I should do :smiling5:
Hopefully you’ll see what I mean as I post up some more pictures.
Do you have spec savers where you are mate? :nerd: lol

Hi Jim,
Cheers mate:thumb2: I have one of Michael Rinaldi’s books and I’m pinching borrowing some of his ideas. He uses words like mapping and oil paint rendering, i call it painting :smiling5:
Like I said, I’m using enamel paint for this rather then oils, but the concept is the same.
 
Thread owner

Attachments

  • D9CF5298-D085-4BEA-AFB4-C662FFA36B78.jpeg
    D9CF5298-D085-4BEA-AFB4-C662FFA36B78.jpeg
    3.1 KB · Views: 0
  • 728F650A-51BE-4C00-828E-9B3045A30FCE.jpeg
    728F650A-51BE-4C00-828E-9B3045A30FCE.jpeg
    3.7 KB · Views: 0
  • 8345DBBD-83CF-48CF-B41A-C58BA5213700.jpeg
    8345DBBD-83CF-48CF-B41A-C58BA5213700.jpeg
    3.2 KB · Views: 0
  • 835C6B0E-9BD1-491D-A54A-DB2A6D289BE7.jpeg
    835C6B0E-9BD1-491D-A54A-DB2A6D289BE7.jpeg
    3.7 KB · Views: 0
Hi Si
That really is looking good. Just the kind of weathered whitewash Mr Ranaldi gets. I suppose the slower drying of oils and enamels is an advantage for this sort of work. Unless you are a Peter Day magician acrylics can't be blended or feathered out - well I've tried and failed completely :sad:.
Jim
 
Stunning work Si. Once the white wash has finished you will have a perfect base to do all the weathering from. This is turning into a wonderful work of art. Well done mate:thumb2::thumb2:
 
Thread owner
Hi Si
That really is looking good. Just the kind of weathered whitewash Mr Ranaldi gets. I suppose the slower drying of oils and enamels is an advantage for this sort of work. Unless you are a Peter Day magician acrylics can't be blended or feathered out - well I've tried and failed completely :sad:.
Jim

Well as we all know Jim, Peter learnt his dark art at Hogwarts:smiling5: I got some success using a wet pallet after watching this guy...

I watch this and came away mind blown and still unable to do it:sad:!!

Stunning work Si. Once the white wash has finished you will have a perfect base to do all the weathering from. This is turning into a wonderful work of art. Well done mate:thumb2::thumb2:

Thanks Steve:smiling4:
I was in two minds about when to weather, before or after doing the whites, but decided on after.
I think before I get too far I’m going to stencil the markings on so I can weather them in. I got these stencils many years ago and completely forgot them....
View attachment 326898

Cheers
 

Attachments

  • image.jpg
    image.jpg
    4.3 KB · Views: 0
I would certainly do the white wash before weathering. However I am trying to push the boundaries of the standard weathering process's by doing more layering work. I am now looking at doing various levels of weathering in between the regular process of weathering. All in my head at the moment but hopefully I will be able to try out the theory soon. I forgot to ask if you are doing side guard panels??
 
A fine bit of so far that man. I know I'd never be able to do a winter camo scheme.
 
Not wanting to make you look daft, but if you read what I’ve written at the bottom of post#22 you’ll see that it says “I’m gradually building up the effect with some thinned enamel now” (building up the white areas effectively). Exactly what you’ve suggested I should do :smiling5:
Yes, I knew that when I posted — you also said “All comments welcome” so I thought I’d offer my thoughts that you’re on the right track but not there yet. :)
 
Great paintjob and even better whitewash Si:thumb2:, love how the pics show the build-up of white gradually stepping up.:smiling4:
 
Si,
Cannot remember if I have ever built one of these, so got the deck chair unfolded and here I am.
Mmmmmmmmmmmmm! That is a super fine job on the paint and whitewash, looking forward to more and my credit card from the pain and prospect of adding one of these to the stash.
Very inspiring.
Mike.
 
Status
Not open for further replies.
Back
Top