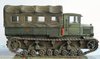
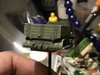
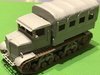
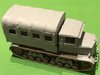
I got the urge to build something and this was to hand
View attachment 323510
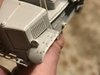
Note that the model on the box top is not the same as contained in the box - kit does not have opening doors or window glass so I suspect they have just used a pic of their 1.35 version!
Due to some clever moulding, and simplification, the kit only contains 27 parts so basic clean up doesn't take too long
It is worth spending a bit of time tweaking things though to get it looking a bit better
View attachment 323512
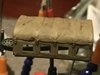
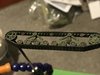
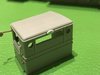
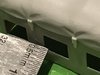
the canvas tilt moulding has rather wishy washy details so it pays to re-scribe the scalloped edges of the top section by scraping with a blade
View attachment 323521
the buckles were not very well done either and the end ones are almost non existent so they were replaced
I also added in some creases to the canvas
View attachment 323513
due to moulding requirements the tilt is also quite thick, at least 1mm, so I pared it down around all the windows to a lot less than half a mm
View attachment 323516
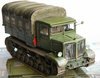
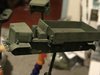
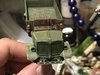
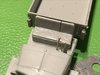
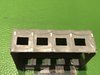
the one piece chassis has the exhaust moulded integrally which means it looks a bit poor so I sliced the end section off and replaced it with lead wire with the end drilled out
View attachment 323517
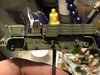
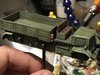
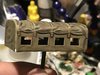
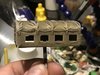
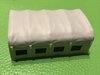
as with all the latest Trumpeter releases the track units are moulded as one piece units to which half wheels / bogies are added
careful work with the glue means that they can be left loose to aid painting
View attachment 323515
View attachment 323519
View attachment 323522
View attachment 323511
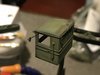
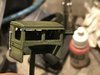
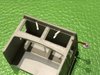
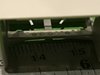
the main cab is also moulded as one unit and needs a little work as a result
I found the instruction sheet online for the 1/35 version which helped show some of the missing details such as the dashboard and the oval plate on the cab rear
no idea what the oval plate is but there is a hole in the kit part ready to mount it but then they don't supply the part!
the 35th one has some raised circles on it but once the cab is installed you can not see them so I didn't bother adding them
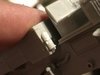
the side grab handles are moulded solid so I carefully sliced them off preserving the cab ribs in the process and replaced them with brass wire
the rear view mirror arm snapped when I was cleaning up the mould line so it got replaced with a length of Slaters rod
I also added a pair of windscreen wipers from microstrip
the portholes in the cab rear are moulded solid but the 35th instructions show them glazed so they were drilled out
the cab can be left loose which should aid painting
View attachment 323520
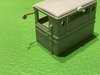
the cab interior was very simplified so I cut in some seat cushions and distressed them to try indicate some use
the steering tillers are moulded as one lump so they were carefully sawn down the middle to separate them into two
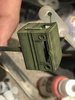
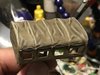
the fire extinguishers moulded on the front face of the truck bed were going to be left but looking at them again they are not great so they will get replaced
View attachment 323514
View attachment 323518
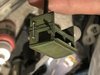
the short track guards were thinned down and hollowed out to create the outer return edge and the solid headlights were drilled out
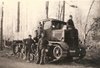
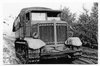
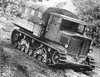
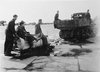
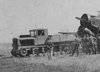
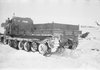
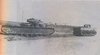
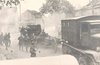
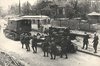
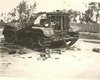
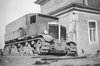
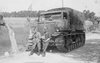
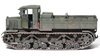
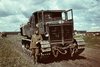
there are probably a whole host of other small details missing from the kit but reference photos seem thin on the ground and the ones I found are all rather fuzzy wartime black and whites
Once the fire extinguishers are replaced I think it will be ready for paint
View attachment 323510
Note that the model on the box top is not the same as contained in the box - kit does not have opening doors or window glass so I suspect they have just used a pic of their 1.35 version!
Due to some clever moulding, and simplification, the kit only contains 27 parts so basic clean up doesn't take too long
It is worth spending a bit of time tweaking things though to get it looking a bit better
View attachment 323512
the canvas tilt moulding has rather wishy washy details so it pays to re-scribe the scalloped edges of the top section by scraping with a blade
View attachment 323521
the buckles were not very well done either and the end ones are almost non existent so they were replaced
I also added in some creases to the canvas
View attachment 323513
due to moulding requirements the tilt is also quite thick, at least 1mm, so I pared it down around all the windows to a lot less than half a mm
View attachment 323516
the one piece chassis has the exhaust moulded integrally which means it looks a bit poor so I sliced the end section off and replaced it with lead wire with the end drilled out
View attachment 323517
as with all the latest Trumpeter releases the track units are moulded as one piece units to which half wheels / bogies are added
careful work with the glue means that they can be left loose to aid painting
View attachment 323515
View attachment 323519
View attachment 323522
View attachment 323511
the main cab is also moulded as one unit and needs a little work as a result
I found the instruction sheet online for the 1/35 version which helped show some of the missing details such as the dashboard and the oval plate on the cab rear
no idea what the oval plate is but there is a hole in the kit part ready to mount it but then they don't supply the part!
the 35th one has some raised circles on it but once the cab is installed you can not see them so I didn't bother adding them
the side grab handles are moulded solid so I carefully sliced them off preserving the cab ribs in the process and replaced them with brass wire
the rear view mirror arm snapped when I was cleaning up the mould line so it got replaced with a length of Slaters rod
I also added a pair of windscreen wipers from microstrip
the portholes in the cab rear are moulded solid but the 35th instructions show them glazed so they were drilled out
the cab can be left loose which should aid painting
View attachment 323520
the cab interior was very simplified so I cut in some seat cushions and distressed them to try indicate some use
the steering tillers are moulded as one lump so they were carefully sawn down the middle to separate them into two
the fire extinguishers moulded on the front face of the truck bed were going to be left but looking at them again they are not great so they will get replaced
View attachment 323514
View attachment 323518
the short track guards were thinned down and hollowed out to create the outer return edge and the solid headlights were drilled out
there are probably a whole host of other small details missing from the kit but reference photos seem thin on the ground and the ones I found are all rather fuzzy wartime black and whites
Once the fire extinguishers are replaced I think it will be ready for paint
Attachments
-
 voro-013_2018-12-23.jpg3.8 KB · Views: 0
 -
 voro-012_2018-12-23.jpg2.7 KB · Views: 0
 -
 voro-011_2018-12-23.jpg3.3 KB · Views: 0
 -
 voro-010_2018-12-23.jpg2.9 KB · Views: 0
 -
 voro-009_2018-12-23.jpg3.6 KB · Views: 0
 -
 voro-008_2018-12-23.jpg3.9 KB · Views: 0
 -
 voro-007_2018-12-23.jpg3.1 KB · Views: 0
 -
 voro-006_2018-12-23.jpg2.9 KB · Views: 0
 -
 voro-005_2018-12-23.jpg3.2 KB · Views: 0
 -
 voro-004_2018-12-23.jpg3.1 KB · Views: 0
 -
 voro-003_2018-12-23.jpg3.1 KB · Views: 0
 -
 voro-002_2018-12-23.jpg2.5 KB · Views: 0
 -
 voro-001_2018-12-23.jpg3.3 KB · Views: 0