Theme editor

Scale Model Shop

Something big and German-Bf110

Status
Not open for further replies.
Thread owner
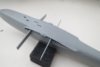
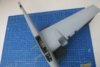
I'm genuinely confused now! I've more or less finished the fuselage and am wondering if we are all talking about the same kit. Here's the underside:


View attachment 241185


I've done nothing but clean up and assemble the parts, no filling or even sanding. The fit so far has been as good as anything I've ever built, including the Tamiya 'uber kits'.


The only thing wrong so far is the appalling instructions, they really are terrible, but those I can work around. I never build a kit rigorously to the instructions anyway, but it would help if they actually showed where and how all the parts fitted :)


Cheers


Steve
 

Attachments

  • IMG_1465_zpsfgvu53sr.jpg
    IMG_1465_zpsfgvu53sr.jpg
    1.7 KB · Views: 0
That could just be the problem with the others then Steve trying to follow the instructions to the letter.


This is looking very good so far looking forward to the next instalment
 
I have just finished my dragon me262 (to be posted soon), the instructions were also terrible considering there was over 200 pieces. I read reviews on that build and people had real problems, don't get me wrong there was some major fit issues and some extra work needed doing but it's craft isn't it, I found myself referring to the instructions for colour guidance and quick reference only in the end. I reckon it'd bore me if it went together too easy!


To caveat that I'm looking to do a nice easy hasegawa build next
 
Thread owner
The Dragon Me 262 is the old Trimaster kit, first released 26 years ago, in 1989. Revell and Italeri have also released versions of this kit. It does have some serious fit issues.


The Cyberhobby kit I'm building is much more recent, I think 2008 was the original release of the first version, and as far as I can tell it's a superb molding and fit.


Cheers


Steve
 
\ said:
Thanks for the heads up John. The nose seems to fit okay, it's the standard 'E' nose (like a C/D but with the little air intake for the cockpit ventilation/heating system). I haven't fitted the machine guns, I will just fit the barrels at the end with other dangly bits.
If by chin you mean the big bit that covers the spars for the wings and cannon bay, I haven't tried that yet, might be something to look forward to!


Taped in place:


View attachment 140670


One of them said the cannon barrels, which run under the floor of the cockpit got in the way of other parts and had to be cut off (they won't be visible anyway) but I can't see how you could fit them in such a way that they'd do that, unless you fitted the entire weapon pack incorrectly. Maybe he had a different, test, version of the kit.


You can see the barrels here:


View attachment 140671


Cheers


Steve
Hmm. I did the D-3. Maybe they retooled that part when they realized how bad their engineering was. Anyway, good to see no awful gaps.


John
 
concerning the cannon bays, I encountered that problem, but found out why. You have to not attach the cannon mags and slide the cannons in first, then attach the magazines. This is why dragon's instructions are awful
 
Thread owner
\ said:
concerning the cannon bays, I encountered that problem, but found out why. You have to not attach the cannon mags and slide the cannons in first, then attach the magazines. This is why dragon's instructions are awful
A very good point John. That is how I did mine, but only after giving up on the instructions and looking at a picture of the real weapon pack in a Bf 110 manual !


I made a start on the wheel bay/engine nacelle assemblies last night and had similar vague instructions to overcome. A couple of parts can only be fitted correctly if you drop the partly completed assemblies into their respective wings (temporarily). Do the instructions show this....do they f##k :)
 
Hi Steve I just caught up and this is looking very good ( you certainly know your stuff.


I built ( tried and repeat tried to build an eduard ( I think it was a c/d 110 a couple of years back) it was the one with the whale belly ( think it was a fuel tank. ) the kit came with 4 fuselage halfs so you could decide on length of fuselage. Any ways the kit I found was rather ill fitting ( the gun bay did not fit into the fuselage and the wings were wrong too. The weopans bay internally would not fit so couldn't close up. It was a weekend edition I'll admit but it ended up in the bin as I was rather frustrated in the end.


I've wanted to build a Me110G for a long time as I think that was the best it ever got too in the war, think it had the upward firing cannon?? ( seen the one in the Battle of Britain Hall and I think that's a G with the radar/ nightfighter


Anyways your making excellent progress and it looks very clean and tidy too


Staying tuned for more


Regards


Robert
 
Thread owner
Hi Robert, the 'Dackelbauch' contained a couple of fuel tanks and an auxiliary oil tank. Longer endurance meant more oil consumption on WW2 era piston engines. When the auxiliary fuel tanks were carried under wing an auxiliary oil tank was fitted under the fuselage. The designations became a bit confused, despite an effort by the Reich Air Ministry (RLM) to clarify them. The 'Dackelbauch' was fitted to the D-O and D-2 (a D-O with the Dackelbauch was identical to a D-2, the other version D-O/B, without dackelbauch, was the same as the D-3...confusing!)


The extended rear fuselage was a feature of the D series and some early E series aircraft. It contained a dinghy and other emergency kit.


The G series was the final version with the more powerful DB 605 engines. The night fighter version was the G-4. All were radar equipped and some had the 'shrage musik' upward firing cannon fitted. Sometimes this is given as rustsatze (auxiliary kit) 8 or R-8. The rustsatze number did not alter the basic type and would not be added to the aircraft data plate anyway. The one at Hendon is indeed a G-4 but doesn't have the 'schrage-musik' pack. It does have the under belly cannon pack, sometimes given as R-3.


Cheers


Steve
 
This is coming along beautifully Steve. You are finding the same as me, an outstanding viceless fit. All it needs is to pre-plan and dry fit making sure you are always looking a few steps ahead and as you say don't take the so called instructions too seriously.
 
Thread owner
I've made some progress. I've been building a few of the bits and pieces which will eventually go into and onto the model. I've also built the wings and am now attaching them:


View attachment 242380


Anyone who has built one of these kits will recognise that this has nothing to do with the instructions, which would have you build up the engine nacelles c/w the entire undercarriage and then drop this into the wing before joining the upper and lower wing halves and joining the whole lot to the fuselage.


View attachment 242381


This would have minimised the chance of getting the engine, nacelle etc to fit the wing properly and pretty much guaranteed breaking the undercarriage at a later stage, as well as making painting the model a lot more tricky! Definitely a case of 'I'll do it my way'. :)


Cheers


Steve
 

Attachments

  • IMG_1490_zpsnjtyzv64.jpg
    IMG_1490_zpsnjtyzv64.jpg
    2.2 KB · Views: 0
  • IMG_1488_zpsqsrclkah.jpg
    IMG_1488_zpsqsrclkah.jpg
    1.4 KB · Views: 0
Thread owner
I've got both wings on, just a very little tidy up to do. The fit is excellent.


Did I mention BIG...oh yes, in the title! This is on an A3 cutting mat.


View attachment 242402


Cheers


Steve
 

Attachments

  • IMG_1493_zpsr6aax6rq.jpg
    IMG_1493_zpsr6aax6rq.jpg
    2.3 KB · Views: 0
Thread owner
I've started building the nacelles my way.


I had to remove some tabs on a couple of parts (at the back of the exhausts inserted into the wing, F 36, 37, 40, 41) to get them in building this way, but no great strife. I have fitted a partially built and painted engine simply to have something to attach exhausts (which will be added much later) and airscrews to.


I also added a few tabs, one visible in this photo, just to help me line things up.


View attachment 242506


So far it's all going swimmingly :)


Cheers


Steve


EDIT: Since I've just finished one nacelle I'll add these comments. I've read that the nacelles don't fit well over the engines, well they do over partly built ones. I've also read that the propeller shaft is off centre, which will obviously cause the propeller/spinner assembly to also be off centre. Whoever found that fitted the engines in incorrectly!
 

Attachments

  • IMG_1494_zpsgzyvofmm.jpg
    IMG_1494_zpsgzyvofmm.jpg
    1.6 KB · Views: 0
It looks like a nice well detailed model Steve. It's a shame the manufacturer put a lot of effort into the model, but not the instructions.............
 
Status
Not open for further replies.
Back
Top