Theme editor

Scale Model Shop

Special Hobby 1/48 Martin Maryland.

Status
Not open for further replies.

Dave W

New member
Joined
Jan 8, 2011
Messages
4,713
Reaction score
0
Points
0
1/3
Thread owner
View attachment 84214

View attachment 84215

View attachment 84216

View attachment 84217

View attachment 84218

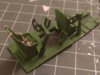
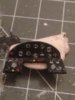
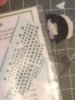
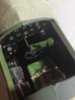
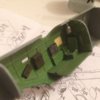
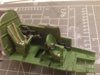
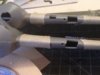
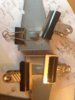
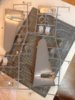
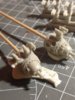
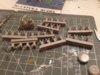
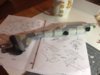
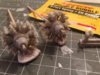
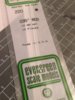
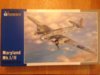
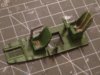
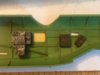
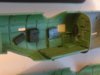
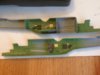
Thought I would build this next.Im going to paint it as one of the Aircraft flown by the Malta based reconnaissance pilot Adrian Warburton.Not sure which one yet,but probably the one on the box.Warburton was the only pilot ever to become an 'Ace' flying bomber type aircraft. Although a bomber,the Maryland was equipped with four guns mounted in the wings as well as a turret.After taking his photos of places like Taranto harbour and Sicily,Warburton would often have a go at enemy aircraft he ran into on the way back to Malta,shooting several down.Anyway,the kit is quit nice.Its a limited run type with no locating pins.But the parts seem very well moulded with fine engraved detail.Theres a PE fret and some resin parts.The engines are all resin with individual cylinders to attach.Ive made a start building up the interior which is very well detailed.Though a lot won't be visible on the finished model.Still some work to do ,but here are some in progress photos.View attachment 197237

View attachment 197238

View attachment 197239

View attachment 197240

View attachment 197241
 

Attachments

  • image.jpg
    image.jpg
    2.4 KB · Views: 0
  • image.jpg
    image.jpg
    2.8 KB · Views: 0
  • image.jpg
    image.jpg
    2.3 KB · Views: 0
  • image.jpg
    image.jpg
    2.4 KB · Views: 0
  • image.jpg
    image.jpg
    2.2 KB · Views: 0
I and aircraft models do not really mix, but I have always like the Maryland, nice start Dave, great interior work.

Si:)
 
Hi Dave

Have to confess that I know nothing of this aircraft. Looks an interesting kit though and it's amazing to think a pilot could become an 'Ace' in one of these aircraft.

I'll be following this Dave

All the best

P
 
Looks a nice enough kit so far Dave. Good start, the interior looks good.
 
nice start Dave, great interior work., and dose look interesting as well, keep an eye on this one :rolleyes:
 
Good start Dave not heard of this manufacturer before looks a good kit.
 
Thread owner
Thanks for the interest people.should get some more done this evening after I've watched England 'playing for pride'!.
 
You don't see one of those very often. Looking forward to seeing it progress Dave.
 
Thread owner
View attachment 84276

View attachment 84277

View attachment 84278

Done a bit more tonight.The kit comes with an instrument panel but no decal.It has raised detail,but I'm not very good at painting that sort of detail.So I've added some instruments from an 'Airscale' decal sheet.And I've added a few blobs of yellow and red paint with a cocktail stick.Its not meant to be an accurate Maryland panel,but looks better than a plain black panel.I've also added the two control columns.These proved to be a life saver as on one mission Warburton was intercepted by 3 Italian CR42's.A bullet came through the nose and instrument panel hitting him in the chest.The blow rendered him unconscious and the aircraft went into a dive.The navigator unstowed the spare column,assembled it and pulled the aircraft out of the dive.For his actions he received the DFM.Warburton regained consciousness and resumed control.View attachment 197299

View attachment 197300

View attachment 197301
 

Attachments

  • image.jpg
    image.jpg
    2.6 KB · Views: 0
  • image.jpg
    image.jpg
    2.5 KB · Views: 0
  • image.jpg
    image.jpg
    2.6 KB · Views: 0
Good start Dave, looking forward to the next installment, detail is very good

Lee :)
 
Thread owner
View attachment 84554

View attachment 84555

View attachment 84556

View attachment 84557

View attachment 84558

View attachment 84559

Ive now assembled the wings.First I primed then sprayed the under carriage bays Aluminium.Then I glued the bay roofs into the lower wing halves.After allowing these assemblies to dry I then glued the wing halves together.A bit tricky without any locating pins and on one of them the landing light cut out doesn't quite line up.So I need to sort it with some plastic card.Next I trimmed a bit off the cabin bulk heads as the fuselage halves wouldn't quite meet.Thats the trick with these limited run type kits.You need to test fit everything before glueing.Ive now glued all bulkheads,floors,turret mount and instrument panel to the left fuselage half.And I've taped the two fuselage halves together without glue to check everything's lined up correctly.I will leave it to dry overnight and tomorrow will glue the fuselage halves together.View attachment 197577

View attachment 197578

View attachment 197579

View attachment 197580

View attachment 197581

View attachment 197582
 

Attachments

  • image.jpg
    image.jpg
    2.3 KB · Views: 0
  • image.jpg
    image.jpg
    2.9 KB · Views: 0
  • image.jpg
    image.jpg
    2.7 KB · Views: 0
  • image.jpg
    image.jpg
    2.3 KB · Views: 0
  • image.jpg
    image.jpg
    2.7 KB · Views: 0
  • image.jpg
    image.jpg
    2.8 KB · Views: 0
Thread owner
This evening I managed to glue some tiny PE levers to the pilots throttle quadrant.Then I glued the fuselage halves together.After that I turned my attention to the engines .These consist of resin crank cases and individual resin cylinders.After removing the crank cases from the pouring blocks with a razor saw,I washed the parts in washing up liquid solution,scrubbing them with an old tooth brush.I then tried super glueing the cylinders to the crank cases.But I'm having trouble getting them to bond together.Ive tried 3 different superglues without much success.So I'm going to have to use two part epoxy, which usually does the trick.

View attachment 84724

View attachment 84725

View attachment 84726


View attachment 197747

View attachment 197748

View attachment 197749
 

Attachments

  • image.jpg
    image.jpg
    3.2 KB · Views: 0
  • image.jpg
    image.jpg
    3 KB · Views: 0
  • image.jpg
    image.jpg
    2.5 KB · Views: 0
Thread owner
I've just spent a couple of hours cutting 28 cylinders from their pouring blocks and glueing them to the two crank cases.I used two part 5 minute epoxy for the job.The engines don't have push rod tubes included.The instructions suggest using lengths of plastic rod.So Ive bought a pack of Evergreen 35 thou rod.Thats tomorrow evenings job.

View attachment 84787

View attachment 84788


View attachment 197810

View attachment 197811
 

Attachments

  • image.jpg
    image.jpg
    3.1 KB · Views: 0
  • image.jpg
    image.jpg
    2.7 KB · Views: 0
Status
Not open for further replies.
Back
Top