Theme editor

Scale Model Shop

Spitfire Mk VIII 'Pauline' - Tamiya 1/32

Status
Not open for further replies.
Thread owner
I have not had a lot of time at the bench over the last week or so what with Talford, meetings etc but I have managed to get the internal detail painted, weathered and assembled. Some pics

The i.p.
View attachment 290559
Some pics of the 'pit detail
View attachment 290560
View attachment 290561
View attachment 290562
Then I pinched it inside the fuselage.
View attachment 290563
After taping together as above I 'tac' the fuse sides together by applying small drops of Mr S Cement in various places, keeping it well away from the tape. Once it has dried (min 1/2 hour) I remove the tape then run a brush of Mr S all along the join. Job done and ready to treat the seams.
 

Attachments

  • IMG_2781.jpg
    IMG_2781.jpg
    1.6 KB · Views: 0
  • IMG_2808.jpg
    IMG_2808.jpg
    3.5 KB · Views: 0
  • IMG_2810.jpg
    IMG_2810.jpg
    3.6 KB · Views: 0
  • IMG_2811.jpg
    IMG_2811.jpg
    3 KB · Views: 0
  • IMG_2812.jpg
    IMG_2812.jpg
    3.2 KB · Views: 0
Thread owner
Fuselage seams treated and a few bits of detail added.

View attachment 290838

The prop done. Unusually this aircraft’s prop was dark blue. I used RAF Marking Blue and did a wash and added wear
View attachment 290839

There are a lot of lights on the underside of a Mk VIII. I used a liquid chrome pen.
View attachment 290840
View attachment 290841 View attachment 290842


Masketar do a line of utility masks including sets of masking circles of various diameters These are thoroughly recommended for masking jobs line these lights View attachment 290843 View attachment 290844
 

Attachments

  • 9EF0C94F-111F-46CA-93E3-F89D6E795A2B.jpeg
    9EF0C94F-111F-46CA-93E3-F89D6E795A2B.jpeg
    3.4 KB · Views: 0
  • 3E1C6C0D-EB40-4DCC-85FA-9F7D51312FC4.jpeg
    3E1C6C0D-EB40-4DCC-85FA-9F7D51312FC4.jpeg
    3 KB · Views: 0
  • F790CF8A-1965-4FA4-A74C-0BA657EDEAA4.jpeg
    F790CF8A-1965-4FA4-A74C-0BA657EDEAA4.jpeg
    2.6 KB · Views: 0
  • 2B82C354-C828-4040-A5B1-FFE2866A91A9.jpeg
    2B82C354-C828-4040-A5B1-FFE2866A91A9.jpeg
    2.5 KB · Views: 0
  • CBA40628-9520-44E7-AF00-6F6BA3F5D372.jpeg
    CBA40628-9520-44E7-AF00-6F6BA3F5D372.jpeg
    2.8 KB · Views: 0
  • 95A1DC54-2931-4996-AE78-CDEED7E845A6.jpeg
    95A1DC54-2931-4996-AE78-CDEED7E845A6.jpeg
    2.9 KB · Views: 0
  • F07D2B10-01A3-4320-A944-392353C57CCD.jpeg
    F07D2B10-01A3-4320-A944-392353C57CCD.jpeg
    2.7 KB · Views: 0
Looking really good Barry. This is making me want to start a build now!
The masks from Masketar seem useful, although I normally just punch small disks out of kabuki tape with my punch and die sets.
Really looking forward to seeing this Tami Spit along side it's siblings.

Cheers
Paul
 
Blue for the prop, that is very interesting, I learned somthing :-)
I like the way you do the light, clever.

Theuns
 
That is some outstanding work right there, Barry. If this turns out to be anything close to your P-51D, it will be a true piece of art.
 
Thread owner
View attachment 290863
Working on the undercarriage. Barracuda resin for the wheels and SAC metal legs.
These am parts are definitely a good addition particularly the wheels. The axles on the legs needed shortening slightly to fit the wheels.
I will need to position the weighted wheels after the uc is in place as part of the first al fittings to get the flat part positioned.
 

Attachments

  • F53B9C23-C089-4D36-A83F-FA3AA39C2751.jpeg
    F53B9C23-C089-4D36-A83F-FA3AA39C2751.jpeg
    3.1 KB · Views: 0
Thread owner
Another HGW failure. When I was unable to get their fabric seatbelts to work I thought I could at least make use of the canopy masks in the set.

Well, the canopy masks are no use at all.
They comprise of an inner and outer set, something I consider to be an overkill. Well here is the set.
View attachment 290965

You can see that I removed a piece from the ‘outer’ set of masks. Well it did not fit. Indeed I have placed it beside the Tammy masks to compare and, for good measure put the ‘inside’ element next to it as well. You would expect of course the inner one to be smaller but the outer should be the same size as the Tammy.
View attachment 290967
I did not bother to try the other elements in the set. I threw the HGW masks away and used the ones supplied by Tamiya instead.

Do not bother with HGW products. Clearly the issues with this brand is not limited to the difficulty in putting together their fabric seatbelts, they are incapable of actually supplying masks that fit. Perhaps the failures with their seatbelts is not all down to me.
 

Attachments

  • 6834CB80-053F-456C-851B-ED36606BA1AF.jpeg
    6834CB80-053F-456C-851B-ED36606BA1AF.jpeg
    2.9 KB · Views: 0
  • B21E1A26-CDBE-442C-96C8-221A43118F3E.jpeg
    B21E1A26-CDBE-442C-96C8-221A43118F3E.jpeg
    2.4 KB · Views: 0
The Tammy ones require cutting, yes? Mind you, it looks like that won't present too many problems. Irritating though, paying for A.M. stuff and it not being fit for purpose!
 
You know what? I've used a few different third party masks and eduard ones with eduard kits (which are probably the best of a mediocre bunch) but for me since I started using bare metal and I know it's a bit more work but it gives a far superior finish to any mask sets as you cut tight up to the frames and your in control.
If you ain't tried it I'd highly recommend.
 
Thread owner
Just a quick update.

I have been pulling together the engine. This being a buttoned up build I have just done enough of the engine to be able to fit the panels around it and to hold the prop. I did not take any pics of that.

I have also fitted the wings to the fuselage. I had something of a self-made problem here. I must have clamped the wing in the wrong position because when I fitted it I found a ridge between the fusekage and wing. This did not happen on my other builds. I sorted this by building up Mr Surfacer 500 along the join in layers, sanding it down and then finishing it off with Mr Dissolved Putty (which fills any remaining 'micro gaps' that would show up under a fine paint like MRP) then, after another sanding, some rescribing and a bit of time with Rosie the Riveter all was sorted as good as new.

A couple of pics:
View attachment 291194
Above you can make out where I had to use filler along the wing root. As you can see the engine panels fit perfectly The Master Model brass cannon fit perfectly and really are one of the worthwhile enhancements to this kit.

View attachment 291195
A pic of the underside showing various lights that I masked with the Maketar 'utility' masks.

I need to run over most of the model with a fine sanding stick before doing an i.p.a. wash. A bit of masking and then a primer. I will be black basing and using MRP Black Fine Surface Primer.

More pics when I get to that stage prior to applying base coats.
 

Attachments

  • IMG_2836.jpg
    IMG_2836.jpg
    2.7 KB · Views: 0
  • IMG_2838.jpg
    IMG_2838.jpg
    3.2 KB · Views: 0
Thread owner
I managed a fair bit of progress over the Friday and Saturday, largely because the missus was out shopping all day!!!! The MRP paints helped too, being so quick to dry compared to Vallejo....

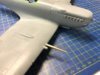
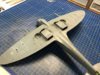
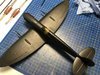
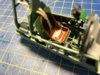
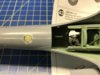
For those of you who doubt the value of using primer the aircraft fuselage seams looked perfect under the light but the primer really brought out the need for more work on them...

So below you can see them treated with Mr Sufacer 500
View attachment 291356
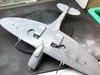
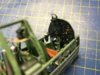
After sanding and a second treatment, this time with Mr Dissolved Putty and another sanding we had this.
View attachment 291357
View attachment 291358
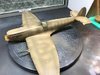
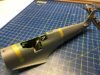
Another final coat of black primer...
View attachment 291359
View attachment 291360
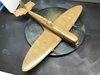
OK, I admit, when I was a child hand brushing paint (laid on rather thickly) I used it to try to cover up flaws in a build, seams and such like. You cannot get away with that with an airbrush using very thin high quality paints and, to be honest, you cannot get away with it anyway and I shudder thinking about all that thick paint hiding detail as well as flaws. One of the secrets to a good paint finish is surface preparation. Time spent on this is well spent and as you can see above, you can get a perfect canvas on which to lay down the base coats. I should add that before priming I wiped all over with ipa and after sanding and rescribing I wiped all over with a damp cloth. Make sure you check the model all over for any threads that may have got caught up when wiping with ipa or water.

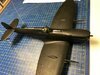
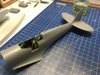
On with the first base coat. Black basing is ideal for lighter camo coats to create a good modulated finish depicting the play of light over what would be a large suface along with some wear and grime.
View attachment 291361
There is the Medium Sea Grey underside. As always with MRP paint I finished off with a mist coat of Mr Levelling Thinner (MLT). This treatment just helps to improve the already excellent finish further. I actually do this as part of my airbrush cleaning routine. A cup of ipa first to get most of the base colour out, I wipe around in the cup with a cotton bud. Then a full cup full of MLT to finish off the clean up but sprayed over the model instead of into the cleaning cup....

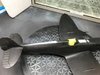
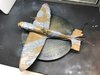
I actually had time as well, on the same day as doing the Medium Sea Grey to mask up and spray Dark Earth. Black basing helped bring in some dark points and I then used Light Earth to post shade to lighten some areas that would catch the light and the centre of panels.
View attachment 291362
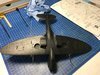
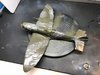
The overall appearance was more of a contrast than I wanted between the very dark areas with more of the black basing showing and the lighter areas where I sprayed Light Earth. This is easy enough to resolve and indeed is pretty much deliberate as from this I can 'blend' the finish to what I want. Instead of the Mr Levelling Thinner being sprayed 'neat' I used a 50:50 mix with Dark Earth. Spraying at a high pressure of about 30psi from a distance, I went all over the aircraft but applied more to areas when I wanted to reduce contrast. The MLT magic happens and you get this.
View attachment 291363
Exactly the appearance I wanted with a subtle modulated appearance. It is ready not just for the Dark Green but also the finish is perfect for decals and washes with no need to gloss coat. I just love this MRP Paint..... none better.
 

Attachments

  • IMG_2839.jpg
    IMG_2839.jpg
    3.1 KB · Views: 0
  • IMG_2840.jpg
    IMG_2840.jpg
    3 KB · Views: 0
  • IMG_2841.jpg
    IMG_2841.jpg
    3.2 KB · Views: 0
  • IMG_2842.jpg
    IMG_2842.jpg
    3.5 KB · Views: 0
  • IMG_2843.jpg
    IMG_2843.jpg
    3.7 KB · Views: 0
  • IMG_2845.jpg
    IMG_2845.jpg
    3.1 KB · Views: 0
  • IMG_2846.jpg
    IMG_2846.jpg
    3.1 KB · Views: 0
  • IMG_2847.jpg
    IMG_2847.jpg
    2.8 KB · Views: 0
Looking great Barry! I don't suppose you have a shot of the model just prior to laying the base coat over the Black Basing? Also, how do you deal with losing details like recessed rivets - my Zero is covered with them, and using filler will, by default, fill some of them up, and I have no idea how I would restore such tiny dimples!
 
Thread owner
Just caught up on this one Barry, some nice work going on, looking very good with some paint on now.
 
Thread owner
I have been getting on with the camo...
Masked up using Clever Putty, don't you love it when part of the masking comes away!!! The door needs repositioning...
View attachment 291395
Green sprayed - not finished the colour modulation yet.
View attachment 291396
 

Attachments

  • IMG_2848.jpg
    IMG_2848.jpg
    2.8 KB · Views: 0
  • IMG_2849.jpg
    IMG_2849.jpg
    2.8 KB · Views: 0
I use the Panzer Putty ( It's just like the Clever Putty ) most of the time Barry great stuff isn't it.
Nice work so far.
 
Status
Not open for further replies.
Back
Top