Theme editor

Scale Model Shop

Steady, wait 'til he's right on the bridge!" A 1/72 diorama

Status
Not open for further replies.
\ said:
Colin, I can't even load pictures on here right, let alone photoshop....Whatever that is!
I'll believe ya :) :) :)

\ said:
I'm finding the contents of the replies a bit embarrassing, but very nice! Thank you.
we wouldn't give em if it weren't worth it mate!!
 
After seeing this on my phone i had to jump on the puter for a better look.
 
Thats amazing Ron. You have a great tallent there my friend. And a fantastic eye for detail. Totaly amazing workmanship.

Andy
 
Thread owner
Thanks fellas, all good stuff.....

Just one picture. I've finished the water diversion to the lavoir.

The diverted water is a plastic collar stiffener cut to fit and then a bit more adhesive to bed it on, and to add a bit of shape to the bank of the stream. The 'dry' stream bed is just ordinary varnish drizzled over the painted polystyrene, which I hacked it out earlier in the build. The beads of the styrene make, I think, very convincing damp pebbles on the stream bed.

Just a bit of vegetation to add later in the build.....

Cheers all,

Ron

View attachment 56439

View attachment 169465
 

Attachments

  • 'Wait 'til he's on the bridge.' 093.jpg
    'Wait 'til he's on the bridge.' 093.jpg
    2.8 KB · Views: 0
That looks great mate, looks like you're not far off adding the vehicles/figures now???

\ said:
The 'dry' stream bed is just ordinary varnish drizzled over the painted polystyrene,
OK .... good idea .... i'm nickin' it for one of the GB's next year :) :)
 
Thread owner
\ said:
That looks great mate, looks like you're not far off adding the vehicles/figures now???OK .... good idea .... i'm nickin' it for one of the GB's next year :) :)
Cheers Colin, but it will be a while before I start the figures and stuff...got loads more to do to the village, not to mention the 'minor' detail of the canal water, I'm still plucking up the courage to tackle that part. I will make a start on them if I need a break though.

Not another idea 'nicked'!......I 'aint rittin' no more tips!!!!!!!!!!!!!!!!
 
Thread owner
Thanks Derek and Scott, I'm glad you like it so far.....

I'm trying to add a bit of detail and alter the general layout to make things a bit more 'Busy' and loose that empty feeling. I'm also going to leave the canal proper until I've finished the village, I don't want to ruin the water surface.

Here's what I've come up with so far......

I've finished the stone steps, then I thought a small perimeter wall around them would look nice, so I made one out of scrap styrene.

I have also added a cobbled pavement in front of the wrecked house and a small bit by the warehouse side door. On the other side of the canal I've added a little bench.

As for 'bits' I've made a start with a good old rustic ladder, a pile of round fence posts and a stack of timber on skids- all made from Gern's stirrers.

I will add some poles and power lines last thing or they'll only get in the way!!

Next I'll crack the obligatory can and have a think what else I can add, then tackle the damaged house and really trash it!!

Thanks for looking in.

Ron

View attachment 56482

View attachment 56483

View attachment 56484

View attachment 56485

View attachment 56486

View attachment 56487

View attachment 56488

View attachment 56489

View attachment 56490

View attachment 169508

View attachment 169509

View attachment 169510

View attachment 169511

View attachment 169512

View attachment 169513

View attachment 169514

View attachment 169515

View attachment 169516
 

Attachments

  • 'Wait 'til he's on the bridge.' 103.jpg
    'Wait 'til he's on the bridge.' 103.jpg
    2.3 KB · Views: 0
  • 'Wait 'til he's on the bridge.' 101.jpg
    'Wait 'til he's on the bridge.' 101.jpg
    2.2 KB · Views: 0
  • 'Wait 'til he's on the bridge.' 099.jpg
    'Wait 'til he's on the bridge.' 099.jpg
    2.6 KB · Views: 0
  • 'Wait 'til he's on the bridge.' 100.jpg
    'Wait 'til he's on the bridge.' 100.jpg
    2.7 KB · Views: 0
  • 'Wait 'til he's on the bridge.' 097.jpg
    'Wait 'til he's on the bridge.' 097.jpg
    2.7 KB · Views: 0
  • 'Wait 'til he's on the bridge.' 098.jpg
    'Wait 'til he's on the bridge.' 098.jpg
    2.5 KB · Views: 0
  • 'Wait 'til he's on the bridge.' 096.jpg
    'Wait 'til he's on the bridge.' 096.jpg
    2.5 KB · Views: 0
  • 'Wait 'til he's on the bridge.' 095.jpg
    'Wait 'til he's on the bridge.' 095.jpg
    2.5 KB · Views: 0
  • 'Wait 'til he's on the bridge.' 094.jpg
    'Wait 'til he's on the bridge.' 094.jpg
    2.7 KB · Views: 0
Thread owner
I've turned my attention to the 'Reception area'. I've kept this open space behind the two buildings on purpose.....

I have added a small extension to one and a bit of an old tin roof on the other to kind of fill in the space a bit, without taking much of the ground area away.

The long roof is the usual strip method which I explained at the start of the build. The other is made from kitchen foil.

Now here's a question which I'm sure someone on this most wonderful of forums can answer....I've been trying to model a piece of corrugated tin in 1/72 with no success....Any ideas how to form the very small -3" in real life- corrugations? I use the cocktail sticks trick for 1/35 but these are too big for this 1/72 model.

I'm happy with just scribing the sheet lines on and weathering but I would like, if poss., to do it 'proper like'.......I haven't looked on 'tinternet as I thought it would be more fun to see what you guys come up with. No Googling- I could have done that,lol.....brains only!

Here are a couple of pictures of the initial work on the back yards.

I hope you like them...

Cheers,

Ron

View attachment 56566

View attachment 56567

View attachment 169592

View attachment 169593
 

Attachments

  • 'Wait 'til he's on the bridge.' 104.jpg
    'Wait 'til he's on the bridge.' 104.jpg
    2.1 KB · Views: 0
  • 'Wait 'til he's on the bridge.' 105.jpg
    'Wait 'til he's on the bridge.' 105.jpg
    2.6 KB · Views: 0
please stop now,this is bloody awesome:respect2:only kiddin about the stop lol

mobear
 
Fantastic Ron. You always amaze me with your work. Now for your problem, cocktail stick are too big. If i was to do what you wanted to... id get myself to B&Q and buy myself a box of long panel pins and use the same method. Just a thought mate.

Cheers

Andy
 
Thread owner
Nice one ole, thanks for you post.

Andy, top idea. I never thought along 'metal lines' and if panel pins- which I have loads- are still too thick I could nick some of the brides sewing needles and stick those together.....I'll try your pins idea first though.

I knew I could rely on you people to come up with the goods......Any other suggestions?

Cheers,

Ron
 
Thin plastic rod attached to a base plate so they are just touching. Lay foil on top and with a pointy, but not sharp thing, run a line down the foil between the lengths of plastic rod. This will create one corrugation per two plastic rods. When you get to the end, put the last corrugation into the first of the grooves formed by the plastic rods and repeat for however wide your fol is.

Here is a link of a video I did for 1:48. Just replace the cocktail sticks with finer plastic rod. Apologies for causing enormous boredom with this, the first ever tutorial video I did as G.O.M (Grumpy Old Man) Productions.

[video=youtube_share;pCy5WRKZi88]

 
Just off the top of my head ron, what about trying this. Get a couple of plastic hair combs and put a 1" x 2" strip of wine foil between the two sets of teeth ,then press them together in a vice. Hopefully the teeth will intermesh and create a corrugated effect in the foil, who knows , it might just work !!!! tony
 
Thread owner
Thanks boys for putting your thinking caps on.

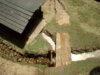
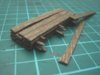
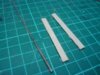
Graham, I'm happy with making the sheets...I've done loads, but not in such a tiny scale - 3" corrugations equates to roughly 1/2 of a mm - I don't know, but I suspect plastic rod that size would be hard to find and then difficult to glue in a straight line and keep the contours free of glue. This dilemma will apply to anything so small glued together, so care will be needed. As you know, with the larger scale corrugation making 'machine' this problem doesn't occur.

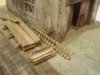
Tony, excellent suggestion, but I think the comb teeth might be too big....We are talking mega diddy here!!

However your idea has sparked summat mucker. Hows this....

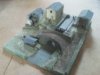
Instead of a couple of combs, substitute these for either two sets of Andy's panel pins or sewing needles glued as you would the cocktail sticks, then adopt your vice method. This might, just might work. The problem is the tiny size.

All great suggestions and thanks for offering up all your ideas.....Time to try them all, me thinks!

Cheers,

Ron
 
right then.

glue some sewing needles on a flat bit of wood at the required distance apart.

do the same with the needles on a round bit of wood to make a roller.

for the sheeting use two layers of kitchen foil with a thin layer of pva glue between.

lay sheet on flat wood base and roll the round jobbie over the top to get the corrugated effect ... the glue will set overnight and keep the shape.

I'm making one of these tomorrow to see if it works and to have one ready in case I need one :)
 
Status
Not open for further replies.
Back
Top