Theme editor

Scale Model Shop

Steve's 1:48 Revell Apollo 11 "Eagle" lunar lander

HAWKERHUNTER

SMF Supporters
Joined
Feb 29, 2012
Messages
2,097
Reaction score
858
Points
113
1/3
Thread owner
Well with a few days before the start of the next GB I thought I would get this one sorted.Been in my stash for many years. As a child of the 50's and 60's the space race was something that played a major part in my youth so this model holds some fond memories for me. I built the Airfix lander way back in the 60's and was looking forward to this one. That said what a disappointment. Revell in their wisdom have completely omitted all the plume deflectors from the model. I have circled the parts not included in the model.
51970314675_9783df9d25_z.jpg
So the deflectors and fittings are going to have to be scratch built.
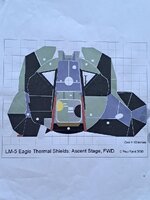
Anyway here are a few of the box art and progress to date.
IMGP0032.jpg
IMGP0033.jpg
IMGP0034.jpg
IMGP0036.jpg

IMGP0040.jpg
This is one of 3 Space models I have, the others being the Airfix Saturn 5 rocket and the Revell 1;32 Command Module. I thought they could go to the grand children if they have any space projects at school.

Steve
 
Really looking forward to your build but strangely I built the Revell 1/48 50th Anniversary kit (03701) which has the deflectors and mountings but no base or figures - hope you don't mind me posting a picture of it in your thread so you can see.
I also have the documents showing the different colours of panels as specified by NASA, if you need a copy contact me and I will scan and send them to you.
Good luck with the build.
20250530_155819.jpg
 
Thread owner
Thats a nice looking lander Stefan, I cant believe they would omit such a key part of the lander, it kind of looks a bit bare without them. I would love to have a copy of the documents if you can send them over. my email is steveball0627@yahoo.co.uk. Thanks.
 
Hawkerhunter, you might want to edit your post and remove that email address, (from a public forum) otherwise you will prolly be getting some dodgy emails!
 
Thread owner
Well today I thought if I am going to do some scratch building on the plume deflectors then I might as well give the ascent stage a cryogenic rocket motor exhaust exit nozzle. Although they make this model to separate into 2 stages ,the decent stage and the ascent stage, they don't fit an exhaust nozzle to the ascent part. This is what you get just a flat end where the nozzle should go.

First job was to cut out the hole for the exhaust nozzle. I just used a hot knife blade.

Once cut out I realised that I would have to reduce the lip down by 5mm to allow for the new exhaust nozzle to be fitted without it interfering with the recess in the decent stage. I used a dremel for the sanding down.
IMGP0047.jpg
I then used the end of a 1:32 F4 Phantom under wing pod to use as the exhaust nozzle.
IMGP0052.jpg
I put a slight chamfer on the lip of the new exhaust nozzle prior to fitting into the ascent stage.
IMGP0053.jpg
Next I did some work on the thrust chamber assembly cluster. There are four of these all made up from 2 parts. There is a nasty seam on them and the fit alignment isn't good so lots of tidying up to do.
IMGP0057.jpg
In order to get rid of the seams I am going to sacrifice the nozzle locating pins on the top side so I can sand down properly. These will then get glued onto the main body but I wont fit the 4 nozzles until the end. That's it for now. Thanks for looking.

Steve
 
Steve, looking good. When I join two halves together on items such as these or cylinders for example i remove the location pins so the two halves can be slid around for the best fit.
 
Thread owner
First thing is a warning. Avoid this model kit like the plague. Unlike the 50th Anniversary version it just lacks detail, no wonder it only cost me £16.99 when purchased.
So the lunar lander does not have smooth sides on the descent stage. The lander is covered in a thermal blanket made up of aluminized Kapton and mylar foils.
Click image for larger version  Name:	thumbnail (4).jpg Views:	0 Size:	177.3 KB ID:	1259671
In the newer kit the parts come with moulded in undulations but this kit the sides are silky smooth. The idea is you just cover it in gold foil but as can be seen from the photo only 50%of the lander is covered in gold foil, the other 50% is the grey kapton sheeting. Because I think spraying the foil to get the grey parts may be problematic I have decided to give the sides that would be grey some definition.
Click image for larger version  Name:	IMGP0060.jpg Views:	0 Size:	161.7 KB ID:	1259672
So to get the lumps and ripples I applied a thin coat of 5 min epoxy resin then crumpled up some tin foil and put that over the top. I then used a scouring sponge to push the foil into the epoxy and once dry I was able to lift the tin foil off the model leaving the now set rippled epoxy in place.
Click image for larger version  Name:	IMGP0062.jpg Views:	0 Size:	240.3 KB ID:	1259673
For some reason though after running out of foil I had to get a new roll and when I came to do the top of the descent stage it would not pull off so that foil will have to stay in place.
Click image for larger version  Name:	IMGP0069.jpg Views:	0 Size:	208.7 KB ID:	1259674
Next was getting rid of the seam line that ran around the entire ascent stage. Plenty of filler and smoothing off needed.
Click image for larger version  Name:	IMGP0064.jpg Views:	0 Size:	217.1 KB ID:	1259675
And now when primed.
Click image for larger version  Name:	IMGP0068.jpg Views:	0 Size:	131.2 KB ID:	1259676
Quite a complex masking job coming up now. I have applied a first layer of silver and the painting phase will now be, silver, mask off, green/aluminium, mask off, light grey, mask off and then final coat of dark grey hopefully ending up with something like this.
Click image for larger version  Name:	thumbnail.jpg Views:	0 Size:	109.3 KB ID:	1259678
Thanks for looking

Steve
 

Attachments

  • thumbnail.jpg
    thumbnail.jpg
    109.3 KB · Views: 0
Last edited:
Back
Top