Theme editor

Scale Model Shop

Steves shilka

Status
Not open for further replies.
Thread owner
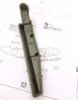
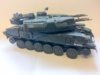
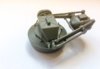
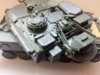
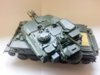
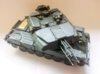
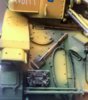
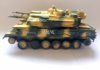
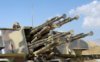
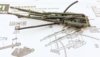
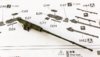
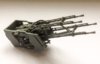
Started on the cannons the other night, i had purchased the RB brass barrel se,but when looking at real vehicle photos and the Meng instructions it dawned on me that the brass set are not accurate for the variant i am building, plus the 'gas extractor pipes' (?) are not bulky enough !!. One thing i would suggest if anyone else contemplates building this kit is to attach the rubber hose to part H44 before attaching H44 to the gun cannon as its a very,very tight fit, trying to get the hose on and then the other hose attached to the actual cannon. Also ensure part D24 is fitted before part C47. besides that all going well.

View attachment 284093 View attachment 284094

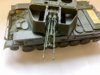
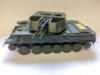
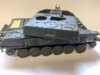
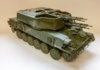
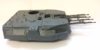
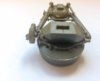
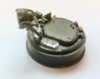
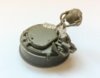
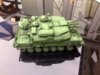
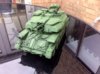
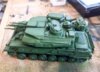
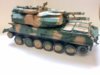
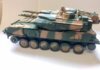
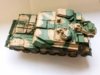
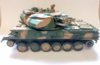
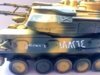
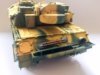
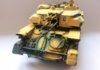
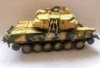
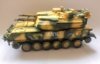
Their are call outs for painting the system, but again looking at references, Shilka's from the middle East have the gun System painted in the same colour as the tank, so that what i will be doing to mine;

View attachment 284095 View attachment 284096
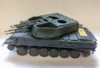
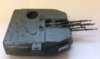
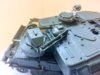
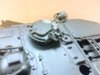
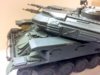
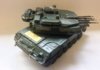
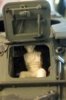
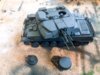
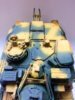
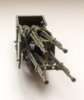
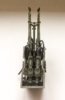
 

Attachments

  • gun3.jpg
    gun3.jpg
    2.2 KB · Views: 0
  • gun 1.jpg
    gun 1.jpg
    2.4 KB · Views: 0
  • IMG_0296.JPG
    IMG_0296.JPG
    2.1 KB · Views: 0
  • IMG_0295.JPG
    IMG_0295.JPG
    2.4 KB · Views: 0
Thread owner
Finally got the four barrels together to finish off the cannon system (front) :). Not an easy thing at all, trying to line up 2 pivot point on each side when the top and bottom cannons which are only held together by a swing arm, creating a swinging 'mess' and then you have to glue on the back plate at the same time. :mad: Best way was to glue the rear and sides together, leave the Tamiya cement to set for a few secionds the gently prise open and attach the pivot points, still took quite a few deep breaths and some cursing to get both side lined up and the pivot arm to stay put :(:mad:. Even now i am not convinced its all together properly. Think i will pick an attitude for the system and glue the pivot points, after all its not a toy !! :D

View attachment 284269 View attachment 284270 View attachment 284271 View attachment 284272
 

Attachments

  • IMG_0358.JPG
    IMG_0358.JPG
    1.8 KB · Views: 0
  • IMG_0357.JPG
    IMG_0357.JPG
    2.1 KB · Views: 0
  • IMG_0356.JPG
    IMG_0356.JPG
    1.8 KB · Views: 0
  • IMG_0355.JPG
    IMG_0355.JPG
    1.6 KB · Views: 0
This really is coming along a treat Steve, looking forward to the next update;)
 
Thread owner
After spending 3 days at RIAT Airshow (http://www.scale-models.co.uk/threads/royal-international-airshow-2017.28647/) and a couple of days getting my photos down to a reasonable size, i got back to the Shilka, sprues starting to look a lot more managable. Didnt bother installing the ammo bins, as its going to built shut up. Glued the cannon assembly into one position, test mounted on the hull and spins nice and smoothly, no snagging anywhere !!
Note - the scratch marks have been sanded smooth, so wont show when painted

View attachment 284635 View attachment 284636 View attachment 284637 View attachment 284638 View attachment 284639
 

Attachments

  • IMG_0581.JPG
    IMG_0581.JPG
    2.8 KB · Views: 0
  • IMG_0580.JPG
    IMG_0580.JPG
    2.2 KB · Views: 0
  • IMG_0579.JPG
    IMG_0579.JPG
    2.2 KB · Views: 0
  • IMG_0582.JPG
    IMG_0582.JPG
    2.4 KB · Views: 0
  • IMG_0583.JPG
    IMG_0583.JPG
    2.2 KB · Views: 0
Thread owner
Added a few more bits and bobs onto the turret, starting to come together now.

View attachment 284844
View attachment 284845
View attachment 284846
A few more parts have the Meng sprue point issues as can be seen by the red circles on this part, means a double cut, once of the sprue tree and a double clean to remove the stub. Not a biggie, just a pain and sometimes they are not in the best place.

View attachment 284847

I have seen a few photo ideas for the dio, so have ordered the Paracel NVA driver for the shilka, i will modify his head to disguise his origins, a Shemagh round his face should sort him out, then some generic painting and he will be done, not that you will be able to see that much of him once he is in there.
 

Attachments

  • sprue issues.jpg
    sprue issues.jpg
    1.8 KB · Views: 0
  • IMG_0646.JPG
    IMG_0646.JPG
    1.8 KB · Views: 0
  • IMG_0644.JPG
    IMG_0644.JPG
    1.8 KB · Views: 0
  • IMG_0643.JPG
    IMG_0643.JPG
    1.5 KB · Views: 0
Thread owner
Work progresses on the Shilka and end is in sight now.

The commanders Cupola is a great bit of construction, don’t get me wrong the search light is a right fiddly bit of model building, but looks great once complete, patience been the order of the day.

View attachment 284956 View attachment 284957 View attachment 284958


Like the Cupola the search radar is a nifty bit of engineering and goes together without any issues at all. Impressed by the split in the piping between the scanner and the control box, very neat.

View attachment 284959 View attachment 284960 View attachment 284961

Starting to look like the ‘sewing machine’ it’s meant to be !

View attachment 284962
 

Attachments

  • 7.JPG
    7.JPG
    2.2 KB · Views: 0
  • 6.JPG
    6.JPG
    2.8 KB · Views: 0
  • 5.JPG
    5.JPG
    2 KB · Views: 0
  • 4.JPG
    4.JPG
    1.8 KB · Views: 0
  • 3.JPG
    3.JPG
    2.7 KB · Views: 0
  • 2.JPG
    2.JPG
    1.9 KB · Views: 0
  • 1.JPG
    1.JPG
    1.8 KB · Views: 0
Thread owner

Attachments

  • IMG_0551.JPG
    IMG_0551.JPG
    3 KB · Views: 0
  • IMG_0550.JPG
    IMG_0550.JPG
    2.9 KB · Views: 0
  • IMG_0549.JPG
    IMG_0549.JPG
    2.5 KB · Views: 0
  • IMG_0548.JPG
    IMG_0548.JPG
    2.2 KB · Views: 0
  • IMG_0547.JPG
    IMG_0547.JPG
    2.4 KB · Views: 0
great progress on this one,Steve,has a lotof detail as well,your doing a top job of this build,
liking it a lot,;)
 
Thread owner
This little chap turned up from Vietnam today (Paracel miniatures), he is the shilka NVA driver, once I have put an shemagh on him you won't be able to tell his nationality

View attachment 285240
 

Attachments

  • IMG_0584.JPG
    IMG_0584.JPG
    2.6 KB · Views: 0
Thread owner

Attachments

  • IMG_0779.JPG
    IMG_0779.JPG
    2.9 KB · Views: 0
  • IMG_0778.JPG
    IMG_0778.JPG
    3 KB · Views: 0
  • IMG_0777.JPG
    IMG_0777.JPG
    2.7 KB · Views: 0
  • IMG_0776.JPG
    IMG_0776.JPG
    3 KB · Views: 0
  • IMG_0775.JPG
    IMG_0775.JPG
    3.1 KB · Views: 0
Thread owner
So this morning it has darkened down a bit, so tonight i think i will mist on a mid tone to cut back some of the highlighted panels and then get the yellow onto it.
 
Thread owner
flattened down the bright green and then applied the camo yellow, had to touch up some over spray by hand (didn't need to as checked sources on a big screen and you can see the over-spray on the real thing - damn it !!:mad::(), added a wash / filter of Vallejo European dust, to darken things down a bit and add some tone. Next will be a dust wash, oil pin wash and rust.

View attachment 285466 View attachment 285467 View attachment 285468 View attachment 285469

It may look like the camo doesn't match, but that's due to the turret been slewed 180 and then pointing of the side of the tank body :)
 

Attachments

  • 1.JPG
    1.JPG
    2.4 KB · Views: 0
  • 2.JPG
    2.JPG
    2.4 KB · Views: 0
  • 3.JPG
    3.JPG
    2.6 KB · Views: 0
  • 4.JPG
    4.JPG
    2.3 KB · Views: 0
Thread owner
Looking back at my references and a few of the models in the excellent 'Bear in the Sand book by Abrams squad ( http://www.bookworldws.co.uk//bear-sand-p-7257.html ), and not been happy myself with the yellow, i decided to revisit the colour and sprayed on a mix of Tamiya yellow + desert (about 60% - 40%) this looks so much better, maybe a bright at the moment, but once weathered it will flatten down. Also painted a few of the tools, shovels, saw, tow ropes, etc and added on some decals from Echelon designs.It may not be historically correct, but have used a bit of artistic license, mind seeing photos of the real things, they all have different slogans painted on in random places.

View attachment 285748 View attachment 285749 View attachment 285750 View attachment 285751 View attachment 285752 View attachment 285753 View attachment 285754
 

Attachments

  • 6.JPG
    6.JPG
    3.4 KB · Views: 0
  • 5.JPG
    5.JPG
    3.1 KB · Views: 0
  • 4.JPG
    4.JPG
    2.6 KB · Views: 0
  • 3.JPG
    3.JPG
    2.4 KB · Views: 0
  • 2.JPG
    2.JPG
    2.3 KB · Views: 0
  • 1.JPG
    1.JPG
    2.2 KB · Views: 0
  • 0.JPG
    0.JPG
    2.2 KB · Views: 0
Status
Not open for further replies.
Back
Top