
You are using an out of date browser. It may not display this or other websites correctly.
You should upgrade or use an alternative browser.
You should upgrade or use an alternative browser.
Tamiya 1:32 Spitfire Mk IXc
- Thread starter colin m
- Start date
- Status
- Not open for further replies.
I think it's something we all have to do. I'm sure the new Revell 1:32 Spitfire is great, but when you see how Tamiya have engineered this thing, well.\ said:one of these days im going to cave in and get one!
The engine could be a kit in itself - well it took so long to build, it practically is !\ said:really liking the merlin looks real
Which brings me to this phase. Later tonight I hope to have the underside grey, painted. Right now, it's primered and pre-shaded (although having seen Dave's post shading on his Lancaster I'm wondering if it's worth pre-shading)\ said:The airframe is looking very clean and certainly ready for paint
Also I've done a little bit of yellow and some of Laurie's magic blue tape for masking the curvy bits off.
View attachment 122805
View attachment 235696
Attachments
G
Guest
Guest
It looks fantastic mate!
I've built both and though the Revell kit is a decent kit the Tamiya kit is streets ahead, vastly superior in every aspect. Yours is starting to look the business now.\ said:I'm sure the new Revell 1:32 Spitfire is great, but when you see how Tamiya have engineered this thing, well.
Cheers
Steve
G
Guest
Guest
What is "Laurie's magic blue tape for masking the curvy bits off"
The seat was made from a composite material, often erroneously referred to as bakelite, which is similar but not the same stuff. I've seen it referred to in contemporary documents as a 'plastic seat'.\ said:Colin this is looking incredible and I have heard great things about this kit, the merlin looks beautiful. One question why the red seat? I've not seen that before.
Regards
Phil
It was a reddish brown colour with some variation.
I've also seen the material for the seat described as SRBP (synthetic resin bonded paper). In the 1940s that 'synthetic resin' would have been a phenolic resin. Because some official documents do refer to a Bakelite seat this has become accepted as the material. It is more likely a use of the Bakelite name as a generic term for any product based on a phenolic resin, somewhat like 'hoover' to mean any vacuum cleaner.
Cheers
Steve
Laurie, on this forum discovered it. It's a plastic tape from the automotive industry which bends quite nicely.\ said:What is "Laurie's magic blue tape for masking the curvy bits off"
Steve has 'hit the nail on the head' with his reply. My seat is probably a bit to bright, also is missing the cushioned back. I got a bit lazy there.\ said:Colin this is looking incredible and I have heard great things about this kit, the merlin looks beautiful. One question why the red seat? I've not seen that before.
Regards
Phil
The Revell in its completed form does look nice, but I haven't seen one close up.\ said:I've built both and though the Revell kit is a decent kit the Tamiya kit is streets ahead, vastly superior in every aspect. Yours is starting to look the business now.
Cheers
Steve
But the Tamiya, as you know, is in a league of its own. I still smile to myself every time I look at the engine.
G
Guest
Guest
For me the engine is a bridge too far. I can see me losing small parts (why is our carpet grey) and there would be more glue than plastic. Maybe its the old eyesight even with a magnifier or I just don't have the patience.
This looks like it is going to be great model and I envy your skill.
PS maybe I could find and engine builder and do the rest myself lol.
This looks like it is going to be great model and I envy your skill.
PS maybe I could find and engine builder and do the rest myself lol.
G
Guest
Guest
That spitty is looking great mate! I wish my mustprang was as far as your build.
Theuns
Theuns
No, the engine is a great piece of modelling engineering - don't fear it, embrace it.......you can do it, just go slow and look at plenty of pictures, that's all I did.\ said:For me the engine is a bridge too far.
That is a problem with these kits. They are full to the top with parts that need to be fitted somewhere. There's literally hundreds of bits.\ said:I wish my mustprang was as far as your build
G
Guest
Guest
Thanks Colin. Maybe I will buy one of these kits and have a go. Problem I expect is that if the engine is not exactly right then it wont fit between the fuselage halves. As I don't really want it on show anyway it does seem a waste although I think it can be made for display or not with small magnets. Could be wrong though.
The cowlings, which incidentally are super thin moldings, can be fitted with little magnets making them removable. You can always glue them in place if you wish. It depends whether you want to be able to show the engine. It will all fit together with a complete engine (unlike some kits) but you do need to be careful with your fitting, alignments etc.
Cheers
Steve
Cheers
Steve
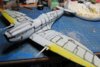
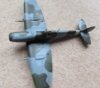
The build has moved on a bit. I pre-shaded, as I always do. But, I don't think I'll bother doing that again. The pre-shading added very little to the result, but post shading made quite a difference. The post Shading was much more controllable. I think, this might be the way forward for me from now on. We'll see.
The engine cowlings are held in place with tape, hence the silly gaps. Actually, they can come off now the camouflage has been applied.
View attachment 123482
View attachment 123483
The light wasn't brilliant taking these pics, but the post shading shows up in places, also. It is actually grey, not that sort of blue grey it seems to be in the picture.
Colin M..
View attachment 236373
View attachment 236374
Attachments

G
Guest
Guest
Very nice Colin, nice crisp paintwork
Looks really nice Colin, watching this one with great interest. Post shading isn't something I've tried yet. I pre shade but probably like yourself, I find when you get a good base down its not really that effective.
What is the process of post shading then? It seems pretty daunting to me.
Phil
What is the process of post shading then? It seems pretty daunting to me.
Phil
Thanks Patrick, but, it might be a bit too much crisp for me. I might have to fire the airbrush up again.\ said:Very nice Colin, nice crisp paintwork
So Phil, it might be you and I are sort of thinking the same thing, is pre-shading worth it ? I often end up doing both, but am now thinking, I might ditch the pre-shading.\ said:Looks really nice Colin, watching this one with great interest. Post shading isn't something I've tried yet. I pre shade but probably like yourself, I find when you get a good base down its not really that effective.
What is the process of post shading then? It seems pretty daunting to me.
Post shading just involves using a slightly different shade of paint to that already applied, go for lighter and spray it in the centre of panels, go for darker and spray the panel seams. The really nice thing about post shading is you can see the effect as you go along.
Ok that makes sense, sounds simple. I'll give it a go cheers.\ said:Thanks Patrick, but, it might be a bit too much crisp for me. I might have to fire the airbrush up again.
So Phil, it might be you and I are sort of thinking the same thing, is pre-shading worth it ? I often end up doing both, but am now thinking, I might ditch the pre-shading.
Post shading just involves using a slightly different shade of paint to that already applied, go for lighter and spray it in the centre of panels, go for darker and spray the panel seams. The really nice thing about post shading is you can see the effect as you go along.
Phil
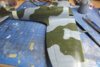
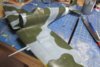
Well then, I wasn't totally impressed by the original paint work, just too uniform for me, it needed a bit of 'life' to it. So, back to the spray booth (cardboard box in the garage) to add a bit of more post shading.
Below are the results, not too easy to see in the pics, but in real life, it has worked quite nicely.
View attachment 124539
View attachment 124540
Hopefully the matt coat will highlight this further.
View attachment 237430
View attachment 237431
Below are the results, not too easy to see in the pics, but in real life, it has worked quite nicely.
View attachment 124539
View attachment 124540
Hopefully the matt coat will highlight this further.
View attachment 237430
View attachment 237431
Attachments
- Status
- Not open for further replies.
Legal Notice
scalemodelling.co.uk is a privately operated online discussion forum. All content posted by members reflects their own views and opinions and does not necessarily represent those of the forum owners or administrators. While reasonable efforts are made to moderate content, no responsibility is accepted for user-generated material. By using this site, you agree to comply with UK law and the forum rules.