- Joined
- Apr 27, 2018
- Messages
- 15,119
1/3
John,
Cracking work on the building my friend.
Cracking work on the building my friend.

Hi Bob, thank you very much, yes quite spacious inside if you shrink to 1/35 :smiling2::smiling2:Gordan Bennett John, lovely work!! So much detail!
Is there room inside for my modelling room?
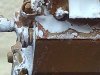
Thanks Peter, to be fair its done with Ferric Chloride, a mix made with water and the sheet is dipped in , if you leave it too long it eats it away ! Certainly gives to right look.Superb John and your rusting skills are apparent again.
Cheers Andrew.John
Moving the work on the building!
ATB
Andrew
Thanks Andy, great fun too make.Ooh, wrigley tin, I like it.
Andy.
Looking good Dzohn. Stack is outstanding:smiling2:. Really. PaulE
John,
Cracking work on the building my friend.
Thank you Steve, very kind of you to say. Hope you like the next part as much then.:smiling3:Stunning rust effect JR. Top notch work all round my friend. Most impressed


Paul, cheers.John,
Really like the mottled faded effect on the paint work.
I know Bob, the lady across the road calls it "Stupid oclock " Since I've retired I normally get about around 0830 and later.6am, my god thats the middle of the night :upside:
Thanks Lee. :thumb2::smiling3:Commander. Very impressive
Well spotted Simon, glad some one reads the small print ! :smiling:A wooden bat?
Cricket, baseball or vampire?
Hi Rick, thank you for your help, we also would say " ridge cap " or capping.I suspect our good JR is referring to what we in the USofA refer to as a "ridge cap". :rolling: Rick H.

You know Graeme that's right, you get into a rhythm and as long as they are clean and clear of debri you soon have them done .The joy of Friuls! It can be therapeutic John, the building is looking good.
Thanks Greg, :thumb2:glad you approve .rooting is great...and the the aging of the house is very realistic... keep on doing what you do... it's super..
Very true Rick in your comments.JR, I can't imagine doing individual track links in my scale.....one would need one of those fancy space telescopes just to find the pins. I can understand the anguish it causes but the results are so rewarding. Friul on John!:thumb2: Rick H.


scalemodelling.co.uk is a privately operated online discussion forum. All content posted by members reflects their own views and opinions and does not necessarily represent those of the forum owners or administrators. While reasonable efforts are made to moderate content, no responsibility is accepted for user-generated material. By using this site, you agree to comply with UK law and the forum rules.