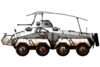
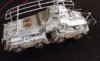
this is the first time I have tried to do a winter camo with any conviction I might add
I think it looks ok for a first attempt but I'm open to advice on improvement")
The kit itself is very good and very easy I put this together yesterday afternoon and had the main paint on it by early evening ( doing scruffy paint jobs lessens the time )
Anyway here it is View attachment 116091
View attachment 116092
View attachment 116093
View attachment 116094
View attachment 116095
View attachment 116096
View attachment 116097
View attachment 116098
View attachment 116099
View attachment 116282
View attachment 116283
View attachment 116284
View attachment 116285
View attachment 116286
View attachment 116287
View attachment 229114
View attachment 229115
View attachment 229116
View attachment 229117
View attachment 229118
View attachment 229119
View attachment 229120
View attachment 229121
View attachment 229122
View attachment 229305
View attachment 229306
View attachment 229307
View attachment 229308
View attachment 229309
View attachment 229310
I think it looks ok for a first attempt but I'm open to advice on improvement
The kit itself is very good and very easy I put this together yesterday afternoon and had the main paint on it by early evening ( doing scruffy paint jobs lessens the time )
Anyway here it is View attachment 116091
View attachment 116092
View attachment 116093
View attachment 116094
View attachment 116095
View attachment 116096
View attachment 116097
View attachment 116098
View attachment 116099
View attachment 116282
View attachment 116283
View attachment 116284
View attachment 116285
View attachment 116286
View attachment 116287
View attachment 229114
View attachment 229115
View attachment 229116
View attachment 229117
View attachment 229118
View attachment 229119
View attachment 229120
View attachment 229121
View attachment 229122
View attachment 229305
View attachment 229306
View attachment 229307
View attachment 229308
View attachment 229309
View attachment 229310
Attachments
-
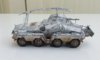 image.jpg1.8 KB · Views: 0
 -
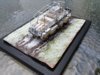 image.jpg3 KB · Views: 0
 -
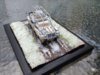 image.jpg2.9 KB · Views: 0
 -
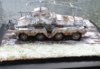 image.jpg2.7 KB · Views: 0
 -
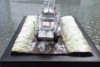 image.jpg2.4 KB · Views: 0
 -
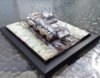 image.jpg3 KB · Views: 0
 -
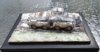 image.jpg2.2 KB · Views: 0
 -
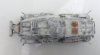 image.jpg1.5 KB · Views: 0
 -
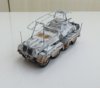 image.jpg2 KB · Views: 0
 -
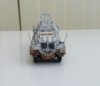 image.jpg1.5 KB · Views: 0
 -
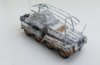 image.jpg1.8 KB · Views: 0
 -
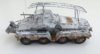 image.jpg1.8 KB · Views: 0
 -
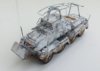 image.jpg1.9 KB · Views: 0
 -
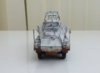 image.jpg1.5 KB · Views: 0
 -
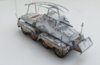 image.jpg1.8 KB · Views: 0

")