Theme editor

Scale Model Shop

Tamiya Katana 1100

Status
Not open for further replies.
Thread owner
\ said:
I'm watching intently Peter, hoping to pick up a few tips. I love all of the scratch building. I also like the sound of the matt finish.Jason
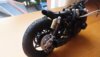
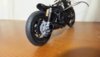
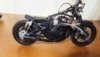
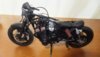
I toyed with a lot of different ideas ............. Nearly settled on Gunmetal for the bodywork with Dayglo wheels. But a coat on one wheel looked nasty and really did not suit the "Suzuki GS Wheels"...... Too bright, ok on a GP bike but not this.

Peter
 
Thread owner

Attachments

  • DSCF2129 (2).jpg
    DSCF2129 (2).jpg
    1.9 KB · Views: 0
  • DSCF2133 (2).jpg
    DSCF2133 (2).jpg
    1.6 KB · Views: 0
I can't believe I've not posted on this build yet Peter some very nice work going on
 
Thread owner
All this lot is now black ............ Primer, a spot or two more filler, some more sanding, another light coat of primer and two coats of flat black........ The modified seat and tailpiece has come out rather well and the Flat Black contrasts well with the Semi Gloss on the seat.

...... and now it's all smooth as that proverbial baby's backside............... The only major task now is detailing the front callipers and hangers.

View attachment 66094

I'm not sure if I ought to put the white "Suzuki" decal on the tank or leave it yet............ Maybe just small "Yoshimura" decal strategically placed somewhere.

I can start putting some of this thing together now.

Peter

View attachment 67181

View attachment 180207
 

Attachments

  • DSCF2136.jpg
    DSCF2136.jpg
    2.2 KB · Views: 0
I'm glad I'm doing my build as a scrap yard diorama no need for all that filling and sanding to make it all super smooth. But some great work Peter looking forward to more
 
Thread owner
\ said:
I'm glad I'm doing my build as a scrap yard diorama no need for all that filling and sanding to make it all super smooth. But some great work Peter looking forward to more
Well from what I've seen so far of the Honda Ian.......... You are doing very nicely making it look like crap (In the nicest way I have to add).
 
I love the subtle contrast you get between flat and semi gloss black. You're really making progress now Peter.

I'm realizing I need to get a wiggle on with mine.
 
Really sharp so far Peter keep up the great work! Liking the front fork assembly and brake disc a lot!!
 
Thread owner
It's all coming together rather quickly now........... I guess that's what happens when there are just a load of sub assemblies made up............Engine and airbox are in, Rear swinging arm and rear shocks are on, Braided brake lines are on, Exhaust is on ( I cut that way down to a "stump"), Cut down rear mudguard, and that itty bitty black tubing Tamiya use for wiring and cables has been fitted.

View attachment 66241 View attachment 66242 View attachment 66243 View attachment 66244

View attachment 66245

Peter

View attachment 67326

View attachment 67327

View attachment 67328

View attachment 67329

View attachment 67330

View attachment 180352

View attachment 180353

View attachment 180354

View attachment 180355

View attachment 180356
 

Attachments

  • DSCF2152.jpg
    DSCF2152.jpg
    2.6 KB · Views: 0
  • DSCF2150.jpg
    DSCF2150.jpg
    2.4 KB · Views: 0
  • DSCF2149.jpg
    DSCF2149.jpg
    2.3 KB · Views: 0
  • DSCF2146.jpg
    DSCF2146.jpg
    2.2 KB · Views: 0
  • DSCF2144.jpg
    DSCF2144.jpg
    2 KB · Views: 0
Thread owner
\ said:
Really sharp so far Peter keep up the great work! Liking the front fork assembly and brake disc a lot!!
Thanks Trey ........... There has been a lot of work gone into this one. But I'm really enjoying it.

Peter
 
It's looking very smart Peter I really like the braided brake lines. Do they come with the kit?
 
Thread owner
Thanks Ian. The braided lines don't come with the kit. I bought them off evilbay they are quite cheap. I bought two sizes, Thin one for the brakes and a thicker one for the oil lines............. They are a bitch to fit they are a woven wire braid. so fitting them over a male stud you have to open the end a little and inevitably it just sort of frays out. In the end I used a tiny piece of black insulator off of some wire on each end where it locates over the stud. They are then fixed on with crazy glue. They are flexible but also rather stiff so they have to be bent into shape before fixing them on.

Peter
 
Thread owner
At last it's starting to look like a motorcycle............... Front Forks and Wheels, Brake Lines, Cables, Footrests and Cone Air Filter are all done.

View attachment 66333 View attachment 66334 View attachment 66335 View attachment 66336

View attachment 66337

Just the bodywork to fit and oil cooler connections to go ............ A couple of little touch ups and I'm done.

Peter

View attachment 67416

View attachment 67417

View attachment 67418

View attachment 67419

View attachment 67420

View attachment 180442

View attachment 180443

View attachment 180444

View attachment 180445

View attachment 180446
 

Attachments

  • DSCF2171.jpg
    DSCF2171.jpg
    1.9 KB · Views: 0
  • DSCF2170.jpg
    DSCF2170.jpg
    1.6 KB · Views: 0
  • DSCF2169.jpg
    DSCF2169.jpg
    2.3 KB · Views: 0
  • DSCF2168.jpg
    DSCF2168.jpg
    2.2 KB · Views: 0
  • DSCF2172.jpg
    DSCF2172.jpg
    1.6 KB · Views: 0
Status
Not open for further replies.
Back
Top