Theme editor

Scale Model Shop

Tamiya Mercedes Benz 300sl 1/24

Status
Not open for further replies.
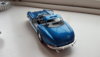
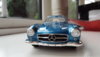
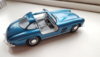
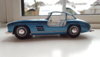
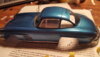
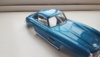
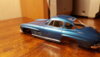
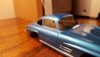
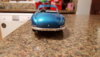
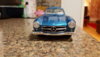
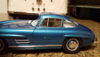
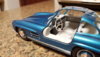
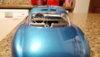
Looking great mate, they set it off really nicely, this will look amazing on display on a shelf
 
\ said:
Is not easy. You need to get a really even coat of paint all over without going too thick.
Next you use finer micromesh than you want to... If you go too course you have deeper scratches to remove from the paint but you have already removed a lot of the overall thickness by then. You just want to remove the orange peel to a desirable level with the finest grit you can get away with and then use compound for the shine.


Stay away from edges and corners where possible as they get rubbed down more and the paint tends to be thinner.


Mark has done an exceptional job on this, his patience and pace seem to be spot on.
Cheers for that Dougie, I shall keep your advice close to hand.


Agreed, Marks work is flawless.
 
\ said:
Thanks guys for your kind words. Dave your question about rub through, well thats just it your rubbing it and thats where your going wrong.
I prefer to think like im 'cutting' it. When you wet shave do you apply pressure like your rubbing? Of course not you go lightly and let the razor cut.


Its the same with micromesh, you need just enough pressure to hold it against the surface (this means no pressure really, like your holding a butterfly wing). Dont rub it back and forth like your sanding something, go in light straight cuts from left to right and count them. I did 40 cuts before moving up to the next grade ( this varies from one person to the other), as you go up to the next grade it will take less off. Also listen to the cut, if its scraping like your sanding something your going too hard. You want to listen for a high pitch squeeky sort of rizzle sound (is the best i can describe it ) and make sure you do it wet to keep friction heat down. Use lots of water, too little and the paper will 'grab' the paint and graze it ( especially on freshly dried paint ) and take your time dont rush it.


I did one panel at a time divding up the sections. This ensured i didnt go uneaven on one place.


Don't know if that helps or not
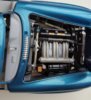
Thanks Mark, fantastic advice and eloquently written. I'm just preparing the body for my next build (59 Chevy Impala) I need this to be exceptional as it's such an eye catching car!


I'm also preparing a Ferrari Enzo, got this from a charity shop today, it was already built, the body looked as though it had been painted by Stevie Wonder using a very large hairy stick, the interior is reasonable, looks like it may have been a joint father/son venture. Stripped it down today, paint has been taken off, lost the decals though (might present a problem for me ), only cost me £2 so no risk if I have to bin it!
 
Thread owner
Flip me guys. My work isn't flawless, but I appreciate the sentiments really I do. I'm just a modeler learning as he goes and enjoying the journey. Like you all.
 
Thread owner
Well i have some bad news and then some good news. The bad news is I have another pinger. The brakelight lense that i painstakingly painted pinged off the bezel when attaching with tweezers and lost it.


The good news is that i found something on the bottom of my foot (i rarely wear socks at home) and it was the pinged off indicator lense i lost a few days earlier. Lol


Then popped it in the model happy ish and went to take a break and something else stuck to my foot...yep the brake light lense. Hahhahaha


So now I don't have to order another kit to complete this one. Yay for now..but im still buying another one anyway for the barn find build.

View attachment 124380

View attachment 124381

View attachment 124382

View attachment 124383

View attachment 124384

View attachment 237271

View attachment 237272

View attachment 237273

View attachment 237274

View attachment 237275
 

Attachments

  • 20151108_134231.jpg
    20151108_134231.jpg
    2.6 KB · Views: 0
  • 20151108_114741.jpg
    20151108_114741.jpg
    2.1 KB · Views: 0
  • 20151108_130036.jpg
    20151108_130036.jpg
    2.7 KB · Views: 0
  • 20151108_115453.jpg
    20151108_115453.jpg
    2.5 KB · Views: 0
  • 20151108_114759.jpg
    20151108_114759.jpg
    2.4 KB · Views: 0
Thread owner
Ok chaps.


The time has come. The build has entered its final dressing stage. Im happy with the model so far, only thing thats bugging me is the window surround. Its ok, but the rest of the bodywork is so perfect it looks gash in my opinion.


So im going to go down the bare metal foil route on windows surround, I can't leave the model completed with painted window surrounds its just going to annoy the hell out of me with all the effort put in.


Here is the model and its current stage of finish. All i have to do is metal decals on boot, the Mercedes name on the side, permanently fix the doors into the hinges, add the wing mirror (got to make a hole) attach the window wipers, and bare metal foil the window surround and install glass.


The next post will be of the completed model.


Thank you so much for following this rather long thread, you have all added enjoyment to this build for me and I thank you all for your input and support.


Next new build is the barn find 300sl. And im also in possession of an Aston Martin that my dad bought for me a few weeks back as an anniversary present. (Thanks daddy)

View attachment 124460

View attachment 124461

View attachment 124462

View attachment 124463

View attachment 124464

View attachment 124465

View attachment 124466

View attachment 124467

View attachment 237351

View attachment 237352

View attachment 237353

View attachment 237354

View attachment 237355

View attachment 237356

View attachment 237357

View attachment 237358
 

Attachments

  • 20151108_195615.jpg
    20151108_195615.jpg
    1.9 KB · Views: 0
  • 20151108_205021.jpg
    20151108_205021.jpg
    2.4 KB · Views: 0
  • 20151108_205002.jpg
    20151108_205002.jpg
    2.5 KB · Views: 0
  • 20151108_234142.jpg
    20151108_234142.jpg
    2.6 KB · Views: 0
  • 20151108_234233.jpg
    20151108_234233.jpg
    2.7 KB · Views: 0
  • 20151108_234249.jpg
    20151108_234249.jpg
    2.7 KB · Views: 0
  • 20151108_234312.jpg
    20151108_234312.jpg
    3.1 KB · Views: 0
  • 20151108_234322.jpg
    20151108_234322.jpg
    2.5 KB · Views: 0
I would be so chuffed with this mate. Top work. Hope the bmf goes well. Also how did you do the clear paint on the lenses? Brush? How many coats etc.. I find those tricky to do well with tamiya paint. Maybe impatient.


Cheers
 
Thread owner
Thanks Dougie. Yeah the light lenses were very tricky. I find its better to blob it on as if you paint it on it just streaks across the acrylic. The hardest part was getting the lenses to fit inside the bezels and getting them to lay flat whilst manipulation. A blob of clearcoat on the underside acted as a glue to keep them in place.
 
I'm going to try spraying my next ones. Painting properly probably takes many thin coats to do it perfectly. Yours look good and it sounds like you do the same as me but have done a better job
 
Thread owner
My opinion is using an airbrush on light lenses is probably more hassle. Bobbing on leaves a nice fill and left for a day or two it goes hard and the colour looks nice and saturated. But it would be good to see how you get on using an airbrush I'd be interested to see how it pans out.
 
I'll give it a try when I get back to my next kit with coloured lenses. I won't even get that 1:16 car build started for a while as work picked up again. I need to finish my claude prototype before I move on. It's got half aa PE harness done and it's tough going for me to make it, I need new tweezers as mine are the wrong type and bent so make the work much harder.


Frustrating not getting enough time to build.
 
Thread owner
I know. I'm not getting any time this weekend on the kit. Although I have ordered some bmf to finish those window surrounds.
 
Thread owner
Bare metal foil has arrived. So ill be making a start on the window surrounds with the finish line in sight in the next 3 weeks.


Next year im not doing the barn find 300sl. Instead im doing the aston Martin which looks like a really easy kit in comparison to the 300sl and im trying a new kit, a brand i have never built before, a fujumi 250 GTO. Which i am looking forward very much to building.

View attachment 238543

View attachment 238544

View attachment 238545

View attachment 238546

View attachment 238547
 

Attachments

  • 20151114_120722.jpg
    20151114_120722.jpg
    2 KB · Views: 0
  • 20151114_120601.jpg
    20151114_120601.jpg
    2.3 KB · Views: 0
  • 20151114_120739.jpg
    20151114_120739.jpg
    2.3 KB · Views: 0
  • 20151114_120816-1.jpg
    20151114_120816-1.jpg
    3.6 KB · Views: 0
  • 20151114_120613.jpg
    20151114_120613.jpg
    2.2 KB · Views: 0
Thread owner
Okay i hate bare metal foil. Its horrible. Dont like it but im now committed to finishing it. I think the model is now ruined. Its fiddly, perhaps i need more practice. I dont know.

View attachment 238569

View attachment 238570
 

Attachments

  • 20151120_211430.jpg
    20151120_211430.jpg
    2.8 KB · Views: 0
  • 20151120_202535.jpg
    20151120_202535.jpg
    2.7 KB · Views: 0
yep, it looks good... dont be so hard on yourself, the build has been great so far mate
 
Nice, I box on the Aston on eBay but went for too much. The gto is an all time classic
 
Status
Not open for further replies.
Back
Top